A Beginner-Friendly Crochet Motif Tutorial
Small crochet squares are wonderfully satisfying to make. Each motif requires only a small amount of yarn, works up quickly, and can be combined with other squares to create many beautiful handmade projects.
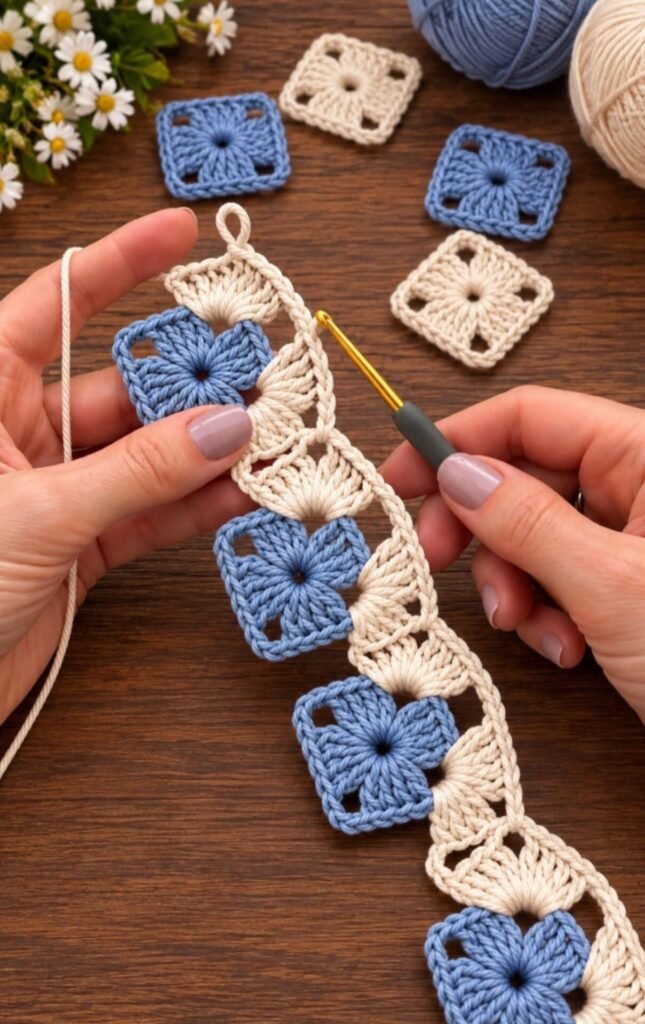
This photo-inspired crochet pattern features compact granny squares made in dusty blue and warm cream yarn. The motifs are joined in an alternating sequence to create a narrow decorative strap.
You can use the finished strip as a bookmark, wrist strap, bag decoration, curtain tie, headband, keychain, decorative trim, or part of a larger crochet project.
Please note that this pattern was reconstructed by studying the finished item in the reference image. Because a photograph does not reveal every hidden stitch or joining point, the instructions may differ slightly from the original maker’s pattern.
PROJECT OVERVIEW
Skill level: Confident beginner
Crochet terminology: US terms
Construction: Individual four-corner motifs joined into a strip
Recommended yarn: DK or light worsted cotton
Recommended hook: 3.5 mm to 4 mm
Approximate motif size: 2 to 2.5 inches or 5 to 6.5 cm after blocking
Finished length: Customizable
Main techniques:
- Magic ring
- Chain stitches
- Double crochet
- Double crochet groups
- Slip stitches
- Working in the round
- Granny square corners
- Joining crochet motifs
- Weaving in ends
- Blocking
WHY YOU WILL ENJOY THIS PROJECT
This pattern is an excellent choice when you want a relaxing project that does not require a large amount of yarn.
Each square can be completed relatively quickly, making the pattern suitable for short crochet sessions. The small motifs are also portable, so you can easily carry the project in a small craft bag.
Additional reasons to try this pattern include:
- It is an excellent scrap-yarn project.
- The finished length is easy to customize.
- You can practice working in the round.
- The repetitive construction becomes relaxing.
- The motifs can be joined in several ways.
- The color combinations are almost unlimited.
- The design can be adapted into many different items.
- It is a practical introduction to blocking crochet motifs.
MATERIALS
You will need:
- Approximately 25 to 40 yards of dusty blue DK cotton yarn
- Approximately 25 to 40 yards of warm cream DK cotton yarn
- A 3.5 mm or 4 mm crochet hook
- A blunt yarn needle
- Small scissors
- Locking stitch markers, optional
- Rustproof blocking pins
- A foam blocking mat or folded towel
- A measuring tape
Optional finishing materials:
- Swivel clasp
- D-ring
- Key ring
- Button
- Elastic
- Tassel
- Ribbon
- Woven strap
- Fabric backing
CHOOSING THE BEST YARN
Smooth cotton or cotton-blend yarn is an excellent choice for this project. It provides good stitch definition and allows the radiating stitches and open corners to remain visible.
Mercerized cotton will create a crisp motif with a slightly polished finish. Unmercerized cotton will produce a softer, more natural-looking texture similar to the item shown in the reference image.
You can also use acrylic yarn. However, acrylic is generally more elastic than cotton, so a long acrylic strap may stretch with use.
Try to avoid very fuzzy yarn when making your first version. Fuzzy fibers can make it difficult to identify the corner spaces and joining loops.
CHOOSING YOUR CROCHET HOOK
Begin with the hook size recommended on your yarn label. A 3.5 mm or 4 mm hook should work well with most DK and light worsted yarns.
Use a smaller hook if:
- Your stitches look loose.
- The center hole is too large.
- You want a firm strap.
- The corners lack definition.
Use a larger hook if:
- The motif feels stiff.
- The square cups inward.
- Your chains are extremely tight.
- You want a softer and more flexible result.
The correct hook should produce a motif that lies flat without feeling stiff.
COLOR PLANNING
The combination of dusty blue and warm cream gives this project a calm, classic appearance.
For a balanced result, alternate the colors along the strip:
Blue, cream, blue, cream, blue, cream.
You can also try:
- Pink and cream
- Sage green and beige
- Navy blue and white
- Black and cream
- Mustard yellow and gray
- Several pastel colors
- A complete rainbow
- Different leftover yarn colors
- One neutral color combined with several accent colors
If you use many colors, repeat one neutral shade every second or third motif. This will help the finished design look coordinated instead of random.
ABBREVIATIONS
Ch: Chain
Ch-sp: Chain space
Dc: Double crochet
Hdc: Half double crochet
Sc: Single crochet
Sl st: Slip stitch
St: Stitch
Sts: Stitches
Yo: Yarn over
Rep: Repeat
MR: Magic ring
IMPORTANT PATTERN NOTES
- This pattern uses US crochet terminology.
- A beginning chain 3 counts as the first double crochet.
- Join each round with a slip stitch into the top of the beginning chain 3.
- Work over the starting tail for several stitches when possible.
- Each motif is made using one solid color.
- The blue and cream motifs are alternated during assembly.
- Keep the corner chains relaxed.
- Place a stitch marker in the first corner if you have difficulty identifying the beginning of the round.
- Make one test motif before crocheting all the squares.
- Consistent tension is more important than matching an exact measurement.
- Block the motifs before joining them for the neatest result.
SPECIAL STITCH
Three Double Crochet Cluster
Yarn over and insert the hook into the indicated ring or chain space.
Yarn over and pull up a loop.
Yarn over and pull through two loops.
Leave the remaining loops on the hook.
Repeat this partial double crochet two more times in the same location. You should now have four loops on your hook.
Yarn over and pull through all four loops.
This creates one rounded three-double-crochet cluster.
For a more traditional granny-square appearance, you can replace the closed cluster with three ordinary double crochet stitches worked into the same space.
The pattern below uses ordinary groups of three double crochet stitches because they are easier for beginners and closely reproduce the radiating texture visible in the photograph.
GAUGE AND FINISHED SIZE
Exact gauge is not essential unless your strip must fit a specific piece of hardware.
One finished and blocked motif should measure approximately 2 to 2.5 inches across.
The final measurement will depend on:
- The yarn thickness
- The hook size
- Your personal tension
- The joining method
- The number of rounds
- How firmly you block the motifs
Eight motifs will generally create a strip measuring approximately 16 to 20 inches before adding loops or hardware.
Make one sample square and measure it before calculating how many motifs you need.
PHOTO-INSPIRED GRANNY SQUARE MOTIF
ROUND 1: CREATE THE FOUR SIDES
Step 1: Make a magic ring.
If you do not like using a magic ring, chain 4 and join the first chain with a slip stitch to create a ring.
Step 2: Chain 3. This beginning chain counts as your first double crochet.
Step 3: Work 2 double crochet stitches into the ring.
You now have your first group of three double crochet stitches.
Step 4: Chain 3 to create the first corner.
Step 5: Work 3 double crochet stitches into the ring.
Step 6: Chain 3.
Step 7: Repeat the following sequence two more times:
Work 3 double crochet stitches into the ring, then chain 3.
Step 8: Join the round with a slip stitch into the top of the beginning chain 3.
At the end of Round 1, you should have:
- Four groups of three double crochet stitches
- Four chain-3 corner spaces
Pull the magic ring closed carefully. Leave a very small center opening if you want to reproduce the airy center visible in the reference image.
ROUND 2: DEFINE THE SQUARE
Step 1: Slip stitch across the next two double crochet stitches until you reach the first chain-3 corner space.
Step 2: Slip stitch into the corner space.
Step 3: Chain 3. This counts as the first double crochet.
Step 4: Work 2 double crochet stitches into the same corner space.
Step 5: Chain 3.
Step 6: Work 3 additional double crochet stitches into the same corner space.
The first corner is now complete.
Step 7: Chain 1.
Step 8: In the next chain-3 corner space, work:
3 double crochet, chain 3, 3 double crochet.
Step 9: Chain 1.
Step 10: Repeat the same corner sequence in each of the remaining two corner spaces.
Step 11: Join the round with a slip stitch into the top of the beginning chain 3.
Step 12: Fasten off, leaving a yarn tail approximately 6 inches long if you plan to sew the motifs together.
At the end of Round 2, you should have:
- Eight groups of three double crochet stitches
- Four chain-3 corner spaces
- Four chain-1 side spaces
The finished motif should have a small flower-like center and four clearly defined open corners.
OPTIONAL SMALLER VERSION
If the two-round motif is larger than you want, stop after Round 1 and add a simple single-crochet border.
Join the yarn in any corner space.
Chain 1 and work single crochet stitches evenly across the first side.
Place 3 single crochet stitches into every corner space.
Continue around the entire motif.
Join with a slip stitch and fasten off.
This variation will produce a smaller and denser square.
Use the same version for every motif in your strip. Do not mix one-round and two-round squares unless you intentionally want motifs of different sizes.
HOW MANY MOTIFS SHOULD YOU MAKE?
The correct number depends on how you plan to use the finished strip.
Short bookmark: 6 to 8 motifs
Wrist strap: 7 to 9 motifs
Small bag decoration: 6 to 10 motifs
Bag handle: 10 to 16 motifs
Headband accent: 9 to 13 motifs
Curtain tie: 8 to 12 motifs
Key fob: 3 to 5 motifs
Decorative trim: As many motifs as needed
To calculate the number more precisely, measure one blocked square.
Divide your desired finished length by the width of one square. Remember that joining the motifs may slightly reduce the total length.
ARRANGING THE MOTIFS
Make the required number of squares, using approximately half in dusty blue and half in warm cream.
Block at least one blue square and one cream square before joining the complete strip. Place them side by side and make sure they are similar in size.
Arrange all the motifs on a flat surface.
For the appearance shown in the reference image, alternate the colors:
Blue, cream, blue, cream.
Keep every motif facing the same direction. The right side normally has clearer V-shaped stitch tops and a more defined center.
Take a photograph of your arrangement before joining. You can use the photograph as a guide if the squares are accidentally moved.
JOINING METHOD 1: INVISIBLE WHIP STITCH
The invisible whip stitch is the recommended joining method for beginners. It gives you more control over the position of each motif.
Step 1: Block all the motifs and allow them to dry completely.
Step 2: Place the first blue and cream motifs with their wrong sides together.
Step 3: Align the corresponding edges and corner spaces.
Step 4: Thread the long yarn tail onto a blunt yarn needle.
Step 5: Pass the needle through the back loop of the first stitch on one square.
Step 6: Pass the needle through the corresponding back loop on the second square.
Step 7: Continue matching the stitches across the entire side.
Step 8: Pull the yarn gently after every few stitches.
Do not pull the seam too tightly. The seam should close the gap without creating a hard ridge or causing the squares to pucker.
Step 9: Secure the yarn on the wrong side.
Step 10: Weave the tail through several stitches, change direction, and weave it through a second section before trimming.
Step 11: Add the next motif, continuing to alternate the colors.
Repeat until the strip reaches your desired length.
JOINING METHOD 2: JOIN AS YOU GO
Join-as-you-go reduces the amount of sewing required at the end.
Complete your first motif normally.
When making the final round of every additional motif, replace selected chain stitches along one side with slip-stitch joins to the previous square.
Step 1: Work the new motif until you reach the first corner that will touch the completed motif.
Step 2: Work the first half of the corner.
Step 3: Remove the hook from the active loop.
Step 4: Insert the hook through the matching corner space of the completed motif.
Step 5: Place the active loop back on the hook and pull it through the matching space.
Step 6: Finish the corner of the new motif.
Step 7: Continue to the chain-1 side space.
Step 8: Join the chain-1 space to the corresponding space on the completed motif.
Step 9: Continue to the second corner and join it to the matching corner.
Step 10: Complete the remaining sides normally.
Step 11: Join the round and fasten off.
Check the motifs after every join. Both squares should lie flat.
If the seam pulls inward, your joining stitches are probably too tight. Loosen your slip stitches or use a slightly larger hook for the joining round.
ADDING A NEAT OUTER BORDER
An outer border is optional, but it can make the strip look more polished and help stabilize the edges.
Join cream or blue yarn at one end of the strip.
Chain 1.
Work one single crochet into every visible stitch or chain space along the first long edge.
If a small dip appears where two motifs meet, place 2 single crochet stitches in that area.
Work 3 single crochet stitches in the end corner.
Continue along the opposite long edge.
Keep checking that the strip remains flat.
If the border begins to ripple, you have probably added too many stitches. Remove a few stitches around the problem area.
If the border pulls inward, add an extra stitch at the motif joins.
Join the border with a slip stitch and fasten off.
HOW TO MAKE AN END LOOP
A loop can turn the strip into a hanging decoration, bookmark, wrist strap, or curtain tie.
Join the yarn at the center of the final motif.
Chain between 12 and 20 stitches, depending on the size of loop you need.
Slip stitch back into the same point to close the loop.
For additional strength, turn your work and cover the chain with closely worked single crochet stitches.
Join with a slip stitch and fasten off.
If you are using a D-ring, key ring, or swivel clasp, place the chain around the hardware before closing the loop.
Do not rely on an unreinforced crochet strap to carry a heavy bag. Add woven tape, sturdy ribbon, fabric, or cord behind the crochet if the strap will support significant weight.
FINISHING THE PROJECT
Step 1: Thread each remaining yarn tail onto a blunt yarn needle.
Step 2: Weave the tail through at least 1.5 inches of stitches on the wrong side.
Step 3: Change direction and weave through another group of stitches.
Step 4: Trim the yarn only after the tail is secure.
Step 5: Inspect every join and corner.
Step 6: Block the complete strip.
BLOCKING THE MOTIFS
Blocking helps the squares develop clear corners and a consistent size.
Place the finished strip on a blocking mat or folded towel.
Use rustproof pins to shape each corner.
Measure the motifs and adjust the pins so that the squares have approximately equal dimensions.
For cotton yarn, lightly spray the strip with water or soak it according to the yarn label.
Allow the strip to dry completely before removing the pins.
For acrylic yarn, use gentle steam without touching the yarn directly with the iron.
Too much heat can permanently damage or melt acrylic fibers.
CUSTOMIZATION IDEAS
CHANGE THE WIDTH
Join two parallel rows of motifs to make a wider strap.
You can align the squares to form a traditional grid or stagger the second row to create a mosaic effect.
Finish the entire piece with a single-crochet border.
CHANGE THE TEXTURE
Replace every group of three ordinary double crochet stitches with a closed three-double-crochet cluster.
The clusters will create fuller, rounder petals.
For a shorter and denser motif, use groups of half double crochet stitches.
For a taller and more open motif, use treble crochet stitches.
ADD MORE COLORS
You do not have to limit the project to two colors.
Try:
- Coastal blue, cream, and sand
- Pink, white, and sage green
- Neutral beige and brown
- Rainbow-colored scraps
- Different shades of one color
- One cream square between every bright-colored square
TURN IT INTO A BOOKMARK
Make a strip containing approximately six to eight motifs.
Add a small tassel to one end.
Avoid large buttons or thick hardware that could damage the book.
TURN IT INTO A WRIST STRAP
Make seven to nine motifs, depending on the size of your hand.
Add a reinforced loop and a swivel clasp.
Test the loop before finishing it to ensure it passes comfortably over your hand.
TURN IT INTO A BAG DECORATION
Make a short strip and attach it to a zipper, handle, or metal ring.
You can also sew the strip directly onto the front of a plain fabric bag.
TURN IT INTO A CURTAIN TIE
Make eight to twelve motifs.
Add a loop to one end and a button to the opposite end.
Measure the strip around the curtain before permanently attaching the button.
TURN IT INTO A HEADBAND
Make enough motifs to cover the desired part of your head.
Attach crochet ties, ribbon, or elastic to both ends.
If using elastic, sew it securely to the wrong side of the final motifs.
OTHER PROJECT IDEAS
You can also use these motifs to make:
- A table runner
- A decorative garland
- A journal band
- A keychain
- A small pouch
- A phone strap
- A camera wrist strap
- A belt accent
- A tote bag pocket
- A set of coasters
- Decorative clothing trim
- A patch for a denim jacket
- A small wall hanging
COMMON MISTAKES AND HOW TO FIX THEM
- THE SQUARE CUPS INWARD
Possible causes:
- Your tension is too tight.
- The corner chains are too short.
- Your hook is too small.
Solution:
Loosen your corner chains or use a hook that is 0.5 mm larger.
- THE SQUARE RUFFLES
Possible causes:
- You added too many stitches.
- Your chains are too loose.
- Your hook is too large.
Solution:
Count all stitch groups carefully. Reduce the number of side chains or use a smaller hook.
- THE CORNERS LOOK ROUNDED
Possible causes:
- A corner space is missing.
- The corner chains are too tight.
- One group was placed in the wrong space.
Solution:
Mark every corner space. Make sure each corner contains two three-double-crochet groups separated by chain 3.
- THE CENTER HOLE IS TOO LARGE
Possible causes:
- The magic ring was not tightened.
- The starting ring contains too many chains.
Solution:
Pull the magic-ring tail gradually. If using a chain ring, start with chain 3 instead of chain 4.
- THE MOTIFS ARE DIFFERENT SIZES
Possible causes:
- Your tension changed.
- Different hook sizes were used.
- The motifs contain different stitch counts.
- One color of yarn is thicker than the other.
Solution:
Count every stitch group, use the same hook, and block all motifs to matching measurements.
- THE JOIN FORMS A RIDGE
Possible causes:
- The sewing yarn was pulled too tightly.
- You sewed through both loops.
- The seam contains too many stitches.
Solution:
Use the back loops only and keep the sewing yarn relaxed.
- THE STRIP TWISTS
Possible causes:
- The motifs were joined before blocking.
- Some motifs face the wrong direction.
- The joining tension is uneven.
Solution:
Block the motifs before assembly and keep every right side facing the same direction.
- THE EDGES STRETCH
Possible causes:
- The yarn is very elastic.
- The border stitches are too loose.
- The strap is carrying too much weight.
Solution:
Add a firm single-crochet border or reinforce the back with fabric, ribbon, woven tape, or cord.
- THE YARN ENDS COME LOOSE
Possible causes:
- The tails were cut too short.
- The tails were woven in only one direction.
Solution:
Leave a longer tail and weave it through the stitches in several directions before trimming.
- THE JOINED EDGE LOOKS UNEVEN
Possible causes:
- The motifs were not blocked.
- The seam does not match corresponding stitches.
- Some stitches were skipped during joining.
Solution:
Block every motif to the same size and align the corners before sewing the seam.
TROUBLESHOOTING THE STITCH COUNT
At the end of Round 1, you should have:
- Four groups of three double crochet stitches
- Four chain-3 corner spaces
At the end of Round 2, you should have:
- Eight groups of three double crochet stitches
- Four chain-3 corner spaces
- Four chain-1 side spaces
Every corner must contain two groups of three double crochet stitches separated by a chain-3 space.
If the count is incorrect, undo your work only until you reach the last correct corner. Place a stitch marker in the first corner to make the round easier to read.
CARE INSTRUCTIONS
Always check the washing instructions printed on your yarn label.
Cotton pieces can usually be hand washed in cool water with a small amount of mild detergent.
Rinse the strip gently without twisting or wringing it.
Press out excess water using a clean towel.
Reshape the squares and dry the strip flat.
Do not hang the piece while it is wet. The weight of the water may stretch the crochet stitches.
If metal hardware is attached, dry it promptly and avoid leaving it in prolonged contact with moisture.
Store the finished piece flat or loosely rolled.
FREQUENTLY ASKED QUESTIONS
IS THIS THE EXACT PATTERN USED FOR THE ITEM IN THE PHOTOGRAPH?
No. This is a carefully designed, photo-inspired reconstruction. A photograph cannot show every hidden stitch, joining point, stitch count, or construction detail. Your finished item may therefore have small differences.
CAN A COMPLETE BEGINNER MAKE THIS PROJECT?
Yes. You should first practice making chains, slip stitches, and double crochet stitches.
Make one test square before beginning the complete strip. Using stitch markers in the four corners can make the pattern much easier to follow.
WHAT TYPE OF YARN IS BEST?
Smooth DK cotton is an excellent choice because it provides clear stitch definition and does not stretch as much as many acrylic yarns.
Light worsted cotton can also be used.
CAN I USE ACRYLIC YARN?
Yes. Acrylic yarn will create a softer and lighter strip.
However, acrylic may stretch more than cotton and should be blocked carefully with gentle steam.
WHY IS MY MOTIF NOT SQUARE?
The most common causes are:
- A missing corner group
- Corner chains that are too tight
- Incorrect stitch placement
- Uneven tension
- A missing chain-1 side space
Count all four corners before fastening off.
HOW CAN I MAKE THE CENTER HOLE SMALLER?
Pull the magic ring more firmly.
If you are using a chain ring, begin with chain 3 instead of chain 4.
HOW CAN I MAKE THE MOTIF LARGER?
Add additional granny-square rounds.
In every corner space, work:
3 double crochet, chain 3, 3 double crochet.
In every chain-1 space along the sides, work 3 double crochet stitches.
Place chain 1 between each group.
SHOULD I BLOCK BEFORE OR AFTER JOINING?
For the neatest result, lightly block the individual motifs before joining them.
After assembly, block the complete strip again to straighten the edges and relax the seams.
WHICH SIDE IS THE RIGHT SIDE?
The right side usually has cleaner V-shaped stitch tops and a more defined center.
The starting tail is often easier to see on the wrong side.
The most important thing is to keep all motifs facing the same direction.
HOW MUCH YARN DO I NEED?
A short strip usually requires less than 40 yards of each color.
For a more accurate estimate, make and weigh one motif. Multiply its weight by the total number of motifs you need.
Add approximately 15 percent for joining, edging, swatching, and weaving in ends.
CAN I USE THIS AS A BAG HANDLE?
Yes, but an unreinforced crochet handle is most suitable for a lightweight bag.
If the handle will carry significant weight, add woven tape, fabric, ribbon, or cord behind the crochet to prevent stretching.
HOW CAN I STOP THE STRIP FROM CURLING?
Make sure the joining seam is not too tight.
Add a balanced single-crochet border and block the complete strip while it is lying flat.
CAN I MAKE THE MOTIFS WITH THICK YARN?
Yes. Thick yarn will produce much larger squares.
Use the hook size recommended for your yarn and remember that you will need fewer motifs to create the same finished length.
CAN I USE VERY THIN THREAD?
Yes. Crochet thread will create a delicate lace-like strip.
Use a smaller hook and expect the individual motifs to require more concentration.
CAN I SELL ITEMS MADE FROM THIS PATTERN?
You may sell the handmade finished items you create.
Use your own product photographs and write your own product descriptions. Do not use the reference photograph as an image of the product you are selling.
QUICK PATTERN SUMMARY
Make a magic ring.
Round 1:
Create four groups of three double crochet stitches. Separate the groups with chain 3. Join with a slip stitch.
Round 2:
In every corner, work 3 double crochet, chain 3, and 3 double crochet. Chain 1 between the corners. Join and fasten off.
Make the desired number of motifs, alternating between dusty blue and warm cream.
Block the squares.
Join one side of each square to the next motif.
Add an optional single-crochet border.
Add an optional loop or hardware.
Weave in all the yarn ends and block the finished strip.
FINAL THOUGHTS
This small crochet project demonstrates how a simple granny square can be used for much more than a blanket.
The alternating blue and cream motifs create a beautiful rhythm, while the open corners give the design a light and delicate appearance.
Once you understand the basic motif, you can easily change the colors, yarn, length, width, border, and final purpose.
Make a short version for a bookmark, add hardware for a wrist strap, reinforce it for a bag handle, or join several strips to create a larger crochet piece.
The possibilities are almost endless, and every new color combination will give the project a completely different personality.