Free Photo-Inspired Step-by-Step Pattern
INTRODUCTION
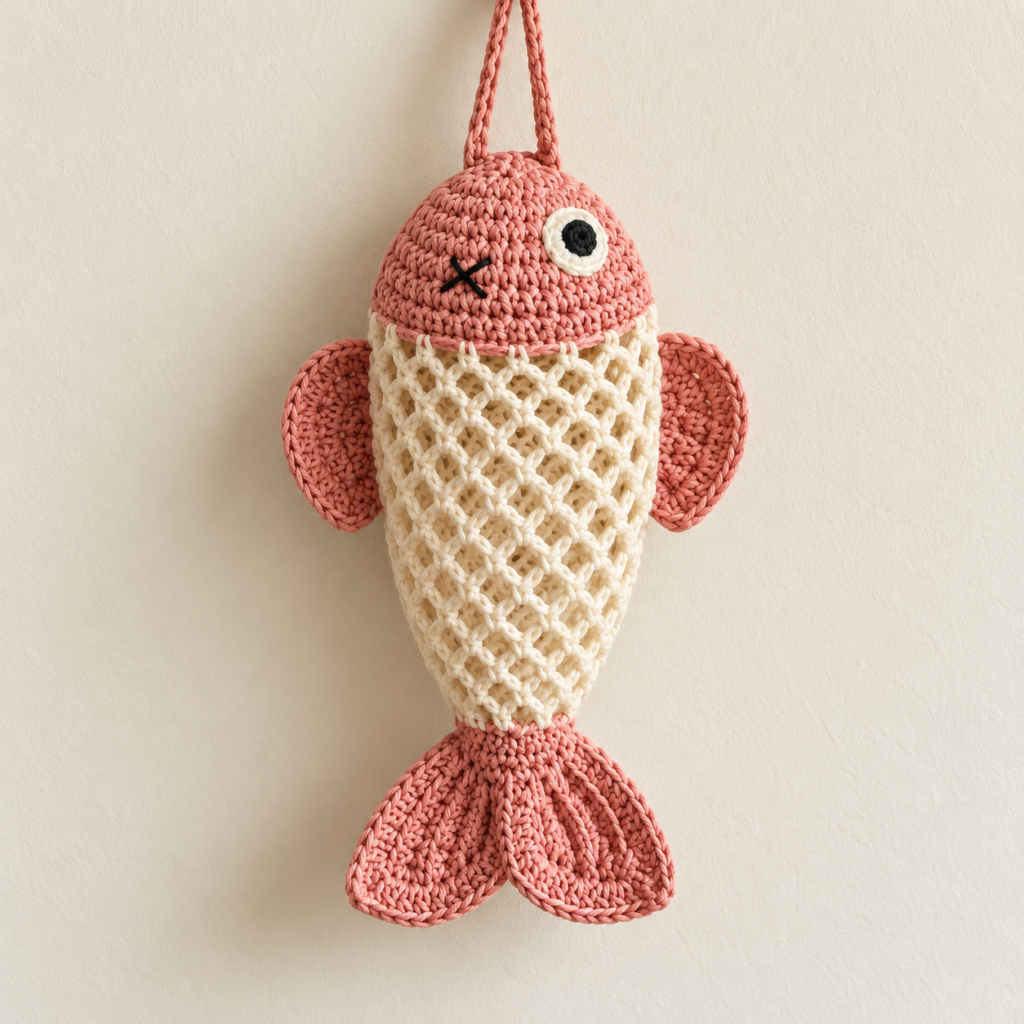
Bring a playful handmade touch to your kitchen with this adorable crochet fish plastic bag holder. Designed with a dusty-rose head, matching fins and tail, and an open cream-colored mesh body, this project turns ordinary plastic bag storage into cheerful wall décor.
The fish’s open net body stretches to hold several lightweight grocery bags, while the lower opening allows you to pull out one bag whenever needed. A sturdy crochet strap at the top makes it easy to hang the holder from a wall hook, pantry door, cabinet handle, or utility-room organizer.
Its whimsical face gives the fish plenty of personality. One large round eye, a small embroidered X-shaped mouth, rounded side fins, and a double-lobed tail complete the design.
This is a satisfying project for crocheters who enjoy making useful household accessories. It also makes a fun handmade housewarming gift.
ABOUT THIS PATTERN
This is a photo-inspired crochet reconstruction. It was created by studying the visible shape, colors, stitches, and construction of the pictured fish bag holder. It is not the original designer’s exact pattern.
The measurements and stitch counts may be adjusted according to your preferred yarn, hook, and finished size.
The pattern uses US crochet terminology.
PROJECT OVERVIEW
The fish bag holder is constructed in separate sections:
A rounded top head
An open mesh body
Two side fins
Two tail lobes
One white and black crochet eye
One embroidered mouth
One hanging strap
The head is crocheted from the top down. The cream yarn is then joined around the lower edge of the head to create the mesh body.
The side fins, tail sections, eye, and hanging strap are made separately and sewn onto the body.
A discreet loading opening can be left at the upper back of the mesh body. The plastic bags are inserted through this opening and removed through the smaller opening near the tail.
SKILL LEVEL
Confident beginner to intermediate
You should know how to:
Make a magic ring
Work in continuous rounds
Single crochet
Half double crochet
Double crochet
Increase and decrease
Create chain spaces
Crochet around both sides of a foundation chain
Sew crochet pieces together
Embroider simple details
Count stitches and rounds
FINISHED SIZE
Using medium-weight cotton or cotton-blend yarn with a 5 mm hook, the finished fish should measure approximately:
18 to 22 inches from the top of the strap to the bottom of the tail
11 to 14 inches for the fish body without the strap
6 to 8 inches across the widest part, including the fins
The final size will depend on your yarn, hook, tension, and number of mesh rounds.
MATERIALS
You will need:
Approximately 120 to 170 yards of cream or ivory yarn
Approximately 100 to 140 yards of dusty-rose yarn
A small amount of white yarn
A small amount of black yarn
A 5 mm to 6 mm crochet hook
Yarn needle
Scissors
Stitch markers
Measuring tape
Optional polyester fiberfill for lightly shaping the head
Optional thin elastic cord for the lower dispensing opening
Optional removable wall hook
Optional wooden ring or metal ring for hanging
CHOOSING THE BEST YARN
Cotton or a durable cotton-blend yarn is recommended for this project.
Cotton provides:
Good stitch definition
A sturdy hanging strap
A strong mesh body
Less stretching over time
Easy washing
A clean handmade appearance
Medium-weight yarn produces a practical holder similar to the pictured design. Ribbon yarn or recycled cotton can also create the thick, textured appearance visible in the reference image.
Avoid very fuzzy yarn because it can make the mesh stitches difficult to see. Extremely soft acrylic may stretch when the holder is filled.
COLOR SUGGESTIONS
The photographed holder uses dusty rose and warm cream.
Other attractive combinations include:
Coral and ivory
Navy blue and white
Turquoise and cream
Sage green and beige
Mustard yellow and white
Lavender and pale gray
Red and cream
Orange and white for a clownfish-inspired design
Light blue and dark blue
Rainbow stripes with a neutral mesh body
For a realistic fish, use several ocean-inspired shades. For a child’s room or playful kitchen, choose bright contrasting colors.
ABBREVIATIONS
This pattern uses US terms.
MR – Magic ring
Ch – Chain
Sl st – Slip stitch
Sc – Single crochet
Hdc – Half double crochet
Dc – Double crochet
Inc – Increase by working 2 sc in one stitch
Dec – Decrease by crocheting 2 stitches together
St – Stitch
Sts – Stitches
Sp – Space
Ch-sp – Chain space
Sk – Skip
Rnd – Round
Rep – Repeat
FO – Fasten off
SPECIAL TECHNIQUES
MAGIC RING
Wrap the yarn around your fingers to form a loop. Insert the hook into the loop, yarn over, and pull up a loop. Chain one, then crochet the required number of stitches into the ring. Pull the tail to close the center.
INVISIBLE SINGLE CROCHET DECREASE
Insert the hook through the front loop of the next stitch.
Insert the hook through the front loop of the following stitch.
Yarn over and pull through the first two loops.
Yarn over again and pull through the remaining loops.
MESH ARCH
Chain the required number of stitches, skip the indicated stitches or chain space, and anchor the arch with a single crochet.
The mesh body is created by stacking these chain arches in offset rounds.
GAUGE
Exact gauge is not essential, but the fabric should be strong enough to support the stored bags.
A useful approximate gauge is:
13 to 15 single crochet stitches = 4 inches
The mesh should stretch without becoming loose or shapeless.
If the head feels too stiff, use a larger hook. If the mesh looks weak or excessively open, use a smaller hook or shorten the chain arches.
PATTERN NOTES
The head is worked in continuous spiral rounds.
Use a stitch marker to identify the first stitch.
The beginning chain of a joined mesh round does not count as a stitch unless stated otherwise.
Keep the mesh chains relaxed and even.
Check the holder’s capacity before fastening off the body.
Leave long yarn tails on the fins, eye, tail, and strap for sewing.
The head may be left unstuffed or filled with a very small amount of fiberfill.
Do not overstuff the head because the bag holder needs to remain lightweight.
SECTION ONE: CROCHET FISH HEAD
Use dusty-rose yarn.
Round 1:
Make a magic ring.
Work 6 sc into the ring.
Pull the ring closed.
You should have 6 stitches.
Round 2:
Work 2 sc in every stitch around.
You should have 12 stitches.
Round 3:
Work 1 sc in the next stitch and 2 sc in the following stitch.
Repeat around.
You should have 18 stitches.
Round 4:
Work 1 sc in each of the next 2 stitches and 2 sc in the following stitch.
Repeat around.
You should have 24 stitches.
Round 5:
Work 1 sc in each of the next 3 stitches and 2 sc in the following stitch.
Repeat around.
You should have 30 stitches.
Round 6:
Work 1 sc in each of the next 4 stitches and 2 sc in the following stitch.
Repeat around.
You should have 36 stitches.
Rounds 7–11:
Work 1 sc in every stitch around.
Maintain 36 stitches.
The head should now resemble a rounded dome.
Round 12:
Work 1 sc in each of the next 5 stitches and 2 sc in the following stitch.
Repeat around.
You should have 42 stitches.
Round 13:
Work 1 sc in every stitch around.
You should have 42 stitches.
Round 14:
Work 1 sc in every stitch around.
Join with a sl st to the first stitch.
Fasten off, leaving a tail for securing the join.
The lower edge of the head should remain open.
SIMPLER SMALLER HEAD OPTION
If you are using very thick yarn, stop increasing at 24 stitches.
Work 5 to 7 even rounds with 24 stitches.
This creates a smaller head similar to the simple version shown in the tutorial reference.
SHAPING THE HEAD
The head should form a smooth half-sphere.
If the top is pointed, gently shape it with your fingers.
If the head ruffles, there are too many increases. Remove the final increase round.
If the head curls inward too quickly, add another increase round before working the even rounds.
OPTIONAL LIGHT STUFFING
The head can remain unstuffed because the firm cotton stitches will usually hold the shape.
For a more rounded head, place a thin layer of fiberfill against the inside of the dome.
Do not fill the entire head. Keep the lower edge clear so plastic bags can pass behind it.
A small circle of matching fabric or crochet can be sewn inside the head to hold the fiberfill in place.
SECTION TWO: PREPARING THE LOADING OPENING
The most practical version of this holder includes a hidden loading opening near the upper back.
Place the fish head with the face area toward you.
Mark approximately 10 to 12 stitches at the back of the lower edge.
The cream mesh will not be permanently sewn to this marked section.
The unjoined area will become the opening through which plastic bags can be inserted.
If you prefer a completely open upper body, attach the mesh around the entire lower edge and lift the head slightly when loading the bags.
SECTION THREE: STARTING THE CREAM MESH BODY
Join cream yarn to any stitch along the lower edge of the head.
Round 1:
Ch 1 and work 1 sc in every stitch around.
Join with a sl st.
You should have 42 sc if you used the full-size head.
Round 2:
Ch 3.
Skip the next 2 stitches and work 1 sc in the following stitch.
Repeat around:
Ch 3, skip 2 stitches, sc in the next stitch.
Join with a sl st at the base of the first ch-3 space.
You should have 14 mesh arches.
Round 3:
Sl st into the first ch-3 space.
Ch 3 and work 1 sc into the next ch-3 space.
Repeat around:
Ch 3, sc into the next ch-3 space.
Join with a sl st.
Round 4:
Sl st into the first ch-3 space.
Ch 4 and work 1 sc into the next ch-3 space.
Repeat around:
Ch 4, sc into the next ch-3 space.
Join with a sl st.
The slightly longer chains allow the body to expand and hold more bags.
SECTION FOUR: CONTINUING THE MESH BODY
Rounds 5–18:
Sl st into the first chain space.
Ch 4 and work 1 sc into the next chain space.
Repeat around.
Join with a sl st after every round.
Continue until the mesh section measures approximately 8 to 11 inches from the lower edge of the head.
Add more rounds for a larger-capacity holder.
For a smaller holder, stop when the mesh section measures approximately 6 to 8 inches.
CHECKING THE CAPACITY
Before shaping the lower opening, place several clean plastic bags inside the mesh body.
The holder should:
Expand without excessive strain
Remain lighter than the hanging strap can support
Allow the bags to move toward the lower opening
Keep the bags from falling through the side mesh
If the holes are too large, replace the ch-4 spaces with ch-3 spaces.
If the body is too narrow, use ch-5 spaces or add another increase round to the head.
SECTION FIVE: OPTIONAL BACK LOADING SLIT
If you want a larger hidden opening, work part of the mesh body in rows rather than complete rounds.
At the beginning of the body, leave two adjacent mesh spaces unjoined at the back.
Turn at the end of each mesh row instead of joining.
Continue for 4 to 6 rows.
Then join the two edges with a chain arch and continue working in complete rounds.
This creates a discreet slit near the upper back. The opening makes it easier to insert a bundle of folded bags.
You may add a small button and chain loop to keep the slit closed.
SECTION SIX: TAPERING THE LOWER BODY
The photographed fish becomes narrower near the tail.
Begin tapering approximately 2 inches before the desired body length.
Taper Round 1:
Work ch-4 arches around, but twice during the round, skip one mesh space and anchor the next arch in the following space.
Distribute the two decreases evenly.
Taper Round 2:
Work ch-4 arches normally into each remaining space.
Taper Round 3:
Repeat Taper Round 1, decreasing two more spaces.
Taper Round 4:
Work ch-3 arches into every remaining space.
The lower opening should be smaller than the center of the body but large enough to pull out one plastic bag.
SECTION SEVEN: FINISHING THE DISPENSING OPENING
Final Round:
Work 2 sc into each chain space around.
Join with a sl st.
Next Round:
Ch 1 and work 1 sc in every stitch around.
Join with a sl st.
Fasten off and weave in the ends.
OPTIONAL ELASTIC OPENING
For a more controlled dispensing opening, hold a thin elastic cord along the final round.
Crochet over the elastic with sc.
Before closing the elastic, test the opening with a plastic bag.
The opening should hold the bags inside without making them difficult to remove.
Tie the elastic securely and hide the knot inside the crochet border.
Do not make the opening excessively tight.
SECTION EIGHT: LARGE ROUND EYE
The fish has one prominent decorative eye.
BLACK CENTER
Use black yarn.
Round 1:
Make a magic ring and work 6 sc into the ring.
Join with a sl st.
Fasten off.
WHITE OUTER EYE
Join white yarn to any black stitch.
Round 2:
Work 2 sc in every stitch around.
You should have 12 stitches.
Round 3:
Work 1 sc in the next stitch and 2 sc in the following stitch.
Repeat around.
You should have 18 stitches.
Join with a sl st.
Fasten off, leaving a long tail for sewing.
If your eye is too large for the head, omit Round 3.
EYE PLACEMENT
Lay the fish flat with the front facing upward.
Position the eye slightly above the center of the head and a little to one side.
Pin it in place.
Sew around the white edge using small, even stitches.
Pass the yarn through the head several times so the eye is securely attached.
Hide the yarn tail inside the head.
OPTIONAL EYE HIGHLIGHT
Use a small piece of white yarn to embroider one tiny stitch on the black center.
This creates a lively reflected-light effect.
SECTION NINE: EMBROIDERED MOUTH
Use black yarn.
Thread the yarn onto a needle.
Position the mouth on the opposite side of the head from the eye.
Make one short diagonal stitch.
Cross it with a second diagonal stitch to form an X.
Secure the yarn on the inside of the head.
For a different expression, embroider:
A short curved smile
A straight horizontal mouth
A small V-shaped mouth
Two short kissing lips
The X-shaped mouth creates the playful appearance shown in the reference.
SECTION TEN: SIDE FINS – MAKE TWO
Use dusty-rose yarn.
Chain 13.
Starting in the second chain from the hook, work:
1 sl st in the next chain
1 sc in the next chain
1 hdc in the next chain
1 dc in each of the next 6 chains
1 hdc in the next chain
1 sc in the next chain
Work 3 sc in the final chain.
Rotate the work and crochet along the opposite side of the foundation chain.
Work:
1 sc in the next chain
1 hdc in the next chain
1 dc in each of the next 6 chains
1 hdc in the next chain
1 sc in the next chain
1 sl st in the final chain
Join with a sl st.
FIN EDGING
Ch 1.
Work 1 sc evenly around the entire fin.
At the rounded outer end, work 2 sc in each of the three center stitches.
Join with a sl st.
Fasten off, leaving a long tail for sewing.
Make a second identical fin.
OPTIONAL TEXTURED FIN
For a more structured fin, add a center ridge.
Join yarn at the base.
Surface slip stitch along the center of the fin toward the rounded edge.
Fasten off and hide the ends on the back.
SECTION ELEVEN: ATTACHING THE SIDE FINS
Place one fin on each side of the upper mesh body.
The fins should sit just below the head.
Angle them slightly outward.
The narrow end of each fin should point toward the body, while the rounded end extends outward.
Pin both fins in place and check that they are positioned at the same height.
Using the long yarn tail, sew the narrow inner edge of each fin to the mesh.
Pass through several mesh knots rather than sewing into only one chain.
Do not sew the entire fin flat. Allow the outer portion to remain free and slightly raised.
Secure the yarn and weave in the ends.
SECTION TWELVE: TAIL LOBES – MAKE TWO
Use dusty-rose yarn.
Chain 16.
Starting in the second chain from the hook, work:
1 sl st in the next chain
1 sc in the next chain
1 hdc in the next chain
1 dc in each of the next 9 chains
1 hdc in the next chain
1 sc in the next chain
Work 4 sc in the final chain.
Rotate the work and continue along the opposite side of the foundation chain.
Work:
1 sc in the next chain
1 hdc in the next chain
1 dc in each of the next 9 chains
1 hdc in the next chain
1 sc in the next chain
1 sl st in the final chain
Join with a sl st.
TAIL EDGING
Ch 1.
Work 1 sc evenly around the tail lobe.
At the wide rounded end, place 2 sc in several stitches to keep the edge flat.
Join with a sl st.
Fasten off, leaving a long tail for sewing.
Make a second identical tail lobe.
SECTION THIRTEEN: JOINING THE TAIL
Place the two tail lobes beside each other.
Overlap their narrow ends by approximately one inch.
Angle one lobe toward the lower left and the other toward the lower right.
Sew the overlapping ends together.
Position the joined tail directly below the dispensing opening.
Sew the upper center of the tail to the lower edge of the fish.
Keep the dispensing opening accessible.
The tail should decorate the bottom without completely closing the opening.
Sew through several stitches and mesh knots for strength.
The two lobes should remain free so they hang naturally.
ALTERNATIVE ONE-PIECE TAIL
If you prefer a tail with no center seam:
Chain 12.
Work one rounded oval section around the chain.
Slip stitch back toward the center.
Chain another 12 from the same base.
Work the second oval section.
Join both sections at the center.
This creates a bow-like double tail in one continuous piece.
SECTION FOURTEEN: HANGING STRAP
Use dusty-rose yarn.
Chain 40 to 50.
The number of chains will depend on the desired hanging length.
Starting in the second chain from the hook, work 1 sc in every chain across.
Fasten off, leaving long tails at both ends.
For a thicker strap, turn and work a second row of sc.
For a rounded cord-style strap, slip stitch in every chain instead of working sc.
ATTACHING THE STRAP
Position one end of the strap on the upper left side of the fish head.
Place the other end on the upper right side.
Make sure the strap is not twisted.
Using the long yarn tails, sew each end through several head stitches.
Pass the needle through the strap and head multiple times.
Tie securely and hide the ends inside the head.
Gently pull on the strap to test its strength.
REINFORCED STRAP OPTION
For a holder that will carry many bags:
Crochet over a length of cotton cord.
Make the strap two rows wide.
Sew through at least five stitches at each attachment point.
Add a wooden or metal hanging ring.
Avoid relying on glue because the strap must support the full weight of the holder.
SECTION FIFTEEN: OPTIONAL TOP LOOP
Instead of a long strap, make a compact hanging loop.
Chain 20 to 25.
Join with a sl st to form a ring.
Work 1 sc in every chain around.
Fasten off.
Sew the loop firmly to the top center of the head.
This option is useful when hanging the holder from a small wall hook.
SECTION SIXTEEN: FINAL ASSEMBLY CHECK
Before using the holder, inspect every part.
Confirm that:
The strap is firmly attached.
The eye is completely sewn down.
The embroidered mouth is secure.
Both fins are at the same height.
The tail is centered.
The dispensing opening is accessible.
The upper loading opening is large enough.
All yarn ends are woven in.
The mesh has no loose or broken chains.
The holder hangs straight.
Place several lightweight plastic bags inside and test the dispenser.
HOW TO FILL THE BAG HOLDER
Flatten each clean plastic bag.
Push air out of the bag.
Fold it loosely or roll it lengthwise.
Insert the bags through the upper back opening.
Guide them downward through the mesh body.
Allow the corner or handle of the lowest bag to extend slightly through the bottom opening.
Pull one bag at a time from the bottom.
Avoid forcing a large bundle into the holder at once. Loading the bags individually helps prevent tangling.
HOW MANY BAGS WILL IT HOLD?
A medium-size holder can usually hold approximately 15 to 30 lightweight grocery bags.
The actual capacity depends on:
The length of the mesh body
The width of the fish
The size of the plastic bags
How tightly the bags are folded
The flexibility of the yarn
Do not overfill the holder. Excessive weight can stretch the mesh and hanging strap.
CUSTOMIZATION IDEAS
STRIPED FISH
Change colors every two or three mesh rounds.
Keep the head, fins, and tail in one coordinating color.
CLOWNFISH VERSION
Use orange for the head, fins, and tail.
Add white and black stripes around the body.
SHARK VERSION
Use gray yarn.
Create a triangular dorsal fin and pointed side fins.
Embroider a smiling mouth with small white teeth.
MERMAID VERSION
Use lavender, turquoise, and metallic yarn.
Add small crochet shells or beads near the tail.
CHILD-FRIENDLY VERSION
Use bright colors.
Add two large eyes and a smiling embroidered mouth.
Avoid buttons or detachable decorations.
MINIMALIST VERSION
Use one neutral color for the entire project.
Omit the face and make simple matching fins.
LARGER FAMILY-SIZE HOLDER
Add more increase rounds to the head.
Create additional mesh arches.
Continue the body for 20 to 24 inches.
Make a wider reinforced hanging strap.
SMALL HOLDER
Stop the head increases at 24 stitches.
Work 8 to 10 mesh arches.
Make the body approximately 6 to 8 inches long.
PROJECT USES
Although this design is intended for plastic grocery bags, it can also hold:
Reusable produce bags
Cleaning cloths
Small fabric scraps
Lightweight socks
Children’s bath toys
Yarn scraps
Reusable shopping-bag pouches
Small rolls of ribbon
Soft hair accessories
Do not use the holder for heavy tools, glass objects, sharp items, or food that requires sealed storage.
COMMON MISTAKES AND HOW TO FIX THEM
MISTAKE 1: THE HEAD IS TOO FLAT
Cause:
Not enough even rounds were added after the increases.
Solution:
Add two or three more rounds of sc without increasing.
MISTAKE 2: THE HEAD RUFFLES
Cause:
There are too many increases for the yarn and hook combination.
Solution:
Remove the final increase round or use a smaller hook.
MISTAKE 3: THE HEAD BECOMES POINTED
Cause:
The magic ring was pulled too tightly or the first increases were uneven.
Solution:
Shape the head by hand. On the next version, distribute the increases carefully and avoid pulling the center excessively tight.
MISTAKE 4: THE MESH HOLES ARE TOO LARGE
Cause:
The chains are too long or the tension is loose.
Solution:
Replace ch-4 spaces with ch-3 spaces or use a smaller hook.
MISTAKE 5: THE MESH BODY DOES NOT STRETCH
Cause:
The chain arches are too short or too tight.
Solution:
Use ch-5 spaces or crochet the chains with a larger hook.
MISTAKE 6: THE BODY TWISTS
Cause:
The first stitch of each round moved unintentionally or the mesh anchors were not placed consistently.
Solution:
Mark the first space of every round and count all mesh arches.
MISTAKE 7: THE BAGS FALL THROUGH THE BOTTOM
Cause:
The dispensing opening is too large.
Solution:
Add another sc round, crochet over elastic, or thread a drawstring through the final stitches.
MISTAKE 8: THE BAGS ARE DIFFICULT TO REMOVE
Cause:
The lower opening is too tight or the bags are packed too densely.
Solution:
Remove one finishing round, loosen the elastic, and load fewer bags.
MISTAKE 9: THE FINS CURL
Cause:
The edging is too tight.
Solution:
Add extra sc around the rounded edge and lightly block the fins before attaching them.
MISTAKE 10: THE FINS HANG UNEVENLY
Cause:
They were attached at different rounds of the mesh.
Solution:
Count the mesh rounds from the head and mark matching positions before sewing.
MISTAKE 11: THE TAIL COVERS THE OPENING
Cause:
The tail was sewn across the entire lower edge.
Solution:
Attach only the narrow center of the tail and leave the dispensing opening free.
MISTAKE 12: THE HOLDER LEANS TO ONE SIDE
Cause:
The strap ends are not centered or one fin is heavier than the other.
Solution:
Reposition the strap so its ends are equally spaced from the center.
MISTAKE 13: THE STRAP STRETCHES
Cause:
The yarn is too soft or the strap is too narrow.
Solution:
Add a second row of sc or crochet over cotton cord.
MISTAKE 14: THE EYE BUCKLES
Cause:
The eye was sewn too tightly.
Solution:
Loosen the sewing stitches and attach the edge evenly without pulling.
MISTAKE 15: THE HOLDER LOOKS SHAPELESS
Cause:
The mesh is empty or the yarn is very soft.
Solution:
Add several bags and arrange them evenly. Use cotton yarn for a firmer finished holder.
BLOCKING AND SHAPING
The head and mesh body usually do not require heavy blocking.
To shape the fins and tail:
Dampen them lightly.
Place them on a towel or blocking mat.
Shape the curves with your fingers.
Pin the edges if necessary.
Allow them to dry completely.
Do not stretch the mesh aggressively. Excessive blocking may make the holes too large.
CARE INSTRUCTIONS
Remove all plastic bags before washing.
If possible, remove any metal or wooden hanging ring.
Hand-wash the holder in cool or lukewarm water.
Use a small amount of mild detergent.
Gently squeeze the fabric.
Do not twist or wring the mesh.
Rinse thoroughly.
Roll the holder inside a towel to remove excess water.
Reshape the head, fins, mesh, and tail.
Lay flat to dry.
Do not hang the holder while it is wet because the weight of the water may stretch the strap and mesh.
If the yarn is machine washable, place the holder inside a laundry bag and select a gentle cold-water cycle. Hand washing is still recommended for the best long-term shape.
FREQUENTLY ASKED QUESTIONS
IS THIS PATTERN SUITABLE FOR BEGINNERS?
A confident beginner can complete it. The head and decorative pieces use basic stitches. The open mesh requires careful counting but becomes repetitive after the first few rounds.
HOW LONG DOES THIS PROJECT TAKE?
An experienced crocheter may complete it in four to six hours. A beginner may need one or two days.
CAN I USE ACRYLIC YARN?
Yes, but acrylic may stretch more than cotton. Use a smaller hook and reinforce the hanging strap.
CAN I USE T-SHIRT YARN?
Yes. T-shirt yarn creates a large and sturdy holder. Use a larger hook and reduce the number of head increases because the finished fish will be much bigger.
CAN I MAKE THE BODY WITH SOLID STITCHES?
Yes, but you will need to add a large opening for loading and another opening for dispensing the bags. The mesh body is recommended because it is lightweight and expandable.
DO I NEED TO STUFF THE HEAD?
No. A tightly crocheted cotton head should keep its shape without stuffing. If desired, add only a thin layer of fiberfill.
HOW DO I LOAD THE BAGS?
Insert folded bags through the hidden opening near the upper back of the body. Pull them out individually through the smaller opening above the tail.
CAN I LEAVE THE ENTIRE TOP OPEN?
Yes. Attach the mesh to the front and sides of the head but leave a wider section at the back unsewn.
HOW DO I MAKE THE HOLDER LONGER?
Continue repeating the mesh round until the desired length is reached. Remember that a longer holder requires a stronger strap.
HOW DO I MAKE THE MESH DENSER?
Use shorter chain spaces. Replace ch-4 arches with ch-3 arches.
HOW DO I MAKE THE MESH MORE OPEN?
Use ch-5 spaces or a slightly larger crochet hook.
CAN I USE SAFETY EYES?
A large safety eye can be used if it has a strong washer. However, a crocheted eye is more suitable for a washable household item.
CAN I MAKE TWO EYES?
Yes. Sew one eye on each side of the head if the holder will be viewed from different directions.
CAN I ADD A DRAWSTRING?
Yes. Weave a crochet chain or cord through the final mesh round. This lets you adjust the dispensing opening.
HOW MUCH YARN DO I NEED?
A medium holder generally requires 220 to 310 yards in total. The exact amount depends on the yarn thickness, body length, and mesh size.
CAN I SELL FINISHED FISH BAG HOLDERS?
You may generally sell the physical items you crochet using this photo-inspired guide. Photograph your own finished work and do not present the reconstructed instructions as the original pattern from the reference image.
QUICK PATTERN SUMMARY
- Crochet a rounded dusty-rose head from the top down.
- Increase gradually from 6 stitches to the required width.
- Work several even rounds to create the dome.
- Join cream yarn around the lower edge.
- Create the mesh using repeated chain arches and single crochet anchors.
- Continue until the body reaches the desired length.
- Decrease several mesh spaces near the bottom.
- Finish with one or two rounds of single crochet.
- Crochet one white and black eye.
- Embroider an X-shaped mouth.
- Crochet two dusty-rose side fins.
- Sew one fin to each side of the upper body.
- Crochet two tail lobes.
- Join the tail lobes and sew them below the dispensing opening.
- Crochet a strong hanging strap.
- Sew the strap firmly to the top of the head.
- Weave in all ends and test the holder with several bags.
FINAL THOUGHTS
This crochet fish bag holder combines playful character with useful household storage. The dusty-rose head, rounded fins, large eye, and double tail make it look like cheerful wall décor, while the expandable cream mesh keeps plastic bags organized and easy to reach.
The pattern can be adapted to suit almost any space. Make the mesh longer for a busy family kitchen, shorten it for a camper or small apartment, or change the colors to match your décor.
Take extra care when attaching the hanging strap, fins, and tail. Strong assembly will help the holder maintain its shape through regular use. Once the basic fish is complete, you can personalize it with stripes, extra eyes, embroidered details, or ocean-inspired colors.
The result is a charming handmade organizer that gives reusable plastic bags a neat home instead of leaving them loose inside a drawer or cabinet.