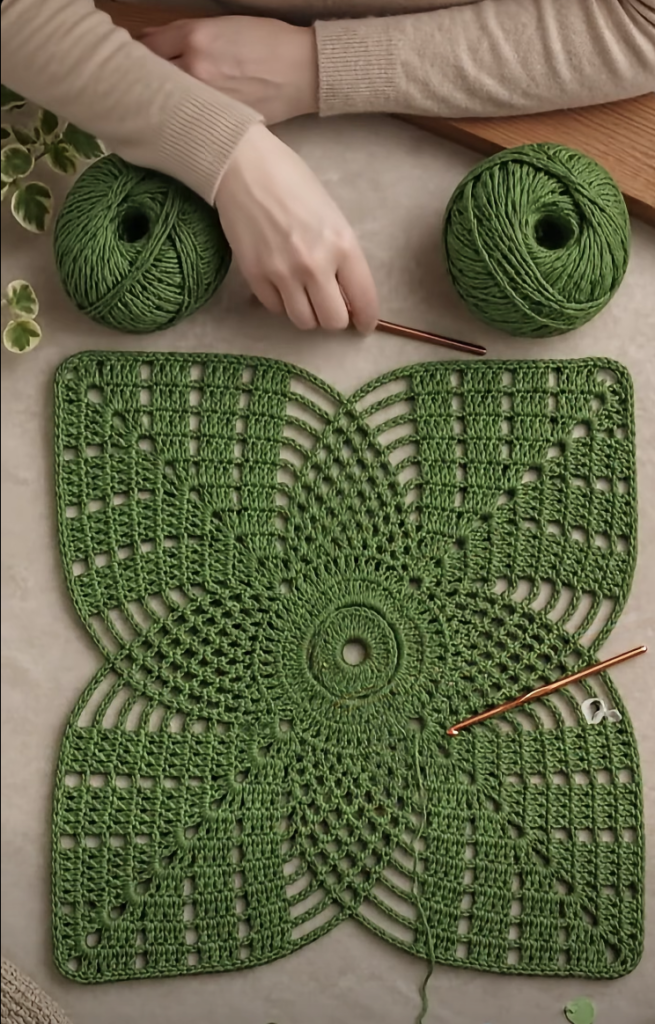
A Photo-Inspired Lace Centerpiece with an Openwork Square Design
If you enjoy elegant crochet pieces that combine geometric shapes with delicate lace, this green crochet table mat is a beautiful project to try.
The design begins with a circular center and expands into four decorative sections that resemble butterfly wings or large leaves. Open chain spaces connect the central motif to four rounded square corners, creating a balanced table mat with an airy, botanical appearance.
The finished piece can be used as a table centerpiece, dresser mat, side-table decoration, plant-pot mat, or decorative layer beneath a vase or candle holder. It can also be made in neutral shades for a traditional home or in brighter colors for a modern look.
This tutorial provides a detailed, photo-inspired reconstruction of the crochet item shown in the reference image.
Because the original written pattern and hidden stitches are not visible in the photograph, this is not guaranteed to be the exact pattern used by the original maker. The instructions are designed to help you create a similar square lace mat with a circular center, four openwork sections, and rounded corners.
PROJECT OVERVIEW
Project type: Decorative crochet table mat
Skill level: Intermediate
Crochet terminology: US crochet terms
Construction: Worked from the center outward
Finished shape: Rounded square
Main color: Deep leafy green
Recommended yarn: Cotton or cotton-blend yarn
Recommended hook size: 2.5 mm to 3.5 mm
Approximate finished size: 16 to 22 inches across
Construction features:
- Circular center ring
- Radiating central stitches
- Four decorative butterfly or leaf sections
- Open chain arches
- Filet-style corner panels
- Rounded square outline
- Simple finishing border
WHY YOU WILL LOVE THIS CROCHET TABLE MAT
This pattern combines several crochet techniques in one decorative project.
The circular center creates a strong visual focal point, while the four symmetrical sections give the finished mat a balanced appearance. The open spaces prevent the piece from becoming too heavy and allow the surface beneath it to remain visible.
This project is also highly customizable. You can change the yarn thickness, hook size, color, number of rounds, and border style.
Other reasons to make this table mat include:
- It creates an elegant handmade decoration.
- The design looks detailed without requiring several colors.
- It can be made with cotton, linen, bamboo, or crochet thread.
- It offers excellent practice for working in the round.
- The openwork pattern is ideal for warm-weather home décor.
- The square shape works well on many tables and cabinets.
- Blocking transforms the stitches into a beautiful, defined design.
- The pattern can be enlarged into a table topper.
- A smaller version can be used as an oversized coaster.
- It makes a thoughtful handmade housewarming gift.
MATERIALS
You will need:
- Approximately 500 to 750 yards of green cotton yarn
- A 2.5 mm to 3.5 mm crochet hook
- A blunt yarn needle
- Sharp scissors
- Several locking stitch markers
- A measuring tape
- Rustproof blocking pins
- A large blocking mat or thick folded towel
- A spray bottle filled with clean water
Optional materials:
- Fabric stiffener
- Liquid starch
- Non-slip fabric backing
- Sewing thread
- Small beads for decorative accents
- A larger hook for loose chain sections
CHOOSING THE BEST YARN
Cotton yarn is the best choice for this style of table mat.
Cotton creates clear stitches, holds the blocked shape well, and gives the finished piece enough structure to lie flat on a table. It also produces excellent definition in the open chain arches and filet-style sections.
Mercerized cotton will create a smooth, slightly shiny surface. It is a good choice if you want the table mat to look formal or polished.
Unmercerized cotton has a softer, more natural finish. It creates a relaxed handmade appearance similar to the mat shown in the photograph.
A cotton and bamboo blend will create a softer piece with more drape. However, it may require more careful blocking.
You can also use crochet thread for a finer, more delicate result. If using thread, choose a smaller hook and expect the finished mat to be significantly smaller unless you add more rounds.
Avoid very fuzzy yarn because it can hide the lace pattern and make the chain spaces difficult to see.
RECOMMENDED YARN WEIGHTS
Crochet thread:
Use a 1.5 mm to 2.25 mm hook for a delicate doily-style mat.
Sport-weight yarn:
Use a 2.5 mm to 3 mm hook for a lightweight table decoration.
DK-weight cotton:
Use a 3 mm to 3.5 mm hook for a larger and more substantial table mat.
Light worsted yarn:
Use a 3.5 mm to 4.5 mm hook for a thick mat or small table topper.
CHOOSING A COLOR
The deep green color gives this mat a natural and botanical feeling. It works especially well in rooms decorated with wooden furniture, neutral fabrics, and indoor plants.
Other attractive color choices include:
- Sage green
- Olive green
- Forest green
- Cream
- Natural beige
- Pure white
- Dusty rose
- Terracotta
- Mustard yellow
- Navy blue
- Soft gray
- Burgundy
A single solid color allows the stitch pattern to remain the main attraction.
You can also create a two-color version by using one color for the circular center and another color for the outer square sections.
SKILL LEVEL
This project is recommended for intermediate crocheters.
A confident beginner may also complete it by working slowly, counting carefully, and placing stitch markers at the four main sections.
You should be comfortable with:
- Making a magic ring
- Working in joined rounds
- Making chains
- Working single crochet
- Working double crochet
- Working treble crochet
- Skipping stitches
- Crocheting into chain spaces
- Increasing evenly
- Reading repeated instructions
- Counting stitches
- Blocking lace
CROCHET ABBREVIATIONS
Ch: Chain
Ch-sp: Chain space
Dc: Double crochet
Tr: Treble crochet
Sc: Single crochet
Sl st: Slip stitch
St: Stitch
Sts: Stitches
Sp: Space
Rep: Repeat
MR: Magic ring
FO: Fasten off
SPECIAL STITCHES
V-STITCH
Work 1 double crochet, chain 2, and 1 double crochet into the same stitch or space.
The V-stitch creates a small open section and allows the fabric to expand.
SHELL
Work 5 double crochet stitches into the same stitch or chain space.
The shell creates a rounded decorative fan.
LARGE SHELL
Work 7 double crochet stitches into the same chain space.
The larger shell can be used in the central leaf or wing sections.
PICOT
Chain 3, then slip stitch into the first chain.
A picot adds a small decorative point to the edge.
FILET SPACE
Work 1 double crochet, chain 2, skip 2 stitches, and work 1 double crochet into the next stitch.
These open spaces create the grid-like appearance visible in the corner sections.
SOLID FILET BLOCK
Work 1 double crochet into each of the next three stitches or work three double crochet stitches into the next chain-2 space.
Solid blocks can be arranged with open spaces to create decorative geometric patterns.
GAUGE AND FINISHED SIZE
Exact gauge is not essential for a decorative table mat.
However, consistent tension is extremely important. If your tension changes, the four sides may become uneven.
Using DK cotton and a 3.25 mm hook, the finished mat should measure approximately 18 to 22 inches across after blocking.
Using sport-weight cotton and a 2.75 mm hook, the finished mat may measure approximately 14 to 18 inches.
Using crochet thread and a small hook will produce a smaller and more delicate doily.
Make a small swatch containing several double crochet stitches and chain spaces before beginning.
The stitches should be:
- Smooth and clearly defined
- Flexible rather than stiff
- Loose enough to block
- Tight enough to hold their shape
IMPORTANT PATTERN NOTES
- This pattern uses US crochet terminology.
- The mat is worked from the center outward.
- The beginning chain 3 counts as the first double crochet unless stated otherwise.
- Join each round with a slip stitch.
- Use stitch markers to divide the work into four equal sections.
- Count the stitches after every round.
- Keep the long chain arches relaxed.
- Do not pull slip stitches tightly.
- The work may look slightly uneven before blocking.
- All four sides must contain the same number of stitches and spaces.
- Read the complete round before beginning it.
- Instructions between asterisks should be repeated around the round.
- If the work starts to ruffle, reduce the increases.
- If the work starts to cup, add more stitches or use a larger hook.
CONSTRUCTION OVERVIEW
The table mat is made in five main stages:
Stage 1: Create the center ring.
Stage 2: Expand the ring into a flat circular medallion.
Stage 3: Divide the circle into four equal sections.
Stage 4: Build four openwork butterfly or leaf sections.
Stage 5: Square the design with four rounded filet-style corner panels.
The exact stitch counts may need a small adjustment depending on your yarn and tension. The most important goal is to keep all four sections identical.
PART 1: CREATE THE CENTER RING
ROUND 1
Make a magic ring.
Chain 3. This counts as the first double crochet.
Work 23 double crochet stitches into the magic ring.
Join with a slip stitch into the top of the beginning chain 3.
You should have 24 double crochet stitches.
Pull the magic ring until the center opening is approximately 0.5 to 0.75 inches wide.
Do not close the hole completely if you want the open center visible in the reference image.
ROUND 2
Chain 3.
Work 1 double crochet into the same stitch.
Work 2 double crochet stitches into every stitch around.
Join with a slip stitch.
You should have 48 double crochet stitches.
ROUND 3
Chain 3.
Work 1 double crochet into the next stitch.
Work 2 double crochet stitches into the following stitch.
Repeat the following around:
Work 1 double crochet into each of the next 2 stitches, then work 2 double crochet stitches into the next stitch.
Join with a slip stitch.
The circle should remain flat.
ROUND 4
Chain 4. This counts as 1 double crochet and chain 1.
Skip the next stitch.
Work 1 double crochet into the following stitch.
Repeat the following around:
Chain 1, skip 1 stitch, and work 1 double crochet into the next stitch.
Join with a slip stitch into the third chain of the beginning chain 4.
This round creates a ring of small open spaces.
ROUND 5
Slip stitch into the first chain-1 space.
Chain 3.
Work 2 double crochet stitches into the same space.
Work 3 double crochet stitches into each chain-1 space around.
Join with a slip stitch.
The circle should now have a stronger, more defined edge.
PART 2: BUILD THE RADIATING CENTER
ROUND 6
Chain 5. This counts as 1 double crochet and chain 2.
Skip 2 stitches.
Work 1 double crochet into the next stitch.
Repeat the following around:
Chain 2, skip 2 stitches, and work 1 double crochet into the next stitch.
Join with a slip stitch.
If your stitch count does not divide perfectly, adjust the final skipped section so the round remains even.
ROUND 7
Slip stitch into the first chain-2 space.
Chain 3.
Work 3 additional double crochet stitches into the same space.
Work 4 double crochet stitches into every chain-2 space around.
Join with a slip stitch.
This creates the dense ring visible around the central opening.
ROUND 8
Chain 4.
Skip 1 stitch and work 1 double crochet into the next stitch.
Repeat the following around:
Chain 1, skip 1 stitch, and work 1 double crochet into the next stitch.
Join with a slip stitch.
ROUND 9
Slip stitch into the first chain-1 space.
Chain 3 and work 1 double crochet into the same space.
Work 2 double crochet stitches into every chain-1 space around.
Join with a slip stitch.
At this stage, the circular center should lie flat and display several visible rings of texture.
PART 3: DIVIDE THE DESIGN INTO FOUR SECTIONS
Lay the circle on a flat surface.
Count the stitches around the final round and divide the total into four equal sections.
Place one stitch marker at the beginning of each section.
These markers identify:
- Top section
- Right section
- Bottom section
- Left section
Each marked area will become one decorative leaf or butterfly-wing section.
Maintaining this four-part symmetry is the most important part of the design.
ROUND 10
Join the yarn at the first marker.
Chain 3 and work 2 double crochet stitches into the same stitch.
Work double crochet stitches evenly across the first quarter.
At the next marker, work 3 double crochet, chain 5, and 3 double crochet into the marked stitch.
Continue across the next quarter.
Repeat the corner sequence at every marker:
3 double crochet, chain 5, 3 double crochet.
Join with a slip stitch.
The four chain-5 spaces establish the main direction of the square.
ROUND 11
Chain 3.
Work one double crochet into each stitch until you reach the first chain-5 space.
In the chain-5 space, work:
3 double crochet, chain 7, 3 double crochet.
Continue working one double crochet into each stitch.
Repeat the corner sequence in all four chain spaces.
Join with a slip stitch.
The longer chains begin separating the four main sections.
PART 4: CREATE THE OPEN BUTTERFLY OR LEAF SECTIONS
ROUND 12
Work double crochet stitches until you are three stitches away from the first corner space.
Chain 5.
Skip the next 3 stitches.
Work 1 single crochet into the corner chain space.
Chain 5.
Skip the next 3 stitches after the corner.
Continue working double crochet stitches across the section.
Repeat around all four corners.
Join with a slip stitch.
ROUND 13
Work across the solid section in the established stitch pattern.
When you reach the first chain-5 arch, work:
1 single crochet, chain 7, and 1 single crochet into the arch.
Repeat in every chain arch around.
Join with a slip stitch.
ROUND 14
Work double crochet stitches across the solid section.
In each chain-7 arch, work:
1 single crochet, chain 9, and 1 single crochet.
Repeat around.
The increasing chain lengths create the open spaces that extend diagonally from the center.
ROUND 15
Work the solid sections as established.
In every chain-9 arch, work:
1 single crochet, chain 11, and 1 single crochet.
Join with a slip stitch.
ROUND 16
Work double crochet stitches across each solid section.
In every chain-11 arch, work:
1 single crochet, chain 13, and 1 single crochet.
Join with a slip stitch.
At this stage, the work should have four expanding open areas.
The long chain arches should resemble the vein structure of a leaf or the inner sections of butterfly wings.
CREATING THE DECORATIVE CENTER POINTS
In the photograph, the open sections meet in decorative pointed shapes around the center.
To reproduce this effect, work groups of chain arches connected with single crochet stitches.
For each open section:
- Begin with a short chain arch near the center.
- Increase the chain length over several rows.
- Maintain a central point.
- Decrease the chain length as you approach the outer panel.
A suggested sequence is:
- Chain 5
- Chain 7
- Chain 9
- Chain 11
- Chain 13
- Chain 11
- Chain 9
- Chain 7
- Chain 5
Anchor each arch with a single crochet stitch into the previous row’s arch.
Make sure all four sections use the same sequence.
PART 5: BEGIN THE FILET CORNER PANELS
The four outer sections are worked as rounded rectangular panels. They combine solid double crochet blocks with open chain spaces.
ROUND 17
Work one double crochet into each stitch across the solid section.
When you reach an open chain arch, work enough double crochet stitches into the arch to create a stable foundation.
A useful starting ratio is approximately one double crochet for every chain stitch, but you may need fewer stitches to keep the fabric flat.
At each main corner, work:
3 double crochet, chain 3, 3 double crochet.
Repeat around.
Join with a slip stitch.
This round converts the long chain arches into a stable base for the outer panels.
ROUND 18
Chain 3.
Work 1 double crochet into each of the next 4 stitches.
Create the first filet space:
Chain 2, skip 2 stitches, and work 1 double crochet into the next stitch.
Continue alternating solid sections and open filet spaces.
At each corner, work:
3 double crochet, chain 3, 3 double crochet.
Repeat the same arrangement on all four sides.
Join with a slip stitch.
ROUND 19
Work double crochet stitches above the previous solid sections.
Work chain-2 spaces above the previous open spaces.
To create the geometric pattern visible in the photograph, occasionally replace an open space with a solid block of three double crochet stitches.
Repeat the same pattern on every side.
ROUND 20
Continue the filet pattern.
Add one new open space near each outer edge.
Keep the center portion of every panel mostly solid.
This creates a combination of open squares and dense crochet areas.
ROUND 21
Repeat the established pattern.
At every corner, work:
3 double crochet, chain 3, 3 double crochet.
The corner spaces allow the mat to continue expanding without curling.
ROUND 22
Create a wider open section close to the diagonal arches.
Work solid blocks toward the outer edge.
Repeat the same sequence on all four panels.
ROUND 23
Work a mostly solid double crochet row around the mat.
Maintain the chain-3 corner spaces.
This row strengthens the outer panels and prepares them for the final openwork design.
ROUND 24
Create another filet row.
Suggested repeat:
Work 3 double crochet, chain 2, skip 2 stitches, and work 3 double crochet.
Continue the repeat across each panel while adjusting the final block so the design remains centered.
ROUND 25
Work double crochet stitches into the solid blocks.
Work chain-2 spaces above the previous open spaces.
At every corner, work:
3 double crochet, chain 3, 3 double crochet.
ROUND 26
Work one final geometric row, maintaining the same pattern on all four sides.
Lay the mat flat and inspect the shape.
The four corners should have similar widths and rounded outlines.
OPTIONAL FINAL BORDER
A simple border will stabilize the edges without competing with the lace pattern.
BORDER ROUND 1
Join the yarn in any corner space.
Chain 1.
Work 1 single crochet into every double crochet stitch.
Work 2 single crochet stitches into every chain-2 space.
At each corner, work:
2 single crochet, chain 2, 2 single crochet.
Continue around.
Join with a slip stitch.
BORDER ROUND 2
Chain 1.
Work 1 single crochet into each stitch around.
At each corner chain space, work:
2 single crochet, chain 2, 2 single crochet.
Join with a slip stitch.
Fasten off.
OPTIONAL PICOT BORDER
For a more decorative edge, add picots during the final single-crochet round.
Suggested repeat:
Work 3 single crochet stitches.
Make one picot.
Repeat around the edge.
Keep the picots evenly spaced.
A picot border is particularly attractive when the mat is made with thin cotton or crochet thread.
HOW TO KEEP THE FOUR SIDES IDENTICAL
Symmetry is essential for this project.
Use the following methods to keep the sections even:
- Place a marker at every main corner.
- Count the stitches in the first section.
- Repeat the same count in the other three sections.
- Write down the number of open spaces in each round.
- Lay the work flat after every two or three rounds.
- Compare opposite sides.
- Correct mistakes before beginning the next round.
- Use a different-colored marker to identify the beginning of the round.
If one side contains an extra stitch, the difference may become more noticeable as the mat grows.
HOW TO ADJUST THE PATTERN
Because yarn weight and personal tension vary, you may need to make small adjustments.
IF THE MAT RUFFLES
Ruffling means the outer edge contains too many stitches.
To correct it:
- Remove a few increases.
- Reduce the number of double crochet stitches worked into chain arches.
- Use shorter chain spaces.
- Change to a slightly smaller hook.
- Block a small section before continuing.
IF THE MAT CUPS
Cupping means the outer edge does not contain enough stitches.
To correct it:
- Add a few evenly spaced increases.
- Use longer corner chains.
- Add one extra stitch to the large chain arches.
- Change to a slightly larger hook.
- Loosen your chain stitches.
IF THE CORNERS PULL INWARD
The corner chain spaces are probably too short.
Replace chain 2 with chain 3 or chain 4.
You can also add an extra double crochet stitch on each side of the corner.
IF THE CHAIN ARCHES SAG
The chains may be too loose or too long.
Reduce each arch by one or two chains.
You can also use a slightly smaller hook when working the chain sections.
IF THE OPEN SECTIONS ARE TOO TIGHT
Increase the chain length gradually.
For example, replace a chain-9 arch with chain 10 or chain 11.
Make the same adjustment in all four matching sections.
ADDING MORE ROUNDS
To make the mat larger, continue the filet-style corner panels.
In every new round:
- Maintain the four corner spaces.
- Add increases only at the corners.
- Repeat the open and solid block arrangement.
- Keep all four sides identical.
- Lay the mat flat regularly.
- Finish with one or two rounds of single crochet.
You can also add a wide lace border consisting of chain arches, shells, and picots.
FINISHING THE TABLE MAT
After completing the final border, cut the yarn and leave a tail approximately 6 inches long.
Pull the tail through the final loop.
Thread the tail onto a blunt yarn needle.
Weave it through the wrong side of several stitches.
Change direction and weave through a second group of stitches.
Trim the yarn close to the fabric.
Repeat this process with every remaining tail.
Do not cut the tails immediately after making a knot. Crochet ends are more secure when they are woven through the fabric in multiple directions.
BLOCKING THE TABLE MAT
Blocking is one of the most important stages of this project.
Before blocking, the corners may look rounded, the open sections may appear uneven, and the lace may not lie completely flat.
Blocking opens the stitches and reveals the full design.
WET-BLOCKING COTTON
Fill a basin with cool or lukewarm water.
Add a small amount of mild detergent if necessary.
Place the table mat in the water and allow it to become completely wet.
Do not rub or twist it.
Remove the mat and gently press out the excess water.
Place it between two clean towels and press again.
Do not wring the crochet.
Spread the mat on a large blocking surface.
Begin by pinning the four main corners.
Measure from the center to each corner to make sure the distances are equal.
Pin the centers of the four sides.
Continue adding pins around the edge.
Open the chain arches carefully and make the corresponding sections symmetrical.
Allow the mat to dry completely before removing the pins.
SPRAY BLOCKING
Place the dry mat on a blocking surface.
Pin it into the desired shape.
Spray it evenly with clean water.
Allow it to dry completely.
This method is useful when the mat needs only light shaping.
USING STARCH
If you prefer a crisp table mat, apply a small amount of fabric starch after blocking.
Do not use too much starch. The mat should remain flexible enough to lie naturally on the table.
Test the starch on a small yarn sample first.
COMMON MISTAKES AND HOW TO FIX THEM
- NOT COUNTING THE STITCHES
The four sections must remain symmetrical.
If one section contains more stitches, the entire square may become uneven.
Fix:
Count every section separately and place markers at the four main division points.
- MAKING THE CHAIN ARCHES TOO TIGHT
Tight arches can pull the center inward.
Fix:
Relax your tension while making chains or use a hook that is 0.5 mm larger for the openwork sections.
- MAKING THE CHAIN ARCHES TOO LOOSE
Loose arches may sag and lose their shape.
Fix:
Use a slightly smaller hook for the chains or reduce the number of chains in each arch.
- ADDING TOO MANY STITCHES
Too many stitches cause ruffling.
Fix:
Remove some increases or work fewer double crochet stitches into the chain spaces.
- NOT ADDING ENOUGH STITCHES
Too few stitches cause cupping.
Fix:
Add evenly spaced increases or use longer corner chains.
- FORGETTING A CORNER INCREASE
A missing corner increase will distort one side of the square.
Fix:
Mark every corner before beginning the round.
- USING DIFFERENT TENSION ON EACH SIDE
Changing tension can make the panels different sizes.
Fix:
Work in a relaxed position and compare the four sections regularly.
- SKIPPING BLOCKING
Without blocking, the lace may look crowded and uneven.
Fix:
Block the finished mat carefully and shape every open section.
- WEAVING THE ENDS TOO SHORT
Short yarn tails may come loose after washing.
Fix:
Leave tails at least 6 inches long and weave them through several directions.
- USING FUZZY YARN
Fuzzy yarn can hide the filet squares and decorative arches.
Fix:
Choose smooth cotton or cotton-blend yarn with clear stitch definition.
- CHANGING HOOK SIZE ACCIDENTALLY
Using a different hook partway through the project can change the size of the stitches.
Fix:
Keep the selected hook with the project until the mat is complete.
- WORKING INTO THE WRONG CHAIN SPACE
This can move the pattern away from the correct center point.
Fix:
Place markers in important spaces and review each repeat before continuing.
CARE INSTRUCTIONS
Always follow the washing recommendations printed on the yarn label.
For cotton table mats:
- Hand wash in cool or lukewarm water.
- Use a small amount of mild detergent.
- Do not scrub the lace.
- Do not twist or wring the mat.
- Press out excess water with a towel.
- Reshape and dry flat.
- Block again after washing if necessary.
Avoid hanging the wet mat because the weight of the water may stretch the stitches.
Store the mat flat or loosely rolled.
Do not fold it tightly for long periods because deep creases may form in the blocked lace.
If the mat is displayed beneath a plant pot, use a waterproof tray to prevent moisture from reaching the yarn.
HOW TO STYLE THE FINISHED MAT
The rich green color pairs beautifully with natural materials and neutral surfaces.
Place the mat:
- In the center of a wooden dining table
- Under a glass vase
- Beneath a decorative bowl
- On a side table
- On a bedroom dresser
- Under a candle holder
- On a coffee table
- Beneath a small indoor plant
- On a console table
- Inside a decorative tray
Avoid placing an open flame directly on the crochet mat.
If using candles, keep them in stable, heat-resistant holders.
PROJECT VARIATIONS
MAKE A SMALLER DOILY
Use crochet thread and a smaller hook.
Stop after completing the central medallion and several openwork rounds.
Finish with a simple picot border.
MAKE A LARGE TABLE TOPPER
Use DK cotton and continue adding filet rounds.
Increase only at the four corners.
Check the shape regularly and stop when the mat reaches the required measurement.
MAKE A TWO-COLOR VERSION
Use a lighter green for the circular center.
Change to dark green for the butterfly sections and corner panels.
You can also finish with a contrasting cream border.
MAKE A FLOWER-INSPIRED VERSION
Use yellow for the center.
Use cream or pink for the radiating sections.
Finish the outer square in green to resemble leaves around a flower.
MAKE A CHRISTMAS VERSION
Use deep green yarn for the main mat.
Add a red or gold final border.
Small gold beads can be sewn securely around the edge after blocking.
MAKE A NEUTRAL FARMHOUSE VERSION
Use natural beige, cream, or light gray cotton.
Finish with a simple single-crochet border.
This version works well with rustic wood furniture.
MAKE MATCHING COASTERS
Use the center section of the pattern.
Stop when the circle reaches approximately 4 to 5 inches.
Add one round of single crochet and block it flat.
FREQUENTLY ASKED QUESTIONS
IS THIS THE EXACT PATTERN SHOWN IN THE IMAGE?
No. This is a photo-inspired reconstruction.
The image does not reveal every stitch, increase, or hidden connection. This pattern is intended to produce a similar circular-center square mat with four openwork sections and filet-style corners.
WHAT TYPE OF CROCHET ITEM IS THIS?
It appears to be a decorative square table mat or large doily.
The four open sections also give the design the appearance of a butterfly or four large leaves.
IS THIS PATTERN SUITABLE FOR BEGINNERS?
It is best suited to intermediate crocheters.
A confident beginner can attempt it after practicing double crochet, treble crochet, chain spaces, and working in joined rounds.
WHY DOES MY MAT NOT LIE FLAT?
A mat that ruffles has too many stitches.
A mat that cups has too few stitches.
You may need to change the number of increases, adjust the chain lengths, or use a different hook size.
DO I HAVE TO USE GREEN YARN?
No. You can use any color.
Solid colors usually display the detailed lace pattern more clearly than highly variegated yarn.
CAN I USE ACRYLIC YARN?
Yes, but cotton is generally better for table mats.
Acrylic may stretch more and can be damaged by excessive heat during blocking.
If using acrylic, steam it very carefully without touching the yarn with the iron.
CAN I USE CROCHET THREAD?
Yes. Crochet thread will create a fine, traditional doily.
Use a smaller hook and expect the finished piece to be smaller.
HOW MUCH YARN WILL I NEED?
A medium-sized table mat will usually require approximately 500 to 750 yards.
The exact amount depends on the yarn weight, hook size, tension, finished dimensions, and number of outer rounds.
HOW CAN I CALCULATE THE YARN AMOUNT MORE ACCURATELY?
Complete the center and several rounds.
Weigh the piece using a digital scale.
Estimate the final size and purchase at least 15 to 20 percent more yarn than your calculation requires.
It is always safer to have extra yarn from the same dye lot.
CAN I MAKE THE MAT LARGER?
Yes.
Continue adding filet-style rounds while maintaining the four corner increases.
Add a wide decorative border after reaching the desired size.
CAN I MAKE IT SMALLER?
Yes.
Use thinner yarn, a smaller hook, or stop after fewer outer rounds.
You can finish at almost any stage by adding one or two rounds of single crochet.
WHY ARE MY FOUR CORNERS DIFFERENT?
You may have missed an increase, added an extra stitch, or worked into the wrong chain space.
Count every side and compare the corners before beginning the next round.
DO I NEED TO BLOCK THE FINISHED MAT?
Yes. Blocking is strongly recommended.
It opens the lace, straightens the edges, defines the corners, and helps the four sections look symmetrical.
CAN I MACHINE-WASH THE MAT?
This depends on the yarn.
Even if the yarn is machine-washable, hand washing is safer for detailed lace.
If you use a washing machine, place the mat in a mesh laundry bag and select a gentle cycle.
CAN I ADD A NON-SLIP BACKING?
Yes.
Cut a piece of non-slip fabric slightly smaller than the finished mat.
Attach it using small hand stitches around the outer edge.
Make sure the stitches do not distort the crochet.
CAN I SELL THE FINISHED TABLE MATS?
You may sell the physical items you make from this tutorial.
Use your own product photographs and write an accurate product description.
Do not use the reference image as a photograph of an item you personally made.
HOW LONG DOES THIS PROJECT TAKE?
The completion time depends on your experience and the finished size.
An intermediate crocheter may need several evenings or approximately 12 to 20 hours.
A large version with a complex border may require more time.
QUICK PATTERN SUMMARY
- Make a central ring containing 24 double crochet stitches.
- Increase the circle evenly.
- Add alternating solid and open rounds.
- Divide the circle into four equal sections.
- Create four expanding chain-arch areas.
- Stabilize the arches with double crochet stitches.
- Build four outer filet-style panels.
- Increase consistently at the four corners.
- Add a simple single-crochet or picot border.
- Weave in all yarn ends.
- Block the finished mat into a symmetrical rounded square.
FINAL THOUGHTS
This green crochet table mat is a striking combination of circular construction, delicate lace, geometric panels, and organic shapes.
The center draws the eye inward, while the four openwork sections create movement and give the design its butterfly-like appearance. The filet-style corners transform the circular motif into a practical square mat that can be displayed in many areas of the home.
Do not worry if the piece looks slightly uneven while you are crocheting. Lace often reveals its final beauty only after careful blocking.
Work slowly, count each section, keep the four corners symmetrical, and adjust the chain lengths when necessary.
Once you understand the construction, you can customize the project with different colors, yarn weights, borders, and finished sizes.
Whether you use it as a table centerpiece, dresser mat, decorative doily, or handmade gift, this photo-inspired crochet design will add texture, color, and craftsmanship to your space.
SEO TITLE
Green Crochet Butterfly Table Mat Pattern with Openwork Lace
META DESCRIPTION
Create an elegant green crochet table mat with a circular center, butterfly-inspired openwork sections, filet corners, detailed instructions, materials, troubleshooting tips, and FAQs.
SUGGESTED URL SLUG
green-crochet-butterfly-table-mat-pattern
SUGGESTED KEYWORDS
green crochet table mat pattern
crochet butterfly doily
square crochet doily pattern
crochet lace table centerpiece
crochet table topper pattern
openwork crochet mat
filet crochet table mat
green crochet home décor
crochet butterfly placemat
large crochet doily pattern
photo-inspired crochet pattern
crochet centerpiece tutorial
PINTEREST TITLE
Elegant Green Crochet Butterfly Table Mat Pattern
PINTEREST DESCRIPTION
Make a beautiful green crochet table mat featuring a circular center, butterfly-inspired lace sections, rounded square corners, and delicate openwork details. This photo-inspired crochet tutorial includes materials, pattern guidance, blocking instructions, common mistakes, customization ideas, and helpful FAQs.