PASTEL CROCHET TURTLE COASTERS
Free Photo-Inspired Pattern for Cute Padded Turtle Decorations
INTRODUCTION
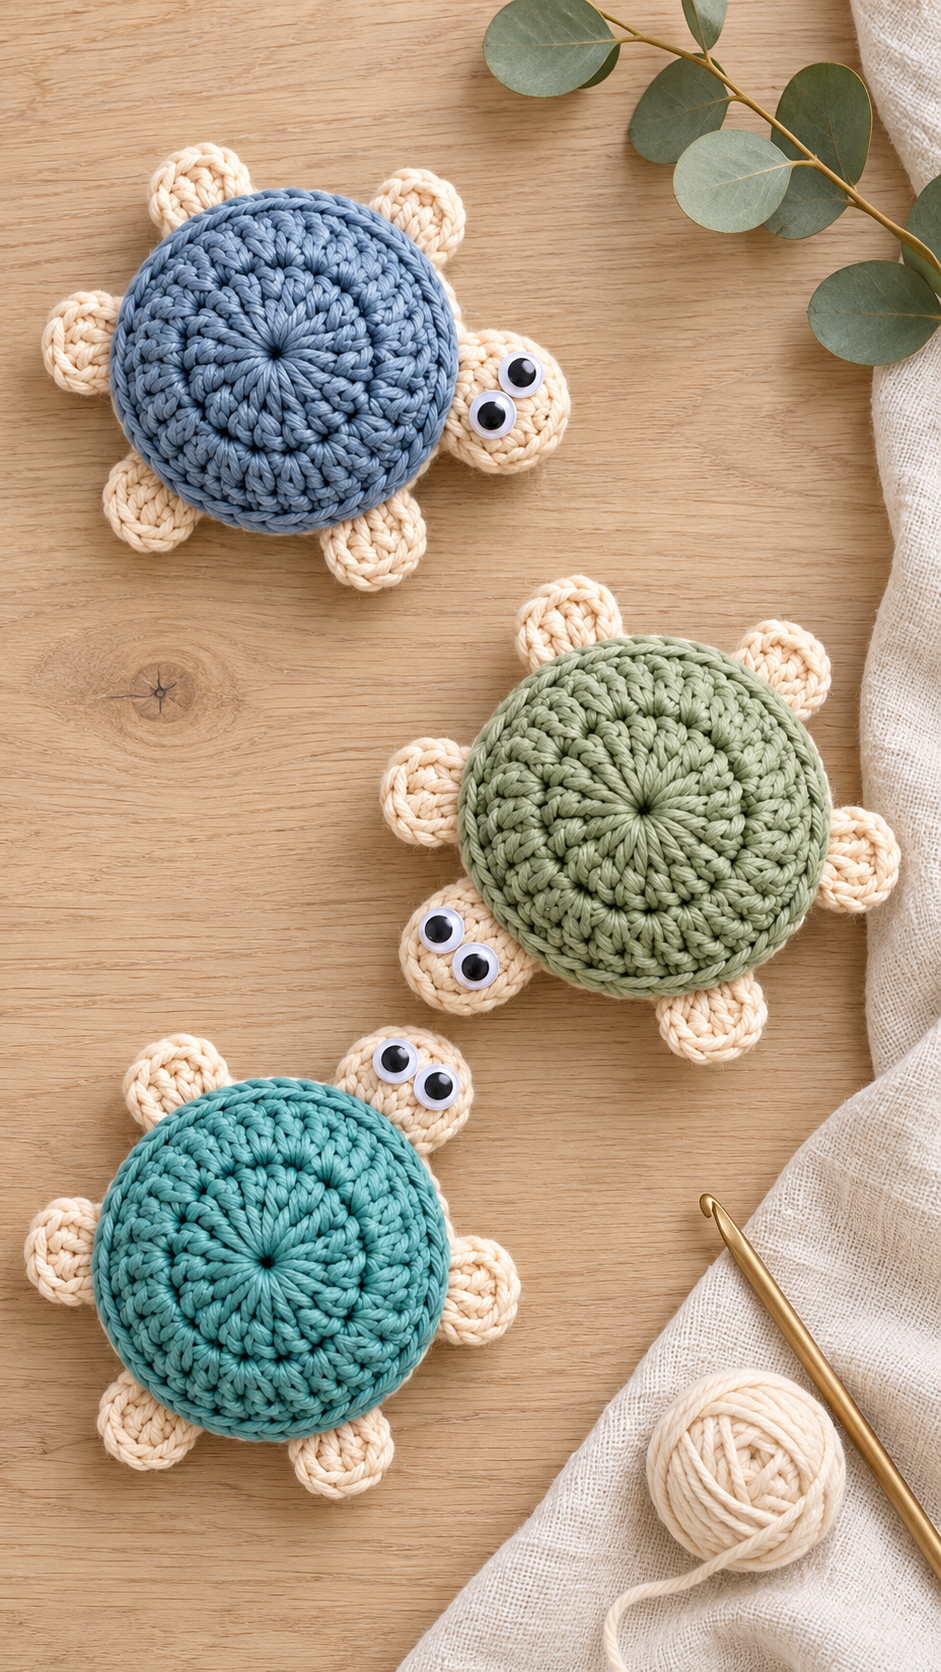
These adorable pastel crochet turtles combine a round textured shell with a cream-colored head and four small flippers. The simple shape, soft colors, and oversized eyes give each turtle a cheerful personality.
The turtles can be made as decorative coasters, nursery decorations, small desk companions, sensory pieces, or lightly padded ornaments. A complete set in blue, sage green, and turquoise makes a lovely handmade gift.
Each turtle begins with a circular crochet shell. A second circle forms the underside, while the head and flippers are crocheted separately and placed between the two shell layers. The pieces are then joined around the edge to create a neat finished turtle.
The project is suitable for using leftover cotton yarn and can be completed in several color combinations.
ABOUT THIS PATTERN
This is a photo-inspired crochet reconstruction based on the visible shape, colors, texture, and construction of the reference turtles. It is not the original designer’s exact pattern.
The instructions are designed to create a similar round turtle with:
A thick circular shell
A subtle spiral texture
One cream head
Four cream flippers
Two large eyes
A neat raised border
The finished dimensions will vary depending on the yarn, hook, tension, stuffing, and number of shell rounds.
This pattern uses US crochet terminology.
PROJECT OPTIONS
You can finish the turtle in several ways.
FLAT COASTER
Do not add stuffing. Use cotton yarn and embroidered eyes. This version is the most suitable for placing under cool or moderately warm cups.
PADDED COASTER
Add a very thin layer of cotton batting between the shell circles. Use embroidered eyes instead of plastic eyes.
SOFT DECORATION
Add a small amount of polyester fiberfill between the shell layers. Plastic safety eyes may be used if the turtle will remain a decorative item.
SMALL TOY
Stuff the shell and head lightly. Embroider the eyes for babies and young children.
IMPORTANT SAFETY NOTE
Plastic safety eyes are not suitable for children under three years old because they can become a choking hazard.
If the turtle will be used as a coaster, do not use plastic eyes where a hot cup could touch them. Embroidered eyes are safer and more practical.
A padded polyester-filled turtle should not be used as a potholder or trivet. Synthetic stuffing and plastic eyes can be damaged by high heat.
SKILL LEVEL
Confident beginner
You should know how to:
Make a magic ring
Work in continuous or joined rounds
Single crochet
Half double crochet
Double crochet
Increase evenly
Crochet through both layers
Sew small crochet pieces together
Weave in yarn ends
Attach or embroider eyes
FINISHED SIZE
Using medium-weight cotton yarn and a 4.5 mm to 5 mm hook, one turtle should measure approximately:
Shell diameter: 5 to 6 inches
Total width including flippers: 7 to 8 inches
Total length from head to back: 7 to 8 inches
Using sport-weight yarn and a smaller hook will create a miniature turtle.
Using bulky yarn and a larger hook will create a larger cushion-style turtle.
MATERIALS
You will need:
Approximately 45 to 70 yards of colored cotton yarn for each shell
Approximately 20 to 35 yards of cream cotton yarn for the underside, head, and flippers
A 4 mm to 5.5 mm crochet hook
Yarn needle
Scissors
Stitch markers
Two plastic safety eyes for a decorative turtle
Black yarn for embroidered eyes
Optional white yarn for eye highlights
Optional small amount of polyester fiberfill
Optional thin cotton batting for a padded coaster
Optional pins for positioning the pieces
Optional fabric glue for temporary placement only
YARN RECOMMENDATIONS
A smooth cotton or cotton-blend yarn is recommended.
Cotton provides:
Clear stitch definition
A firm circular shell
Good durability
Minimal stretching
A natural matte appearance
Easy washing
Heat resistance suitable for ordinary drink coasters
Good yarn options include:
Worsted-weight cotton
Aran-weight cotton
Recycled cotton
Cotton tube yarn
Cotton and bamboo blend
Firm cotton-acrylic blend for decorative versions
The reference turtles have thick, rounded stitches. Cotton tube yarn or tightly twisted medium-weight cotton can create a similar appearance.
Avoid very fuzzy yarn if you want the shell texture to remain visible.
HOOK SIZE
Choose a hook that creates firm stitches without making the fabric stiff.
Suggested combinations:
Sport-weight cotton: 3 mm to 3.5 mm hook
DK cotton: 3.5 mm to 4.5 mm hook
Worsted cotton: 4.5 mm to 5.5 mm hook
Cotton tube yarn: 5 mm to 7 mm hook
If stuffing is visible between the stitches, use a smaller hook.
If the circle feels hard and curls strongly, use a larger hook.
COLOR SUGGESTIONS
The reference set uses:
Dusty blue
Muted sage green
Soft turquoise
Warm cream
Other attractive combinations include:
Lavender and ivory
Blush pink and cream
Mustard and beige
Coral and white
Navy and light gray
Terracotta and oatmeal
Mint green and pale yellow
Dusty rose and taupe
Chocolate brown and tan
Rainbow shells with matching cream bodies
You can make every turtle in a different pastel shade while keeping the heads and flippers the same color.
ABBREVIATIONS
This pattern uses US crochet terms.
MR – Magic ring
Ch – Chain
Sl st – Slip stitch
Sc – Single crochet
Hdc – Half double crochet
Dc – Double crochet
Inc – Increase by working 2 stitches in the same stitch
St – Stitch
Sts – Stitches
Rnd – Round
Rep – Repeat
BLO – Back loop only
FLO – Front loop only
FO – Fasten off
SPECIAL STITCHES
MAGIC RING
Wrap the yarn around your fingers to create a loop. Insert the hook into the loop, yarn over, and pull up a loop. Chain one to secure it, then work the required stitches into the ring. Pull the tail to close the center.
HALF DOUBLE CROCHET INCREASE
Work 2 hdc into the same stitch.
FRONT-LOOP HALF DOUBLE CROCHET
Work the hdc through only the front loop of the indicated stitch. This leaves the back loop visible and creates a subtle decorative ridge.
REVERSE SINGLE CROCHET
Insert the hook into the stitch immediately to the right, yarn over, pull up a loop, yarn over, and pull through both loops.
This stitch is also called crab stitch. It creates a firm corded border.
OPTIONAL PUFF STITCH
Yarn over and insert the hook into the indicated stitch.
Yarn over and pull up a loop to the height of a hdc.
Repeat three times in the same stitch.
Yarn over and pull through all loops.
Ch 1 to secure the puff.
GAUGE
Exact gauge is not essential, but the shell should remain flat.
A useful approximate gauge is:
13 to 15 hdc stitches = 4 inches
Check the shell after every round.
If it curls upward like a bowl, add increases or use a larger hook.
If it ruffles, remove increases or use a smaller hook.
PATTERN NOTES
The shell can be worked in joined rounds or continuous rounds.
Joined rounds create a more defined circular structure.
Continuous rounds create a smoother spiral.
Use a stitch marker to identify the first stitch when working continuously.
The head and flippers are positioned between the top shell and underside.
Make all the small pieces before joining the two shell circles.
For a coaster, keep every piece flat and omit stuffing.
For a soft decoration, add only a small amount of stuffing.
Count the stitches at the end of every shell round.
PART ONE: TEXTURED TOP SHELL
Use blue, sage, turquoise, or your chosen shell color.
Round 1:
Make a magic ring.
Ch 1 and work 10 hdc into the ring.
Pull the ring closed.
Join with a sl st to the first hdc.
You should have 10 stitches.
Round 2:
Ch 1.
Work 2 hdc in every stitch around.
Join with a sl st.
You should have 20 stitches.
Round 3:
Ch 1.
Work 1 hdc in the next stitch and 2 hdc in the following stitch.
Repeat around.
Join with a sl st.
You should have 30 stitches.
Round 4:
Ch 1.
Work 1 hdc in each of the next 2 stitches and 2 hdc in the following stitch.
Repeat around.
Join with a sl st.
You should have 40 stitches.
Round 5:
Ch 1.
Work 1 hdc in each of the next 3 stitches and 2 hdc in the following stitch.
Repeat around.
Join with a sl st.
You should have 50 stitches.
Round 6:
Ch 1.
Work 1 hdc in each of the next 4 stitches and 2 hdc in the following stitch.
Repeat around.
Join with a sl st.
You should have 60 stitches.
Round 7:
Ch 1.
Work 1 hdc in each of the next 5 stitches and 2 hdc in the following stitch.
Repeat around.
Join with a sl st.
You should have 70 stitches.
Check the diameter.
For a small turtle, stop after Round 6.
For a larger turtle, continue with Round 7 or add another increase round.
OPTIONAL ROUND 8:
Ch 1.
Work 1 hdc in each of the next 6 stitches and 2 hdc in the following stitch.
Repeat around.
Join with a sl st.
You should have 80 stitches.
Fasten off, leaving a long tail if you plan to sew the shell instead of crocheting the layers together.
CREATING THE SPIRAL TEXTURE
The photographed shell has a visible spiral pattern.
To emphasize this texture, work the shell rounds through the front loops only.
The unused back loops will form subtle circular ridges.
Another option is to alternate:
One regular hdc round
One BLO hdc round
You can also work one round of surface slip stitches along the circular ridges after completing the shell.
OPTIONAL RAISED SHELL ROUND
After Round 5, work one round of alternating texture:
Work 1 front-post hdc around the next stitch.
Work 1 regular hdc in the following stitch.
Repeat around.
This creates a more sculpted surface.
If the shell becomes too thick, return to ordinary hdc for the remaining rounds.
PART TWO: UNDERSIDE CIRCLE
Use cream yarn for a contrasting underside or use the shell color for a matching base.
Round 1:
Make a magic ring.
Work 10 hdc into the ring.
Join with a sl st.
Round 2:
Work 2 hdc in every stitch around.
You should have 20 stitches.
Round 3:
Repeat around:
1 hdc, 2 hdc in the next stitch.
You should have 30 stitches.
Round 4:
Repeat around:
1 hdc in each of the next 2 stitches, 2 hdc in the next stitch.
You should have 40 stitches.
Round 5:
Repeat around:
1 hdc in each of the next 3 stitches, 2 hdc in the next stitch.
You should have 50 stitches.
Round 6:
Repeat around:
1 hdc in each of the next 4 stitches, 2 hdc in the next stitch.
You should have 60 stitches.
Continue until the underside has the same number of rounds and stitches as the top shell.
Fasten off.
Compare both circles.
They should have the same diameter.
PART THREE: TURTLE HEAD
Use cream yarn.
The head can be made as a flat oval for a coaster or lightly stuffed for a decorative turtle.
Round 1:
Make a magic ring.
Work 6 sc into the ring.
Pull the ring closed.
You should have 6 stitches.
Round 2:
Work 2 sc in every stitch around.
You should have 12 stitches.
Round 3:
Repeat around:
1 sc in the next stitch, 2 sc in the following stitch.
You should have 18 stitches.
Rounds 4–5:
Work 1 sc in every stitch around.
You should maintain 18 stitches.
FOR A FLAT HEAD
Fasten off after Round 5, leaving a long tail.
Flatten the small cup into an oval.
FOR A LIGHTLY PADDED HEAD
Place a very small amount of stuffing inside.
Round 6:
Repeat around:
1 sc in the next stitch, decrease over the next 2 stitches.
You should have 12 stitches.
Fasten off, leaving a long tail.
Do not close the final opening completely. Flatten the open edge so it can be attached between the shell layers.
PART FOUR: ATTACHING THE EYES
Attach the eyes before joining the head to the shell.
PLASTIC SAFETY-EYE VERSION
Insert two safety eyes into the upper surface of the head.
Place them close together for the cheerful appearance shown in the reference.
Attach the washers firmly on the back.
Check that the eyes cannot rotate or pull out.
EMBROIDERED-EYE VERSION
Thread black yarn onto a yarn needle.
Make several small horizontal or circular stitches for each eye.
Add one tiny white stitch near the upper edge of each eye as a highlight.
Secure the yarn on the back.
CROCHET-EYE VERSION
With black yarn:
Make a magic ring and work 5 sc into the ring.
Join and fasten off.
Make a second circle.
Sew the small circles to the head.
Use white yarn to add a highlight.
PART FIVE: FRONT FLIPPERS – MAKE TWO
Use cream yarn.
Round 1:
Make a magic ring.
Work 6 sc into the ring.
Pull the ring closed.
Round 2:
Work 2 sc in every stitch around.
You should have 12 stitches.
Round 3:
Repeat around:
1 sc in the next stitch, 2 sc in the following stitch.
You should have 18 stitches.
Round 4:
Work 1 sc in every stitch around.
Join with a sl st.
Fasten off, leaving a long tail.
Flatten the circle.
Fold it slightly to create an oval flipper.
You may sew through the base to hold the oval shape.
PART SIX: BACK FLIPPERS – MAKE TWO
Use cream yarn.
For matching flippers, repeat the front-flipper pattern.
For slightly smaller back flippers:
Round 1:
Make a magic ring and work 6 sc.
Round 2:
Work 2 sc in every stitch around.
You should have 12 stitches.
Round 3:
Work 1 sc in every stitch around.
Join and fasten off.
Flatten the piece.
Leave a long tail.
PART SEVEN: OPTIONAL TAIL
The reference turtles do not show a prominent tail, but a small tail may be added.
Use cream yarn.
Chain 4.
Starting in the second chain from the hook, work:
1 sl st
1 sc
1 hdc
Fasten off, leaving a long tail.
The small triangle can be placed opposite the head.
PART EIGHT: POSITIONING THE PIECES
Place the cream underside circle on a flat surface with the right side facing upward.
Position the head at one side.
Approximately one-third of the head should extend under the shell.
Place one front flipper above the head position and one below it.
Position the two back flippers on the opposite side.
If using a tail, place it at the center back.
Arrange the pieces so the turtle appears balanced.
The four flippers should be spaced evenly but do not need to be perfectly symmetrical.
Pin or temporarily stitch each piece to the underside circle.
Check the turtle from the front before continuing.
PART NINE: SECURING THE HEAD AND FLIPPERS
Using the long yarn tails, sew the inner edge of each piece to the underside circle.
Sew only the section that will be hidden inside the shell.
Use several strong stitches.
Gently pull each piece to test the attachment.
The head and flippers should not come loose when the finished turtle is handled.
Weave the yarn tails into the underside.
PART TEN: JOINING THE SHELL LAYERS
Place the colored top shell over the cream underside.
The wrong sides should face each other.
Align the outer stitches.
Make sure the head and flippers remain between the two circles.
Join shell-colored yarn through one stitch from each layer.
Round 1:
Ch 1.
Work 1 sc through both layers in every stitch around.
At the base of each flipper and the head, crochet through the shell layers while trapping the body piece securely between them.
Continue until approximately 3 inches remain open.
FLAT COASTER VERSION
Do not add stuffing.
Smooth both layers.
Continue working sc through the remaining stitches.
Join with a sl st.
PADDED COASTER VERSION
Insert a circle of thin cotton batting.
The batting should be slightly smaller than the shell.
Smooth it evenly.
Close the remaining stitches.
SOFT DECORATION VERSION
Add a small amount of polyester fiberfill.
Distribute it evenly.
Do not overstuff the shell.
The turtle should remain low and rounded rather than becoming a ball.
Continue crocheting through the remaining stitches.
Join with a sl st.
PART ELEVEN: SHELL BORDER
Continue with the shell color.
SIMPLE BORDER
Work 1 sl st in every stitch around.
Join and fasten off.
CORDED BORDER
Work reverse sc in every stitch around.
Join and fasten off.
CONTRASTING BORDER
Join cream yarn.
Work 1 sc in every stitch around.
Join and fasten off.
A firm border helps the turtle maintain its round shape and strengthens the attachments.
PART TWELVE: OPTIONAL SHELL DETAILS
SURFACE SPIRAL
Join matching or contrasting yarn near the shell center.
Work surface slip stitches along the visible spiral line.
Continue outward until you reach the border.
Keep the slip stitches loose so the shell remains flat.
DECORATIVE RIDGES
Thread matching yarn onto a needle.
Sew curved lines from the center toward the outer edge.
Use evenly spaced stitches.
SMALL SHELL SPOTS
Make several small circles:
Work 6 sc into a magic ring.
Join and fasten off.
Sew the circles onto the shell before joining it to the underside.
FINAL SHAPING
Massage the shell gently with your hands.
Adjust the stuffing if needed.
Shape the head into a rounded oval.
Flatten the flippers slightly.
Check that the eyes face upward.
Make sure the turtle rests evenly on a flat surface.
If the shell is unstuffed, lightly block it before use.
HOW TO MAKE A COMPLEMENTARY SET
Choose three or more related pastel colors.
For example:
Dusty blue
Sage green
Turquoise
Use the same cream yarn for every head, underside, and set of flippers.
Keep the hook size and number of rounds consistent.
Make all the top shells first.
Make all the underside circles.
Make the heads and flippers in batches.
Assemble one turtle at a time.
This production method helps maintain consistent sizing.
SIZE ADJUSTMENTS
MINI TURTLE
Use sport-weight yarn and a 3 mm hook.
Stop the shell after Round 4.
Make the head with 12 stitches.
Use the mini turtle as a keychain, ornament, or appliqué.
LARGE TURTLE
Use bulky yarn and a 6 mm to 8 mm hook.
Continue the shell increase formula for additional rounds.
After Round 7, work:
1 hdc in each of the next 6 stitches, 2 hdc in the following stitch.
Repeat around.
Continue increasing in the same pattern until the desired diameter is reached.
Use the large version as a cushion or nursery decoration.
THIN COASTER
Make only one shell circle.
Attach flat flippers and a flat head directly to its edge.
Add a neat sc border.
Do not add an underside or stuffing.
CUSTOMIZATION IDEAS
FLOWER-SHELL TURTLE
Crochet a small flower and sew it to the center of the shell.
RAINBOW TURTLE
Change the shell color during every round.
LADYBUG-INSPIRED TURTLE
Use red for the shell and add black spots.
OCEAN TURTLE
Use shades of aqua, teal, and sea green.
SLEEPY TURTLE
Embroider curved closed eyes instead of attaching round eyes.
SMILING TURTLE
Add a small curved mouth with black embroidery yarn.
ROSY-CHEEKED TURTLE
Sew two tiny pink stitches below the eyes.
PERSONALIZED TURTLE
Embroider an initial on the shell.
HANGING DECORATION
Attach a crochet loop to the top of the shell.
KEYCHAIN VERSION
Make a miniature turtle and attach a metal keyring.
GARLAND VERSION
Make several flat turtles and join them with a long crochet chain.
PRACTICAL USES
The finished turtles can be used as:
Drink coasters
Desk decorations
Nursery decorations
Small sensory pieces
Bag charms
Gift toppers
Party favors
Ornaments
Wall decorations
Keychains
Photo props
Small pincushions
Decorative bowl fillers
Avoid using turtles with plastic eyes or polyester stuffing under very hot cookware.
COMMON MISTAKES AND HOW TO FIX THEM
MISTAKE 1: THE SHELL FORMS A BOWL
Cause:
There are too few increases, the stitches are too tight, or the hook is too small.
Solution:
Add one increase round or use a larger hook.
MISTAKE 2: THE SHELL RUFFLES
Cause:
There are too many increases.
Solution:
Remove the final increase round or space the increases farther apart.
MISTAKE 3: THE CENTER HAS A LARGE HOLE
Cause:
The magic ring was not pulled closed.
Solution:
Pull the starting tail firmly and weave it through the center stitches.
MISTAKE 4: THE SPIRAL TEXTURE IS NOT VISIBLE
Cause:
The yarn is fuzzy or the stitches are too loose.
Solution:
Use smooth cotton and work through one loop only to create ridges.
MISTAKE 5: THE TWO SHELL CIRCLES ARE DIFFERENT SIZES
Cause:
The stitch counts or tension differ.
Solution:
Count every round and place the circles together before assembly.
MISTAKE 6: THE STUFFING SHOWS
Cause:
The hook is too large or the shell is overstuffed.
Solution:
Use a smaller hook and remove some stuffing.
MISTAKE 7: THE SHELL LOOKS LIKE A BALL
Cause:
Too much fiberfill was added.
Solution:
Remove most of the stuffing and distribute a thin layer evenly.
MISTAKE 8: THE FLIPPERS ARE UNEVEN
Cause:
They have different stitch counts or were attached at different positions.
Solution:
Make all four flippers before assembly and mark their positions with pins.
MISTAKE 9: THE HEAD POINTS DOWNWARD
Cause:
Too little of the head was inserted between the shell layers.
Solution:
Place approximately one-third of the head beneath the shell and sew it firmly.
MISTAKE 10: THE EYES ARE CROOKED
Cause:
Their positions were not marked first.
Solution:
Insert pins where the eyes will be placed and compare the spacing before attaching them.
MISTAKE 11: THE SAFETY-EYE WASHERS WILL NOT FIT
Cause:
The yarn is very thick or the eye posts are short.
Solution:
Use embroidered or crocheted eyes instead.
MISTAKE 12: THE SHELL BORDER IS WAVY
Cause:
Too many border stitches were added.
Solution:
Work exactly one stitch through each pair of shell stitches.
MISTAKE 13: THE TURTLE WILL NOT LIE FLAT
Cause:
The stuffing is uneven or a body piece is trapped incorrectly.
Solution:
Redistribute the stuffing and adjust the flippers before closing the seam.
MISTAKE 14: THE SMALL PIECES PULL LOOSE
Cause:
They were attached through only one or two stitches.
Solution:
Sew each piece to the underside before joining the shell layers.
MISTAKE 15: THE COASTER ABSORBS MOISTURE SLOWLY
Cause:
Synthetic yarn was used.
Solution:
Use 100 percent cotton for functional coasters.
BLOCKING THE FLAT VERSION
Fill a bowl with cool or lukewarm water.
Submerge the turtle briefly.
Gently press out the water.
Place it on a towel.
Shape the shell into a circle.
Arrange the head and flippers.
Pin the pieces if necessary.
Allow the turtle to dry completely.
Do not block a heavily stuffed turtle.
CARE INSTRUCTIONS
For cotton turtles:
Hand-wash in cool or lukewarm water.
Use mild detergent.
Press out the water gently.
Do not twist the flippers or head.
Reshape the turtle.
Dry flat.
For turtles with plastic safety eyes:
Avoid hot water.
Do not place them in a hot dryer.
Check the eyes after washing.
For stuffed turtles:
Allow extra drying time.
Turn the turtle occasionally so both sides dry.
Make sure the center is completely dry before storing it.
FREQUENTLY ASKED QUESTIONS
IS THIS PATTERN SUITABLE FOR BEGINNERS?
Yes. A confident beginner who understands basic increases and working in rounds should be able to complete it.
HOW LONG DOES ONE TURTLE TAKE?
An experienced crocheter may finish one turtle in one to two hours. A beginner may need three to four hours.
HOW MUCH YARN DO I NEED?
One medium turtle generally requires 65 to 100 yards of yarn in total.
CAN I USE ACRYLIC YARN?
Yes, for a decorative turtle. Cotton is recommended for coasters because it is more absorbent and handles warmth better.
CAN I USE PLASTIC SAFETY EYES ON A COASTER?
Embroidered eyes are recommended for functional coasters. Plastic eyes can make a cup unstable and may be damaged by heat.
CAN I USE THESE AS POTHOLDERS?
No. The pattern is not designed as a potholder. Plastic eyes and polyester filling are unsuitable for high temperatures.
DO I NEED TO STUFF THE SHELL?
No. Leave it unstuffed for a flat coaster. Add only a small amount of stuffing for a decorative version.
CAN I MAKE THE HEAD FLAT?
Yes. Crochet the head circle, fold it into an oval, and attach it without stuffing.
WHY DOES MY SHELL HAVE A SEAM?
Joined rounds naturally create a visible seam. Work in continuous rounds if you prefer a smoother spiral.
HOW DO I KEEP THE CIRCLE FLAT?
Increase evenly, use the correct hook size, and place the shell on a flat surface after each round.
CAN I MAKE THE FLIPPERS A DIFFERENT COLOR?
Yes. Use a contrasting shade for the head and flippers or make each body part a different pastel color.
CAN I ADD A MOUTH?
Yes. Embroider a small curved line below the eyes before assembling the turtle.
CAN I MAKE A REVERSIBLE COASTER?
Yes. Use matching shell circles on both sides and sew the flat head and flippers between them.
HOW DO I MAKE A WASHABLE VERSION?
Use cotton yarn, embroidered eyes, cotton batting, and securely woven yarn ends.
CAN I SELL THE FINISHED TURTLES?
You may generally sell physical items you crochet from this photo-inspired guide. Use your own product photographs and do not describe the reconstruction as the exact original pattern shown in the reference image.
QUICK PATTERN SUMMARY
- Crochet one colored circular top shell.
- Use increases to keep the shell flat.
- Add front-loop or back-loop texture if desired.
- Crochet one matching underside circle.
- Make one cream head.
- Attach safety eyes or embroider the face.
- Crochet four cream flippers.
- Make an optional small tail.
- Position the head and flippers around the underside.
- Sew the small pieces securely in place.
- Place the colored shell over the underside.
- Crochet or sew through both shell layers.
- Leave the turtle flat or add a small amount of stuffing.
- Close the remaining opening.
- Add a neat outer border.
- Shape and block the finished turtle if necessary.
FINAL THOUGHTS
These pastel crochet turtles are small projects with plenty of handmade character. Their circular textured shells are easy to personalize, while the cream heads, rounded flippers, and expressive eyes make every turtle look cheerful and unique.
Make a blue turtle, a sage-green turtle, and a turquoise turtle for a coordinated set, or use leftover yarn to create an entire collection of colorful shells.
Keep the turtles flat for practical cotton coasters, add thin batting for gentle padding, or use a small amount of stuffing to turn them into soft decorations. With embroidered eyes and washable cotton yarn, they can also become thoughtful handmade gifts for families and children.
The simple construction makes this pattern easy to repeat, and the many color possibilities ensure that no two turtle sets need to look exactly the same.