Free Photo-Inspired Motif Pattern and Assembly Guide
INTRODUCTION
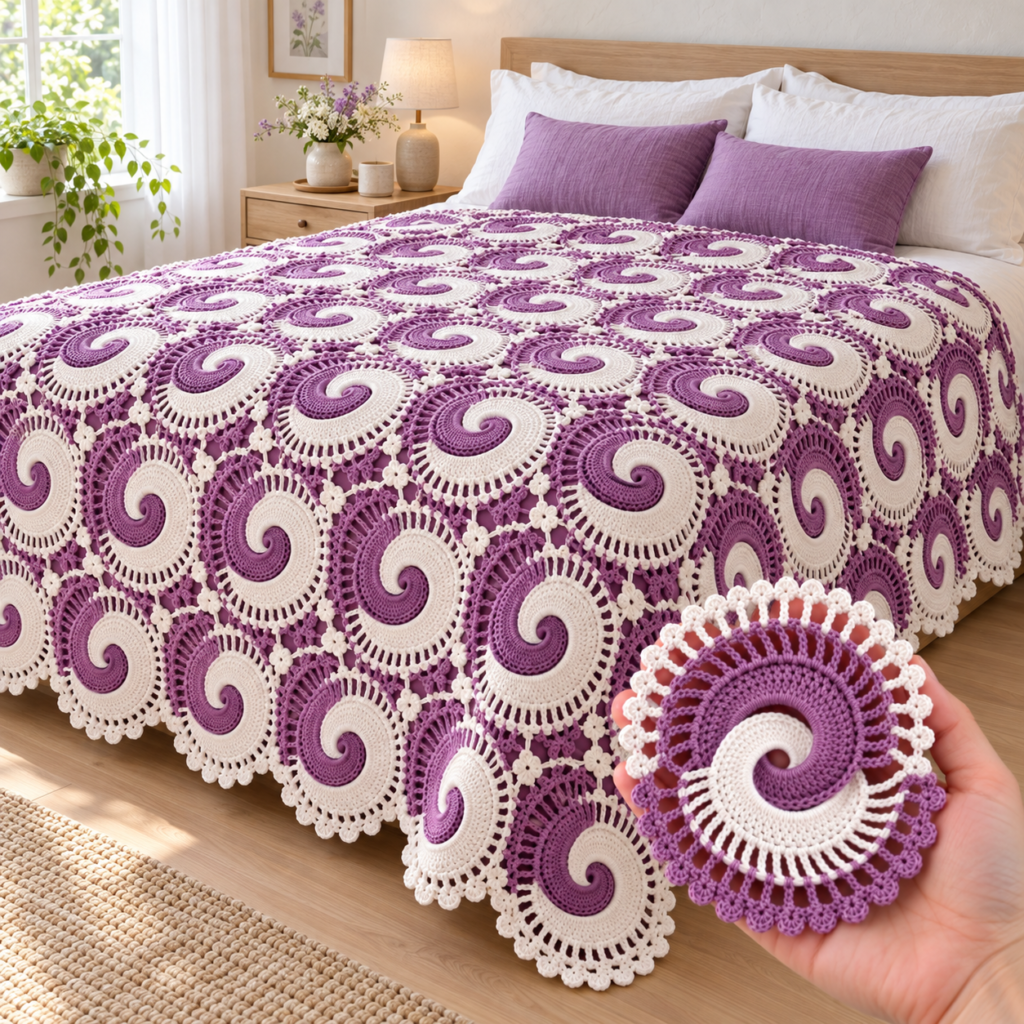
This lavender and ivory spiral crochet bedspread is a dramatic statement piece made from repeated circular lace motifs. Each motif features two contrasting colors flowing around one another in a graceful spiral, followed by radiating openwork loops and a delicate scalloped edge.
When the motifs are joined, the alternating spirals create movement across the entire bed. The open spaces between them keep the finished bedspread light, airy, and flexible despite its impressive size.
The combination of muted lavender and soft ivory gives this project a romantic appearance that works beautifully in elegant, vintage-inspired, cottage, or modern bedrooms. You can recreate the same atmosphere with dusty purple and cream or choose an entirely different color combination to match your décor.
This is a large project, but it is constructed one motif at a time. That makes it easier to carry, store, and work on gradually. Once the individual motifs are complete, they are arranged in rows and joined with small chain connections.
ABOUT THIS PATTERN
This is a photo-inspired crochet reconstruction based on the visible design. It is not the original designer’s exact pattern.
The reference image appears to feature an elaborate interlocking spiral motif. The instructions below use a practical two-color spiral construction to create a similar overall effect.
Because the photographed design is highly detailed, you may need to adjust a few stitch counts to suit your yarn, tension, and preferred motif size. Make and block one complete sample motif before beginning the full bedspread.
This pattern uses US crochet terminology.
PROJECT OVERVIEW
The bedspread is made from separate round motifs.
Each motif contains:
A small central opening
One lavender spiral section
One ivory spiral section
A dense circular body
An open radiating lace round
An outer looped border
Small decorative scallops or picots
Connection points for joining motifs
The motifs are joined in straight rows. Additional chain bridges and small filler elements close the gaps between neighboring circles.
SKILL LEVEL
Intermediate to advanced
This project is best for crocheters who are comfortable with:
Working in rounds
Working with two active colors
Increasing evenly
Leaving live loops temporarily
Tall crochet stitches
Working into chain spaces
Counting repeated sections
Reading repeat instructions
Joining motifs
Blocking lace
The stitches themselves are not extremely difficult. The main challenge is maintaining accurate stitch counts and keeping the two spiral colors organized.
FINISHED SIZE
The size of the bedspread depends on the yarn, hook, motif diameter, and number of motifs.
Using sport-weight cotton yarn and a 3.5 mm hook, one blocked motif should measure approximately:
8 to 10 inches across
Approximate finished sizes:
Baby blanket: 30 x 38 inches
Lap blanket: 40 x 50 inches
Throw: 50 x 60 inches
Twin bedspread: 66 x 90 inches
Full bedspread: 80 x 96 inches
Queen bedspread: 90 x 100 inches
King bedspread: 108 x 100 inches
These measurements include an optional outer border.
Make one motif, block it, and measure the actual diameter before calculating how many motifs you need.
MATERIALS
You will need:
Lavender cotton or cotton-blend yarn
Ivory or soft white cotton or cotton-blend yarn
A 3 mm to 4 mm crochet hook
Stitch markers in at least two colors
Yarn needle
Scissors
Measuring tape
Rustproof blocking pins
Blocking mats
Optional small clips for holding inactive yarn loops
Optional row labels for organizing the motifs
Optional fabric storage bags for completed sections
YARN ESTIMATES
Exact yardage varies considerably. The following estimates provide a starting point:
Baby blanket: 1,200 to 1,700 yards total
Lap blanket: 1,800 to 2,500 yards total
Throw: 2,500 to 3,500 yards total
Twin bedspread: 4,000 to 5,500 yards total
Full bedspread: 5,000 to 7,000 yards total
Queen bedspread: 6,000 to 8,500 yards total
King bedspread: 7,500 to 10,000 yards total
Purchase approximately equal amounts of lavender and ivory.
Add 10 to 15 percent extra for joining, the outer border, swatching, and possible repairs.
YARN SELECTION
A smooth cotton yarn is the best choice for a crisp lace design.
Recommended options include:
Sport-weight cotton
Light DK cotton
Mercerized cotton
Cotton and bamboo blend
Cotton and acrylic blend
Fine recycled cotton
Cotton offers excellent stitch definition and responds well to blocking. A cotton blend can reduce the total weight of a large bedspread.
Avoid very fuzzy yarn because it may hide the spiral lines and small scallops.
For a lightweight decorative bedspread, use sport-weight yarn. For a warmer and heavier blanket, use DK yarn.
HOOK SIZE
Choose a hook that produces flexible but clearly defined stitches.
Suggested combinations:
Sport-weight cotton: 3 mm to 3.5 mm hook
Light DK cotton: 3.5 mm to 4 mm hook
DK cotton: 4 mm to 4.5 mm hook
The motif should lie flat without becoming stiff.
If the center cups upward, increase the hook size or add more increases.
If the motif ruffles, reduce the hook size or remove a few increases.
COLOR IDEAS
The photographed design uses lavender and ivory.
Other beautiful combinations include:
Dusty rose and cream
Sage green and ivory
Navy blue and white
Charcoal and silver gray
Teal and pale aqua
Burgundy and blush
Mustard and cream
Terracotta and beige
Black and white
Chocolate brown and caramel
Soft blue and pale gray
Plum and champagne
For a softer effect, choose two colors with similar values. For a bold graphic effect, use strongly contrasting colors.
ABBREVIATIONS
This pattern uses US terms.
MR – Magic ring
Ch – Chain
Sl st – Slip stitch
Sc – Single crochet
Hdc – Half double crochet
Dc – Double crochet
Tr – Treble crochet
Inc – Increase
St – Stitch
Sts – Stitches
Sp – Space
Ch-sp – Chain space
Sk – Skip
Rnd – Round
Rep – Repeat
FO – Fasten off
SPECIAL STITCHES
DOUBLE CROCHET V-STITCH
Work 1 dc, ch 1, and 1 dc in the same stitch or space.
THREE-DOUBLE-CROCHET CLUSTER
Yarn over and insert the hook into the indicated stitch or space.
Yarn over and pull up a loop.
Yarn over and pull through two loops.
Repeat this process two more times in the same stitch or space.
Yarn over and pull through all four loops on the hook.
PICOT
Ch 3 and sl st into the first chain made.
SMALL SCALLOP
Work 1 sc, 3 dc, and 1 sc into the same chain space.
LARGE SCALLOP
Work 1 sc, 5 dc, and 1 sc into the same chain space.
LONG LOOP
Ch 7 to ch 10, depending on the required size, and anchor the chain with a single crochet.
TWO-COLOR SPIRAL METHOD
Two colors remain active at the same time.
When one color reaches the end of its section, enlarge the working loop or secure it with a stitch marker.
Do not fasten off.
Return to the other color and continue crocheting.
Alternating the colors in this way creates the curved spiral division.
GAUGE
Gauge is measured after blocking.
One completed motif should measure approximately 8 to 10 inches across.
Exact stitch gauge is less important than consistency between motifs.
Every motif in the bedspread should use:
The same yarn
The same hook
The same stitch counts
The same number of rounds
The same blocking measurement
PATTERN NOTES
The motif begins with both colors inside one center ring.
The two yarns are worked separately.
Do not cut either color until its section is complete.
Use one stitch-marker color for lavender and another for ivory.
Keep inactive loops large enough that they cannot unravel.
Turn the work only when specifically instructed.
The motif should remain flat throughout construction.
Count all stitches before beginning the lace rounds.
Make one complete test motif before purchasing yarn for a large bedspread.
PART ONE: PREPARING THE TWO COLORS
Make a slip knot with lavender yarn and place it on your hook.
Make a loose magic ring using ivory yarn.
The magic ring should remain large enough to receive stitches from both colors.
You can also use a neutral foundation ring:
Ch 8 with either color and join with a sl st to form a circle.
Both lavender and ivory sections will be worked into this ring.
PART TWO: BEGINNING THE SPIRAL CENTER
With lavender:
Work 1 sc, 1 hdc, 2 dc, and 2 tr into the center ring.
Enlarge the working loop and secure it with a lavender stitch marker.
Do not fasten off.
Join ivory yarn into the same center ring immediately after the lavender stitches.
With ivory:
Work 1 sc, 1 hdc, 2 dc, and 2 tr into the ring.
Pull the center ring gently until the stitches form a small circle.
Enlarge the ivory loop and secure it with a second stitch marker.
You now have two separate colored sections inside one ring.
Each section contains 6 stitches.
The last tall stitches of each color begin the sweeping spiral effect.
PART THREE: FIRST LAVENDER SPIRAL SECTION
Return the lavender loop to the hook.
Work into the tops of the ivory stitches.
Lavender Round 1:
Work 2 dc in each of the 6 ivory stitches.
You should add 12 lavender dc.
Stop when you reach the beginning of the lavender section.
Secure the lavender loop.
Do not crochet into the original lavender stitches during this step.
PART FOUR: FIRST IVORY SPIRAL SECTION
Return the ivory loop to the hook.
Work into the tops of the original lavender stitches.
Ivory Round 1:
Work 2 dc in each of the 6 lavender stitches.
You should add 12 ivory dc.
Stop when you reach the beginning of the newly extended ivory area.
Secure the ivory loop.
The two colors should now begin curling around the center.
PART FIVE: GROWING THE SPIRAL
The spiral is enlarged by working each color across the previous color’s outer edge.
Work the lavender section first, secure its loop, and then work the ivory section.
LAVENDER EXTENSION 2
Return the lavender loop to the hook.
Across the available ivory stitches, repeat:
1 dc in the next stitch, 2 dc in the following stitch.
Continue until you reach the opposite color boundary.
Secure the loop.
IVORY EXTENSION 2
Return the ivory loop to the hook.
Across the available lavender stitches, repeat:
1 dc in the next stitch, 2 dc in the following stitch.
Continue to the opposite color boundary.
Secure the loop.
LAVENDER EXTENSION 3
Repeat across the ivory edge:
1 dc in each of the next 2 stitches, 2 dc in the following stitch.
Secure the loop.
IVORY EXTENSION 3
Repeat across the lavender edge:
1 dc in each of the next 2 stitches, 2 dc in the following stitch.
Secure the loop.
LAVENDER EXTENSION 4
Repeat across the ivory edge:
1 dc in each of the next 3 stitches, 2 dc in the following stitch.
Secure the loop.
IVORY EXTENSION 4
Repeat across the lavender edge:
1 dc in each of the next 3 stitches, 2 dc in the following stitch.
Secure the loop.
LAVENDER EXTENSION 5
Repeat across the ivory edge:
1 dc in each of the next 4 stitches, 2 dc in the following stitch.
Secure the loop.
IVORY EXTENSION 5
Repeat across the lavender edge:
1 dc in each of the next 4 stitches, 2 dc in the following stitch.
Secure the loop.
The motif should now resemble two broad comma-shaped sections flowing around one another.
ADJUSTING THE SPIRAL BODY
If the motif is smaller than desired, continue the established increase formula.
For the next extension:
Work 1 dc in each of the next 5 stitches, then 2 dc in the next stitch.
On the following extension:
Work 1 dc in each of the next 6 stitches, then 2 dc in the next stitch.
Increase the number of plain stitches between increases by one during each new extension.
Always work the same extension with both colors.
CREATING A MORE PRONOUNCED CURL
To make the inner tips curve more dramatically:
Use sc and hdc near the beginning of each colored section.
Change gradually to dc.
Use tr near the widest outer part.
A suggested transition is:
2 sc, 2 hdc, dc across the center, 2 tr near the final edge.
Keep the same number of total stitches.
The gradual change in stitch height exaggerates the spiral movement.
PART SIX: CLOSING THE SPIRAL BODY
When the center reaches approximately 5 to 6 inches across, taper the end of each color.
With lavender:
Work 2 dc, 2 hdc, 2 sc, and 1 sl st across the final available stitches.
Fasten off.
With ivory:
Work 2 dc, 2 hdc, 2 sc, and 1 sl st across the final available stitches.
Fasten off.
The two color sections should now form one nearly circular center.
Do not worry if the outer edge is slightly uneven. The preparation round will correct small differences.
PART SEVEN: PREPARATION ROUND
Choose the color you want to dominate the first outer section. In the pictured design, lavender is an attractive choice.
Join lavender yarn at any point on the outer edge.
Round 1:
Ch 1.
Work sc evenly around the entire spiral body.
Place approximately one sc in the top of every stitch.
Where the two colors meet, place an additional sc if needed to prevent a gap.
Join with a sl st.
Count the stitches.
Adjust the total to a multiple of 12.
A total of 96 stitches works well for a medium-size motif.
If you have more than 96 stitches, use any multiple of 12 that keeps the motif flat.
Round 2:
Ch 1.
Work 1 sc in every stitch around.
Join with a sl st.
This round stabilizes the spiral before the openwork begins.
PART EIGHT: FIRST RADIATING LACE ROUND
Continue with lavender.
Round 3:
Ch 5. This counts as 1 dc and ch 2.
Skip the next stitch and work 1 dc in the following stitch.
Repeat around:
Ch 2, skip 1 stitch, dc in the next stitch.
Join with a sl st in the third chain of the beginning ch-5.
You should have an even ring of ch-2 spaces.
If the round pulls inward, use ch 3 instead of ch 2.
PART NINE: ELONGATED SPOKE ROUND
Round 4:
Sl st into the first ch-2 space.
Ch 6. This counts as 1 tr and ch 2.
Work 1 tr in the same space.
In every remaining ch-2 space, work:
1 tr, ch 2, 1 tr.
Join with a sl st in the fourth chain of the beginning chain.
This round creates the long radiating openings visible around the motif.
Round 5:
Sl st into the first ch-2 space.
Work 1 sc in the space.
Ch 5 and work 1 sc into the next ch-2 space.
Repeat around.
Join with a sl st.
The ch-5 arches begin forming the decorative outer frame.
PART TEN: ADDING THE SECOND COLOR TO THE LACE
Fasten off lavender.
Join ivory yarn in any ch-5 space.
Round 6:
In each ch-5 space, work:
1 sc, ch 5, 1 sc.
Repeat around.
Join with a sl st.
This creates a row of pointed ivory arches.
Round 7:
Sl st into the first ch-5 space.
Work 5 sc into every ch-5 space around.
Join with a sl st.
The edge should now feel firmer and more defined.
PART ELEVEN: OUTER LOOP ROUND
Continue with ivory.
Round 8:
Ch 1 and work 1 sc in the first stitch.
Ch 7.
Skip the next 4 stitches and work 1 sc in the following stitch.
Repeat around.
Join with a sl st.
If your stitch count does not divide evenly, distribute one or two shorter spaces near the color transitions.
Round 9:
Sl st into the first ch-7 space.
Work 9 sc into the space.
Repeat by working 9 sc into every ch-7 space.
Join with a sl st.
PART TWELVE: DECORATIVE SCALLOPED EDGE
Continue with ivory or change to lavender.
Round 10:
In the first arch, work:
1 sc, 3 dc, picot, 3 dc, 1 sc.
Repeat the same sequence in every arch around.
Join with a sl st.
Fasten off.
ALTERNATIVE SMALL SCALLOP
For a lighter border, work:
1 sc, 3 dc, 1 sc
into every arch.
ALTERNATIVE BOBBLE EDGE
For the small rounded details visible in the reference design, work:
1 sc, ch 3, 3-dc cluster, ch 3, 1 sc
into each arch.
This creates a tiny flower-like bobble at the top of every loop.
PART THIRTEEN: HALF-LAVENDER, HALF-IVORY BORDER OPTION
The photographed motif appears to continue the two-color division through the outer lace.
To create that effect:
Work the lace across one half of the circle in lavender.
Stop at the first color boundary and secure the loop.
Join ivory at the same boundary.
Work the same stitch sequence across the other half.
At both meeting points, join the colors with slip stitches.
Carry neither yarn across the opposite-colored half.
Weave in the ends securely after each round.
This method requires more ends but produces a stronger two-color spiral appearance.
PART FOURTEEN: CHECKING THE MOTIF
Place the completed motif on a flat surface.
Check that:
The center opening is neat.
The lavender and ivory sections curve smoothly.
The motif lies flat.
The openwork loops are evenly spaced.
The scallops have matching sizes.
The total diameter is consistent.
The outer edge contains clear joining points.
Do not begin a full bedspread until you are satisfied with the test motif.
PART FIFTEEN: BLOCKING ONE TEST MOTIF
Soak the motif in lukewarm water for 10 to 15 minutes.
Gently press out the excess water.
Do not twist or wring the crochet.
Place the motif on a towel and roll it gently.
Transfer it to a blocking mat.
Pin the center first.
Pin the main lavender and ivory curves into smooth shapes.
Stretch the outer loops evenly.
Measure the diameter in several directions.
Adjust the pins until the motif is round.
Allow it to dry completely.
Record the final diameter.
CALCULATING THE NUMBER OF MOTIFS
Divide the desired blanket width by the blocked motif width.
Divide the desired blanket length by the blocked motif height after joining.
Example:
If one blocked motif measures 9 inches and you want an approximately 72-inch-wide blanket:
72 divided by 9 equals 8 motifs across.
If you want a 90-inch length:
90 divided by 9 equals 10 motifs down.
You would need approximately 80 motifs before adding a border.
Because round motifs overlap visually and chain joins may reduce or increase the spacing, create one joined sample row before making the final calculation.
SUGGESTED MOTIF LAYOUTS
Small throw:
5 motifs across
6 motifs down
Total: 30 motifs
Large throw:
6 motifs across
7 motifs down
Total: 42 motifs
Twin bedspread:
7 motifs across
10 motifs down
Total: 70 motifs
Full bedspread:
9 motifs across
10 motifs down
Total: 90 motifs
Queen bedspread:
10 motifs across
11 motifs down
Total: 110 motifs
King bedspread:
12 motifs across
11 motifs down
Total: 132 motifs
Adjust these numbers according to your blocked motif measurement and desired overhang.
PART SIXTEEN: JOIN-AS-YOU-GO METHOD
Complete the first motif entirely.
On the second motif, begin the final scallop round.
At each joining point:
Work half of the scallop.
Instead of completing the center picot, ch 1.
Sl st into the corresponding picot or arch of the first motif.
Ch 1.
Complete the scallop on the second motif.
Continue around.
Join the motifs at three to five evenly spaced points along the touching edges.
Do not connect every stitch. A small amount of space helps preserve the airy lace appearance.
Continue adding motifs in rows.
PART SEVENTEEN: SEWN JOIN
Block all motifs to the same size.
Arrange them on a large flat surface.
Place neighboring motifs with the right sides facing.
Thread matching yarn onto a yarn needle.
Whip stitch through corresponding outer loops.
Join each pair at several evenly spaced points.
Do not pull the sewing yarn tightly.
Open the motifs and check that the seam lies flat.
This method is simple and makes it easier to rearrange the color direction before assembly.
PART EIGHTEEN: SLIP-STITCH JOIN
Place two motifs with the wrong sides together.
Insert the hook through one outer loop from each motif.
Yarn over and pull through both loops and the loop on the hook.
Continue with loose slip stitches across the joining area.
Use a larger hook for the joining yarn if the seam feels tight.
A slip-stitch join creates a visible raised line on one side and a flatter seam on the other.
PART NINETEEN: CHAIN-BRIDGE JOIN
For a very open connection:
Attach yarn to an outer scallop on the first motif.
Ch 3.
Sl st into the corresponding scallop on the second motif.
Ch 3.
Sl st into the next scallop on the first motif.
Continue alternating between the two motifs.
This produces a delicate zigzag bridge.
The chain-bridge method closely complements the open lace surrounding the spiral centers.
PART TWENTY: FILLING THE GAPS BETWEEN FOUR MOTIFS
Four joined circles will leave a small open space at their meeting point.
You can leave this space open or add a filler motif.
SMALL FOUR-POINT FILLER
Make a magic ring.
Round 1:
Work 8 sc into the ring.
Join with a sl st.
Round 2:
Ch 5 and work 1 sc in the next stitch.
Repeat around to create 8 loops.
Join with a sl st.
At four evenly spaced loops, replace the center chain with a slip stitch into the neighboring spiral motifs.
Fasten off.
This creates a tiny flower-like connector.
SIMPLE CHAIN FILLER
Join yarn to one motif.
Ch 5 and sl st into the next motif.
Ch 5 and sl st into the third motif.
Ch 5 and sl st into the fourth motif.
Ch 5 and join to the starting point.
Work one small scallop into each chain space.
PART TWENTY-ONE: ARRANGING THE SPIRAL DIRECTIONS
Before joining, place all motifs on the floor or a large bed.
Try one of the following arrangements:
ALL SPIRALS FACING THE SAME DIRECTION
This creates a continuous flowing effect across the bedspread.
ALTERNATING DIRECTIONS
Rotate every second motif 180 degrees.
This creates a balanced wave or mirrored effect.
DIAGONAL MOVEMENT
Rotate the motifs gradually across each row.
This creates the appearance of spirals traveling diagonally across the blanket.
RANDOM ROTATION
Turn each motif in a different direction.
This creates an artistic and energetic arrangement.
Take a photograph of your preferred layout before beginning assembly.
PART TWENTY-TWO: OUTER BEDSPREAD BORDER
After all motifs are joined, work around the complete outer edge.
BORDER ROUND 1
Join ivory yarn at any corner.
Work sc evenly around the entire bedspread.
Where two motifs meet, work a decrease to prevent excess fabric.
At each outer corner, work:
2 sc, ch 2, 2 sc.
Join with a sl st.
BORDER ROUND 2
Ch 4. This counts as 1 dc and ch 1.
Skip 1 stitch and work 1 dc in the next stitch.
Repeat around:
Ch 1, skip 1 stitch, dc in the next stitch.
At every corner, work:
1 dc, ch 2, 1 dc.
Join with a sl st.
BORDER ROUND 3
Sl st into the first ch-1 space.
Work 1 sc in the space.
Ch 4 and work 1 sc in the next ch-1 space.
Repeat around.
At each corner, use ch 6 instead of ch 4.
Join with a sl st.
BORDER ROUND 4
Work 5 sc into each ch-4 space.
In each corner ch-6 space, work:
5 sc, ch 2, 5 sc.
Join with a sl st.
BORDER ROUND 5
Change to lavender.
In each arch, work:
1 sc, 3 dc, picot, 3 dc, 1 sc.
Repeat around.
At the corners, add an extra ch 2 between scallops if needed.
Join and fasten off.
PART TWENTY-THREE: OPTIONAL DEEP LACE BORDER
For a luxurious overhanging edge, continue adding openwork rounds.
Suggested sequence:
One round of ch-5 loops
One round of tall V-stitches
One round of ch-7 loops
One round of sc over the loops
One final round of scallops or picots
Alternate lavender and ivory between rounds.
Block the border carefully so every side has the same depth.
HOW TO MAKE A MATCHING PILLOW COVER
Make one large square panel by joining four or nine motifs.
Block the panel.
Create a plain crochet back using double crochet or linen stitch.
Alternatively, sew a coordinating fabric panel to the crochet front.
Place the front and back with the wrong sides together.
Join around three sides.
Insert a cushion form.
Close the final side using buttons, ties, a zipper, or a crochet seam.
A decorative square floral motif can be added to the center if desired.
CUSTOMIZATION IDEAS
MONOCHROME BEDSPREAD
Use one color for the entire motif. The spiral remains visible through stitch direction and texture.
GRADIENT BEDSPREAD
Use pale lavender in the center motifs and gradually introduce darker purple toward the outer rows.
MULTICOLORED SPIRALS
Use a different color with ivory for every row of motifs.
REVERSED MOTIFS
Make half the motifs with lavender beginning first and half with ivory beginning first.
METALLIC DETAILS
Hold a fine silver or pearl thread with the ivory yarn during the final border.
SMALLER MOTIFS
Stop the spiral after fewer extension rounds and begin the lace border earlier.
LARGER MOTIFS
Continue the increase formula for additional rounds before beginning the openwork.
DENSER BLANKET
Replace the long chain loops with shorter chains and additional double crochet groups.
LIGHTER BEDSPREAD
Use fine cotton thread and larger open spaces.
COMMON MISTAKES AND HOW TO FIX THEM
MISTAKE 1: THE SPIRAL CENTER FORMS A BOWL
Cause:
There are too few increases, or the hook is too small.
Solution:
Add an increase to each color section or use a larger hook.
MISTAKE 2: THE CENTER RUFFLES
Cause:
There are too many increases.
Solution:
Remove several increases from each color section and block the motif again.
MISTAKE 3: ONE COLOR IS WIDER THAN THE OTHER
Cause:
The two sections contain different stitch counts.
Solution:
Count each color separately after every extension. Both sections should follow the same increase sequence.
MISTAKE 4: THE COLOR TRANSITION LOOKS JAGGED
Cause:
The stitch heights change too suddenly.
Solution:
Use a gradual sequence of sc, hdc, dc, and tr at the transition.
MISTAKE 5: THERE IS A HOLE WHERE THE COLORS MEET
Cause:
The first or final stitch was worked too loosely.
Solution:
Tighten the joining stitch or close the hole later with a matching yarn tail.
MISTAKE 6: THE INACTIVE LOOP UNRAVELS
Cause:
The loop was left unsecured.
Solution:
Enlarge the loop and place a locking stitch marker through it.
MISTAKE 7: THE YARNS BECOME TANGLED
Cause:
Both balls are being moved around the work in the same direction.
Solution:
Keep one ball on each side of your workspace and rotate the motif instead of crossing the yarn balls.
MISTAKE 8: THE LACE ROUND PULLS INWARD
Cause:
The chain spaces are too short.
Solution:
Add one or two chains to every arch.
MISTAKE 9: THE BORDER RUFFLES
Cause:
The chain spaces are too long or contain too many stitches.
Solution:
Reduce the chain length or remove one stitch from each scallop.
MISTAKE 10: THE MOTIFS HAVE DIFFERENT SIZES
Cause:
Tension changed during the project.
Solution:
Measure every motif before fastening off. Block all motifs using the same template.
MISTAKE 11: THE JOINED BEDSPREAD BUCKLES
Cause:
The motifs were joined too tightly.
Solution:
Use a larger hook for the joining yarn and leave more space between connection points.
MISTAKE 12: THE GAPS BETWEEN MOTIFS ARE TOO LARGE
Cause:
The motifs were joined only at one or two points.
Solution:
Add more joining points or insert small filler motifs.
MISTAKE 13: THE BEDSPREAD FEELS TOO HEAVY
Cause:
The yarn is too thick or the motifs contain too many dense rounds.
Solution:
Use lighter yarn, reduce the number of solid rounds, or make a smaller decorative throw.
MISTAKE 14: THE OUTER EDGE IS UNEVEN
Cause:
The motifs were not blocked before assembly.
Solution:
Block every motif individually, join them, and block the completed bedspread again.
MISTAKE 15: THE COLORS DO NOT ALIGN ACROSS THE BLANKET
Cause:
The motifs were rotated during joining.
Solution:
Arrange all motifs in advance and mark the top of each one with a removable stitch marker.
WEAVING IN THE ENDS
A two-color motif creates several yarn ends.
Weave each end through stitches of the same color.
Change direction at least once.
Avoid carrying dark yarn behind a light section because it may show through the fabric.
Leave tails at least 5 to 6 inches long before weaving.
Do not rely on knots alone.
Weave in the ends as each group of motifs is completed. Waiting until the entire bedspread is assembled can make the finishing stage overwhelming.
BLOCKING THE COMPLETED BEDSPREAD
Wash the bedspread gently in cool or lukewarm water.
Use a mild detergent suitable for the yarn.
Support the weight of the wet crochet with both hands.
Do not lift the bedspread by one corner.
Gently press out excess water.
Roll the bedspread inside several large towels.
Arrange it on a clean floor, blocking mats, or a spare bed covered with towels.
Straighten all rows and columns.
Measure the width and length.
Shape the outer border.
Open the lace loops with your fingers.
Allow the bedspread to dry completely.
A large cotton bedspread may require more than one day to dry.
CARE INSTRUCTIONS
Hand washing is recommended for the longest life.
If the yarn label permits machine washing:
Use cold water.
Select a gentle cycle.
Place the bedspread in a large mesh laundry bag if possible.
Use mild detergent.
Avoid chlorine bleach.
Do not tumble dry on high heat.
Lay the bedspread flat or support it evenly while drying.
Never hang a wet crochet bedspread from one edge. The weight may stretch the motifs and seams.
Store the bedspread clean and dry.
Fold it loosely.
Refold it occasionally along different lines to prevent permanent creases.
Keep it away from direct sunlight during long-term storage.
FREQUENTLY ASKED QUESTIONS
CAN A BEGINNER MAKE THIS BEDSPREAD?
The complete bedspread is better suited to an intermediate crocheter. A confident beginner can practice by making one motif as a coaster or decorative mat.
HOW LONG WILL IT TAKE?
A large bedspread may take several weeks or months, depending on the number of motifs and the amount of time spent crocheting each day.
HOW MANY MOTIFS DO I NEED?
The number depends on your motif size and desired bedspread dimensions. Make and block one motif, measure it, and then calculate the required rows and columns.
CAN I USE ACRYLIC YARN?
Yes. Acrylic creates a lighter and warmer bedspread. However, it may not hold the blocked lace as sharply as cotton.
CAN I USE CROCHET THREAD?
Yes. Crochet thread creates a delicate heirloom-style bedspread. It will require more motifs and substantially more working time.
DO I HAVE TO USE LAVENDER AND IVORY?
No. Any two colors can be used. Select shades with enough contrast to make the spiral visible.
CAN I MAKE EVERY MOTIF A DIFFERENT COLOR?
Yes. Keep one color consistent, such as ivory, and use a different contrasting color for each motif.
WHY DOES MY SPIRAL NOT LOOK EXACTLY LIKE THE PHOTO?
The original construction is not visible in full detail. This pattern is a photo-inspired reconstruction designed to create a similar interlocking spiral effect rather than an exact duplicate.
SHOULD I BLOCK BEFORE OR AFTER JOINING?
Block every motif before joining. Block the entire bedspread again after assembly and completion of the border.
WHAT IS THE BEST JOINING METHOD?
Join-as-you-go works well for experienced crocheters. A chain-bridge or sewn join is easier when you want to arrange all motifs before assembly.
HOW CAN I REDUCE THE NUMBER OF YARN ENDS?
Carry each color through several related rounds where possible. Work the join-as-you-go method and weave in the ends after completing each row.
CAN I MAKE A RECTANGULAR BEDSPREAD WITH ROUND MOTIFS?
Yes. Arrange the motifs in straight rows and use filler motifs between them. Add a rectangular outer border to straighten the edges.
CAN I MAKE ONLY ONE MOTIF?
Yes. One motif can be used as a coaster, trivet, wall decoration, table mat, or appliqué.
CAN I SELL FINISHED ITEMS MADE FROM THIS GUIDE?
You may generally sell the physical items you crochet using this photo-inspired guide. Use your own photographs and do not claim that this reconstruction is the exact original pattern shown in the reference.
HOW DO I KEEP THE BEDSPREAD FROM BECOMING TOO HEAVY?
Use sport-weight yarn, open joining methods, and shorter dimensions. Cotton-blend yarn may also weigh less than pure cotton.
CAN I ADD A FABRIC LINING?
Yes. A lightweight lining can be hand-sewn behind the crochet. Leave enough ease so the lining does not pull against the motifs.
QUICK PATTERN SUMMARY
- Prepare lavender and ivory yarn.
- Work both colors into the same center ring.
- Keep both working loops active.
- Extend lavender across the ivory edge.
- Extend ivory across the lavender edge.
- Continue alternating the colors.
- Increase evenly during every extension.
- Taper the final stitches of both colors.
- Work a stabilizing single crochet round.
- Add radiating openwork stitches.
- Crochet long chain loops around the motif.
- Finish with scallops, clusters, or picots.
- Block the motif.
- Make the required number of matching motifs.
- Arrange the spiral directions.
- Join the motifs in rows.
- Fill the spaces between four motifs if desired.
- Add an outer bedspread border.
- Weave in all ends securely.
- Wash and block the completed bedspread.
FINAL THOUGHTS
This lavender and ivory spiral crochet bedspread is a beautiful long-term project for anyone who enjoys decorative motifs and intricate lace. Its flowing two-color centers create continuous movement, while the radiating loops and scalloped edges give the blanket an elegant heirloom quality.
The project becomes manageable when approached one motif at a time. Begin with a single sample, perfect the stitch count and blocking size, and then create the remaining motifs in small batches. Careful labeling and consistent tension will make the final assembly much easier.
Whether you create a small throw, a full bedspread, or only a matching decorative pillow, the combination of lavender, ivory, spiral shapes, and open lace produces a striking handmade piece that can transform an entire room.