ELEGANT CABLE KNIT CAPELET NECK WARMER
A Photo-Inspired Buttoned Shoulder Warmer with a Ribbed Collar and Braided Cables
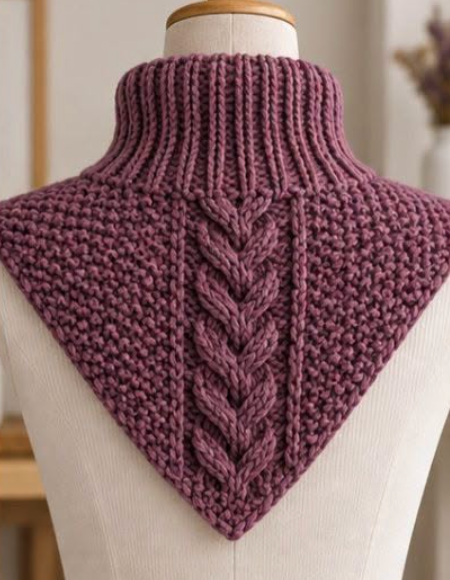
This elegant cable-knit capelet combines the warmth of a turtleneck with the graceful coverage of a small shoulder wrap. Its rich dusty-plum color, oversized braided cables, textured fabric, and decorative metal button give it a timeless handmade appearance.
The front overlaps comfortably across the chest and closes with a single statement button. The high ribbed collar can be worn standing upright, folded down, or crossed slightly at the front. Two pointed front panels frame the body, while the back forms a longer triangular point decorated with a central cable.
This is a versatile cold-weather accessory. It provides warmth around the neck, shoulders, upper chest, and back without the bulk of a full sweater. It can be worn over a blouse, dress, long-sleeved shirt, or lightweight jacket.
IMPORTANT TECHNIQUE NOTE
The item in the reference images is knitted, not crocheted.
The ribbed collar, garter-textured body, and raised braided cables are created using knitting techniques. Although crochet can imitate some of these textures, crochet would not reproduce the same stitch structure or drape.
This article therefore provides a photo-inspired knitting pattern.
IMPORTANT PATTERN DISCLAIMER
The original written pattern is not available, and photographs cannot reveal every hidden stitch, seam, decrease, or construction detail.
The instructions below are an inspired reconstruction designed to create a similar buttoned cable-knit capelet. They should not be presented as the original designer’s exact pattern.
Knit and block a gauge swatch before beginning. Adjust the stitch counts to fit the intended wearer.
PROJECT OVERVIEW
Project type: Knitted capelet and neck warmer
Skill level: Intermediate
Construction: Modular panels joined to a ribbed collar
Fit: Adjustable with overlapping front panels
Recommended yarn: Bulky or chunky yarn
Recommended needles: 6 mm to 8 mm
Main techniques:
- Long-tail cast-on
- Knit and purl stitches
- One-by-one ribbing
- Garter stitch
- Cable knitting
- Increasing
- Decreasing
- Picking up stitches
- Seaming
- Creating a button loop
- Wet blocking
Main design elements:
- High ribbed collar
- Wide shoulder coverage
- Two pointed front panels
- Triangular back panel
- Large braided cables
- Textured side sections
- Overlapping front closure
- Decorative statement button
SUGGESTED FINISHED MEASUREMENTS
The following measurements fit many adults, but the pattern can be customized.
Neck circumference: 18 to 22 inches
Collar height: 6 to 8 inches
Shoulder width: 20 to 25 inches
Front panel length: 13 to 17 inches
Back length from collar: 15 to 19 inches
Front overlap: 4 to 7 inches
For the most comfortable fit, measure the wearer around the base of the neck and across the shoulders before choosing the final size.
SIZE GUIDE
Small:
Neck circumference: 17 to 18 inches
Finished shoulder width: Approximately 20 inches
Medium:
Neck circumference: 19 to 20 inches
Finished shoulder width: Approximately 22 inches
Large:
Neck circumference: 21 to 22 inches
Finished shoulder width: Approximately 24 inches
Extra large:
Neck circumference: 23 to 24 inches
Finished shoulder width: Approximately 26 inches
MATERIALS
You will need:
- Approximately 600 to 900 yards of bulky yarn
- 6 mm to 8 mm knitting needles
- A cable needle
- A circular needle for the collar
- A blunt tapestry needle
- Sharp scissors
- Stitch markers
- A row counter
- Measuring tape
- Blocking mats
- Rustproof blocking pins
- One decorative button measuring 1 to 1.5 inches
- Matching sewing thread for the button, optional
Optional supplies:
- Interchangeable circular needles
- Spare yarn for holding stitches
- Removable stitch markers
- A smaller needle for the ribbed collar
- A crochet hook for creating or reinforcing the button loop
CHOOSING THE BEST YARN
A soft bulky or chunky yarn is ideal for this project.
The yarn should be thick enough to produce visible cables but flexible enough to drape comfortably across the shoulders.
Suitable fibers include:
- Merino wool
- Wool and acrylic blends
- Alpaca blends
- Soft acrylic
- Cotton and wool blends
- Recycled wool blends
Pure wool provides warmth and excellent cable definition. Acrylic is usually easier to wash and may be more affordable. Alpaca creates a luxurious drape but can stretch, so it is best when blended with wool.
Avoid yarn that is extremely fuzzy. Heavy fuzz can hide the cable details and make it difficult to see the individual stitches.
CHOOSING A COLOR
The dusty-plum shade shown in the images gives the capelet a soft, elegant appearance.
Other beautiful choices include:
- Burgundy
- Wine red
- Forest green
- Deep navy
- Charcoal gray
- Camel
- Cream
- Chocolate brown
- Mustard
- Dusty rose
- Black
- Ivory
Solid colors show the cable details more clearly than highly variegated yarn.
A lightly heathered yarn can also work well because it adds depth without hiding the stitch pattern.
GAUGE
A suggested gauge with bulky yarn is:
14 stitches and 20 rows equal 4 inches in garter stitch after blocking.
Cable sections may pull inward and measure more narrowly than plain garter stitch.
Make two swatches:
- One in garter stitch
- One containing the cable pattern
Wash and block both swatches before measuring them.
If you have too many stitches per 4 inches, use larger needles.
If you have too few stitches per 4 inches, use smaller needles.
SKILL LEVEL
This pattern is suitable for intermediate knitters.
A confident beginner can attempt it after practicing cable stitches on a swatch.
You should know how to:
- Cast on stitches
- Knit
- Purl
- Increase
- Decrease
- Read right-side and wrong-side rows
- Place stitches on hold
- Use a cable needle
- Pick up stitches
- Sew knitted pieces together
- Make a button loop
- Block a finished garment
ABBREVIATIONS
K: Knit
P: Purl
St or sts: Stitch or stitches
RS: Right side
WS: Wrong side
K2tog: Knit two stitches together
SSK: Slip, slip, knit
M1L: Make one left
M1R: Make one right
C4F: Slip 2 stitches to a cable needle and hold in front, knit 2, then knit 2 from the cable needle
C4B: Slip 2 stitches to a cable needle and hold in back, knit 2, then knit 2 from the cable needle
C6F: Slip 3 stitches to a cable needle and hold in front, knit 3, then knit 3 from the cable needle
C6B: Slip 3 stitches to a cable needle and hold in back, knit 3, then knit 3 from the cable needle
PM: Place marker
SM: Slip marker
BO: Bind off
SPECIAL STITCHES
GARTER STITCH
Knit every row.
Garter stitch creates the dense, pebbled texture visible across the shoulder and side panels.
ONE-BY-ONE RIBBING
Repeat:
Knit 1, purl 1.
On following rows, knit the knit stitches and purl the purl stitches.
This produces the stretchy vertical ribs used for the high collar.
SLIP-STITCH EDGE
Slip the first stitch of every row purlwise with the yarn in front.
Move the yarn into position and work the remaining stitches.
A slip-stitch edge creates a cleaner border for seaming and button-loop placement.
BASIC SIX-STITCH CABLE
The following cable repeat creates a simple rope:
Rows 1, 3, 5 and 7 on the right side:
Knit 6.
Rows 2, 4, 6 and 8 on the wrong side:
Purl 6.
Row 9:
Work C6F.
Rows 10 through 16:
Work the stitches normally.
Repeat the cable crossing every 8 to 12 rows, depending on the desired cable length.
BRAIDED CABLE PANEL
The broad decorative cables in the images resemble a braided or leaf-style cable.
A manageable version can be worked over 12 cable stitches with two purl stitches on each side.
Cable panel:
Purl 2, knit 12, purl 2.
Work the following 16-row repeat.
Row 1, RS:
P2, C6F, K6, P2.
Row 2 and all WS rows:
K2, P12, K2.
Row 3:
P2, K12, P2.
Row 5:
P2, K6, C6B, P2.
Row 7:
P2, K12, P2.
Row 9:
P2, C6F, K6, P2.
Row 11:
P2, K12, P2.
Row 13:
P2, K6, C6B, P2.
Row 15:
P2, K12, P2.
Repeat these rows to create a continuous braided appearance.
PHOTO-INSPIRED CONSTRUCTION
This capelet can be made from four main components:
- One triangular back panel
- Two pointed front panels
- One ribbed collar
The three body panels are sewn together across the shoulders. The collar is then knitted separately and attached, or its stitches are picked up around the completed neckline.
This modular construction makes it easier to adjust the width and length.
PART 1: KNIT THE BACK PANEL
The back panel forms a triangle with a central braided cable.
The widest edge sits across the shoulders. Gradual decreases create the lower point.
CAST ON
Cast on 83 stitches for a medium size.
Suggested adjustments:
Small: Cast on 75 stitches.
Large: Cast on 91 stitches.
Extra large: Cast on 99 stitches.
The stitch count should allow for:
- Left garter section
- Two purl separator stitches
- Central 12-stitch cable
- Two purl separator stitches
- Right garter section
SETUP ROW
Slip the first stitch.
Knit across the first side section.
Purl 2.
Knit 12 cable stitches.
Purl 2.
Knit across the remaining side section.
Slip the final stitch or knit it, depending on your preferred edge.
WORKING THE BACK
Continue in garter stitch across the side sections.
Work the 12-stitch braided cable pattern in the center.
Maintain two reverse-stockinette separator stitches on each side of the cable.
Begin decreasing to form the triangular point.
RIGHT-SIDE DECREASE ROW
Slip 1.
SSK.
Work in the established pattern until three stitches remain.
K2tog.
Knit the final stitch.
Two stitches have been decreased.
WRONG-SIDE ROW
Knit the garter sections.
Work the cable and separator stitches as established.
Repeat the decrease row every second right-side row for a gradual triangle.
For a sharper point, decrease on every right-side row.
For a longer and softer point, decrease every fourth row.
Continue until approximately 19 to 23 stitches remain.
Maintain the central cable as long as there are enough stitches.
When the side sections become very narrow, stop crossing the cable and work the remaining stitches in garter stitch.
Continue decreasing until 3 stitches remain.
Work:
Slip 1, knit 2 together, pass the slipped stitch over.
Cut the yarn and pull it through the final stitch.
PART 2: KNIT THE LEFT FRONT PANEL
The left front panel crosses toward the right side of the body.
Cast on approximately 45 to 55 stitches, depending on the selected size.
Work the outer section in garter stitch.
Place the cable near the inner front edge.
A suggested arrangement is:
- 24 to 34 garter stitches
- 2 purl stitches
- 12 cable stitches
- 2 purl stitches
- 3 edge stitches
Work straight for approximately 2 to 3 inches.
Begin decreasing at the outer edge to create the pointed front.
Maintain the inner cable edge as straight as possible.
DECREASE ROW
At the outer edge, work:
Slip 1, SSK.
Continue in the established pattern.
Work the remaining stitches normally.
Repeat this decrease every second right-side row.
Continue until the panel forms a long diagonal point.
When approximately 5 stitches remain, decrease to one stitch and fasten off.
PART 3: KNIT THE RIGHT FRONT PANEL
Make a mirrored version of the left front panel.
Place the cable near the inner front edge.
Decrease at the opposite outer edge.
For a right-edge decrease, work until three stitches remain, then:
K2tog, knit 1.
Continue until the front forms a point matching the left panel.
Before fastening off, place both front panels side by side and verify that they have equal lengths and matching cable repeats.
PART 4: SEAM THE SHOULDERS
Block the three panels lightly before assembly.
Lay the back panel flat with the right side facing upward.
Position one front panel along each upper side of the back.
The front panels should angle inward and overlap slightly at the chest.
Use mattress stitch or an invisible seam to join the shoulder sections.
Leave the neckline open.
Try the unfinished capelet around the shoulders before permanently securing the seams.
Adjust the overlap if necessary.
PART 5: KNIT THE RIBBED COLLAR
There are two ways to make the collar.
METHOD 1: PICK UP THE COLLAR STITCHES
Using a circular needle, pick up stitches evenly around the neckline.
Pick up approximately 72 to 96 stitches, depending on the neckline size and yarn gauge.
Make sure the stitch count is even.
Place a marker at the beginning of the round.
Work in knit-one, purl-one ribbing.
Continue until the collar measures approximately 6 to 8 inches.
Bind off loosely in pattern.
A stretchy bind-off is strongly recommended.
METHOD 2: KNIT THE COLLAR SEPARATELY
Cast on an even number of stitches sufficient to create the required neck circumference.
Work knit-one, purl-one ribbing until the piece measures approximately 6 to 8 inches high.
Bind off loosely.
Sew the short edges together to create a tube.
Attach the lower edge of the tube evenly around the capelet neckline.
Make sure the collar seam sits at the center back.
CREATING THE CROSSED FRONT COLLAR
To reproduce the overlapping front appearance, do not join the collar completely in the round.
Instead, knit the collar back and forth as a ribbed rectangle attached around the neckline.
Extend one front collar end by approximately 3 to 5 inches.
This extension can cross over the opposite side and close with the decorative button.
Work a neat slip-stitch edge along both front edges.
ADDING THE BUTTON BAND
The button in the image is positioned near the upper chest, where the crossed collar overlaps the front panel.
Choose which side will sit on top.
Reinforce the area behind the button using a small square of matching fabric or a spare yarn patch.
Sew the button securely through both the knitted fabric and reinforcement.
Avoid sewing the button only through one loose strand of yarn.
MAKING THE BUTTON LOOP
A simple button loop can be made using yarn.
Join the yarn at the edge of the upper collar section.
Chain or finger-crochet a cord long enough to pass around the button.
A loop approximately 1.5 to 2 inches long will suit many large buttons.
Attach the cord back to the edge.
Reinforce the attachment with several stitches.
Test the loop before weaving in the ends.
The button should pass through comfortably without slipping free during wear.
OPTIONAL KNITTED BUTTONHOLE
If you prefer a buttonhole inside the ribbed band, place it approximately 1 to 2 inches from the front edge.
On a right-side row:
Work in ribbing until you reach the buttonhole position.
Bind off 2 or 3 stitches.
Continue in pattern.
On the following row, cast on the same number of stitches over the gap.
Continue working the ribbing.
Choose the number of bound-off stitches according to the button diameter.
ADDING DECORATIVE CABLE EDGES
The photographs show narrow raised lines framing the wide cable panels.
You can create this effect with:
- Two purl stitches on each side of the cable
- A two-stitch twisted cable
- Slip-stitch columns
- Single knit stitches worked through the back loop
For a twisted column, knit the selected stitch through the back loop on every right-side row.
On wrong-side rows, purl the same stitch through the back loop.
This produces a clean raised line.
HOW TO CUSTOMIZE THE FIT
MAKE THE CAPELET WIDER
Add stitches to the garter sections of all three panels.
Do not add stitches to the cable unless you also redesign the cable repeat.
MAKE IT LONGER
Work additional rows before beginning the decreases.
You can also decrease less frequently.
MAKE IT SHORTER
Begin the decreases sooner.
Use fewer rows between decrease rows.
MAKE THE COLLAR TALLER
Continue the ribbing until it measures 9 or 10 inches.
A taller collar can be folded down for extra warmth.
MAKE THE COLLAR LOOSER
Pick up more neckline stitches or use a larger needle.
MAKE THE FRONT OVERLAP MORE
Add width to both front panels or extend one front collar end.
MAKE THE POINTS SHARPER
Decrease on every right-side row.
MAKE THE POINTS SOFTER
Decrease every fourth row instead of every second right-side row.
FINISHING
Weave in all yarn ends using a tapestry needle.
Pass each tail through several stitches on the wrong side.
Change direction and weave it through a second section.
Trim the yarn only after the tail is secure.
Inspect the shoulder seams, collar attachment, button, and button loop.
Reinforce any area that will experience regular pulling.
BLOCKING THE CAPELET
Blocking helps the panels lie smoothly and opens the cable pattern.
Check the yarn label before washing.
For wool or wool blends:
Fill a basin with cool or lukewarm water.
Add a small amount of wool wash.
Place the capelet in the water and allow it to soak.
Do not rub, twist, or wring it.
Lift the capelet carefully.
Press out excess water.
Roll it inside a clean towel and press again.
Lay it flat on blocking mats.
Shape the back point and two front points.
Arrange the cables so they remain straight.
Shape the collar without overstretching the ribbing.
Allow the capelet to dry completely.
BLOCKING ACRYLIC YARN
Acrylic should be steam blocked carefully.
Pin the capelet into shape.
Hold a steamer or steam iron above the fabric without touching it.
Do not apply direct heat.
Excessive heat can flatten or melt acrylic fibers permanently.
COMMON MISTAKES AND HOW TO FIX THEM
- THE CABLE CROSSES IN THE WRONG DIRECTION
Cause:
The cable needle was held on the wrong side of the work.
Fix:
Hold the cable needle in front for a left-crossing cable and in back for a right-crossing cable.
- THE CABLE REPEATS ARE UNEVEN
Cause:
The cable crosses were worked after different numbers of rows.
Fix:
Use a row counter and mark every cable-crossing row on a printed note.
- THE PANELS HAVE DIFFERENT LENGTHS
Cause:
One panel contains more rows or a different decrease rate.
Fix:
Count the rows and cable repeats rather than measuring only by eye.
- THE EDGES CURL
Cause:
The edge contains stockinette stitch without enough stabilizing texture.
Fix:
Use garter stitch, ribbing, or a slip-stitch border along the edge.
- THE COLLAR IS TOO TIGHT
Cause:
Too few stitches were picked up or the bind-off was too firm.
Fix:
Redo the collar with more stitches, a larger needle, or a stretchy bind-off.
- THE COLLAR STRETCHES OUT
Cause:
The needle was too large or the yarn lacks elasticity.
Fix:
Use a smaller needle for the ribbing or thread thin elastic through the inside of the collar.
- THE FRONT DOES NOT STAY CLOSED
Cause:
The button loop is too large or the button is too small.
Fix:
Shorten the loop or replace the button with a larger one.
- THE BUTTON PULLS THE FABRIC
Cause:
The button area was not reinforced.
Fix:
Sew a small backing button or fabric patch to the wrong side.
- THE CAPELET SLIDES BACKWARD
Cause:
The back is heavier than the front or there is not enough overlap.
Fix:
Increase the front overlap, reposition the button, or shorten the back point slightly.
- THE CABLE LOOKS FLAT
Cause:
The yarn is fuzzy, the gauge is loose, or the cable was stretched during blocking.
Fix:
Use smoother yarn, smaller needles, and avoid stretching the cable width.
- THE SHOULDER SEAMS FEEL BULKY
Cause:
The panels were joined with a thick seam.
Fix:
Use mattress stitch and sew through the edge bars rather than through the entire stitch thickness.
- THE FRONT POINTS ARE NOT SYMMETRICAL
Cause:
The panels were not mirrored correctly.
Fix:
Use SSK decreases on one panel and K2tog decreases on the opposite panel.
CARE INSTRUCTIONS
Always follow the washing instructions on the yarn label.
For wool:
- Hand wash in cool water.
- Use a wool-safe detergent.
- Do not rub or wring.
- Press out excess water with towels.
- Dry flat.
For acrylic:
- Use a gentle machine cycle only if the label allows it.
- Place the capelet in a mesh laundry bag.
- Dry flat to preserve the shape.
For cotton blends:
- Wash gently.
- Reshape while damp.
- Avoid hanging the wet capelet because the weight may stretch it.
Store the capelet folded rather than on a hanger.
A hanger may stretch the collar and shoulder sections.
HOW TO STYLE THE CAPELET
Wear the capelet over:
- A white blouse
- A fitted turtleneck
- A long-sleeved dress
- A simple sweater
- A denim shirt
- A lightweight autumn jacket
- A formal dress
- A neutral top
- A winter wedding outfit
The dusty-plum color pairs especially well with cream, gray, camel, black, navy, and soft pink.
PROJECT VARIATIONS
MINIMAL VERSION
Omit the cables and work all panels in garter stitch.
Add a large wooden button for a rustic look.
DOUBLE-CABLE VERSION
Add two narrow cables to each front panel.
Keep one wide braided cable at the center back.
TWO-COLOR VERSION
Use one color for the body and a contrasting shade for the collar and cable panels.
HOODED VERSION
Replace the ribbed collar with a knitted hood.
Pick up stitches around the neckline and work the hood flat before seaming the top.
PONCHO VERSION
Add more width and length to the body panels.
Join the front panels lower down while leaving openings for the arms.
CROPPED VERSION
Shorten all three points and use a collar measuring approximately 5 inches high.
FRINGED VERSION
Attach short tassels or fringe along the pointed lower edges.
Be careful not to hide the cable details.
FREQUENTLY ASKED QUESTIONS
IS THIS ITEM CROCHETED?
No. The reference item is knitted.
Its ribbed collar, garter texture, and braided cables are characteristic knitting techniques.
IS THIS THE EXACT ORIGINAL PATTERN?
No. This is a photo-inspired reconstruction based on the visible shape and stitch details.
The photographs do not reveal every measurement, stitch count, or hidden seam.
WHAT IS THIS GARMENT CALLED?
It can be described as:
- A knitted capelet
- A shoulder warmer
- A buttoned neck warmer
- A cabled collar
- A mini poncho
- A knitted dickey
- A turtleneck cape
WHAT YARN IS BEST?
Soft bulky wool or a wool-acrylic blend provides warmth, structure, and good cable definition.
HOW MUCH YARN DO I NEED?
Most adult sizes require approximately 600 to 900 yards of bulky yarn.
A longer or wider version may require more.
CAN I USE WORSTED-WEIGHT YARN?
Yes, but the fabric will be lighter and you will need more stitches.
Make a gauge swatch and recalculate the panel widths.
CAN I USE SUPER-BULKY YARN?
Yes.
Use larger needles and fewer stitches. The finished capelet will be thicker and the cables will appear very bold.
CAN A BEGINNER MAKE THIS?
A confident beginner can make it after practicing cables on a small swatch.
The modular construction is easier than knitting a complete fitted sweater.
DO I NEED A CABLE NEEDLE?
A cable needle is recommended.
Experienced knitters may cross stitches without one, but beginners should use a cable needle for better control.
CAN I KNIT THE CAPELET IN ONE PIECE?
Yes.
It can be worked top-down by picking up stitches around the collar and adding increases over the shoulders.
However, the modular panel method is easier to adjust and closely reproduces the prominent front and back points.
HOW DO I MAKE THE COLLAR LESS TIGHT?
Use a larger needle, add more stitches, or choose a more elastic cast-on and bind-off.
CAN I REPLACE THE BUTTON?
Yes.
You can use:
- A wooden button
- A metal button
- A toggle
- A decorative brooch
- A shawl pin
- A hidden snap
- Two small buttons
CAN I MAKE IT WITHOUT A BUTTON?
Yes.
Extend the front panels and allow them to overlap naturally.
You can also use a removable shawl pin.
WHY DOES MY CABLE PULL THE FABRIC INWARD?
Cable stitches naturally make the fabric narrower.
This is why the cable gauge should be measured separately from the garter-stitch gauge.
CAN I SELL THE FINISHED CAPELETS?
You may sell the physical items you knit.
Use your own product photographs and descriptions. Do not use the reference images as photographs of an item you personally made.
QUICK PATTERN SUMMARY
- Knit a triangular back panel in garter stitch.
- Place a wide braided cable down the center.
- Decrease gradually to form the lower back point.
- Knit two mirrored front panels.
- Add cable panels near the inner front edges.
- Decrease the outer edges to form two front points.
- Block the panels lightly.
- Sew the front panels to the back at the shoulders.
- Pick up stitches around the neckline.
- Knit a tall one-by-one ribbed collar.
- Extend one collar edge if you want a crossed front.
- Create a button loop or knitted buttonhole.
- Sew on a decorative button.
- Weave in all yarn ends.
- Block the completed capelet.
FINAL THOUGHTS
This cable-knit capelet is a beautiful alternative to a traditional scarf or sweater.
The high ribbed collar provides warmth around the neck, while the broad textured panels protect the shoulders, chest, and upper back. Large braided cables create a handmade statement without requiring several colors.
The modular construction also makes the design easy to customize. You can widen the panels, lengthen the points, change the collar height, reposition the button, or substitute a different cable pattern.
Work carefully, keep track of your cable rows, and compare the two front panels regularly. After assembly and blocking, the capelet should sit comfortably across the shoulders with an elegant overlapping front and a defined triangular point at the back.
SEO TITLE
Elegant Cable Knit Capelet Neck Warmer with Button Closure
META DESCRIPTION
Create an elegant cable-knit capelet with a high ribbed collar, braided cables, pointed shoulder panels, and a decorative button. Includes materials, photo-inspired instructions, sizing, common mistakes, care tips, and FAQs.
SUGGESTED URL SLUG
cable-knit-capelet-neck-warmer-pattern
SUGGESTED KEYWORDS
cable knit capelet pattern
knitted neck warmer
buttoned shoulder warmer
cable knit collar
turtleneck capelet
knitted mini poncho
chunky knit cape pattern
braided cable knitting
knitted dickey pattern
women’s shoulder warmer
dusty plum knit capelet
handmade winter accessory
PINTEREST TITLE
Elegant Cable Knit Capelet with Ribbed Collar and Button
PINTEREST DESCRIPTION
Create a warm and elegant cable-knit capelet featuring a high ribbed collar, textured shoulder panels, braided cables, pointed front and back shaping, and a decorative button closure. This photo-inspired guide includes materials, sizing, construction steps, customization ideas, troubleshooting, care instructions, and FAQs.