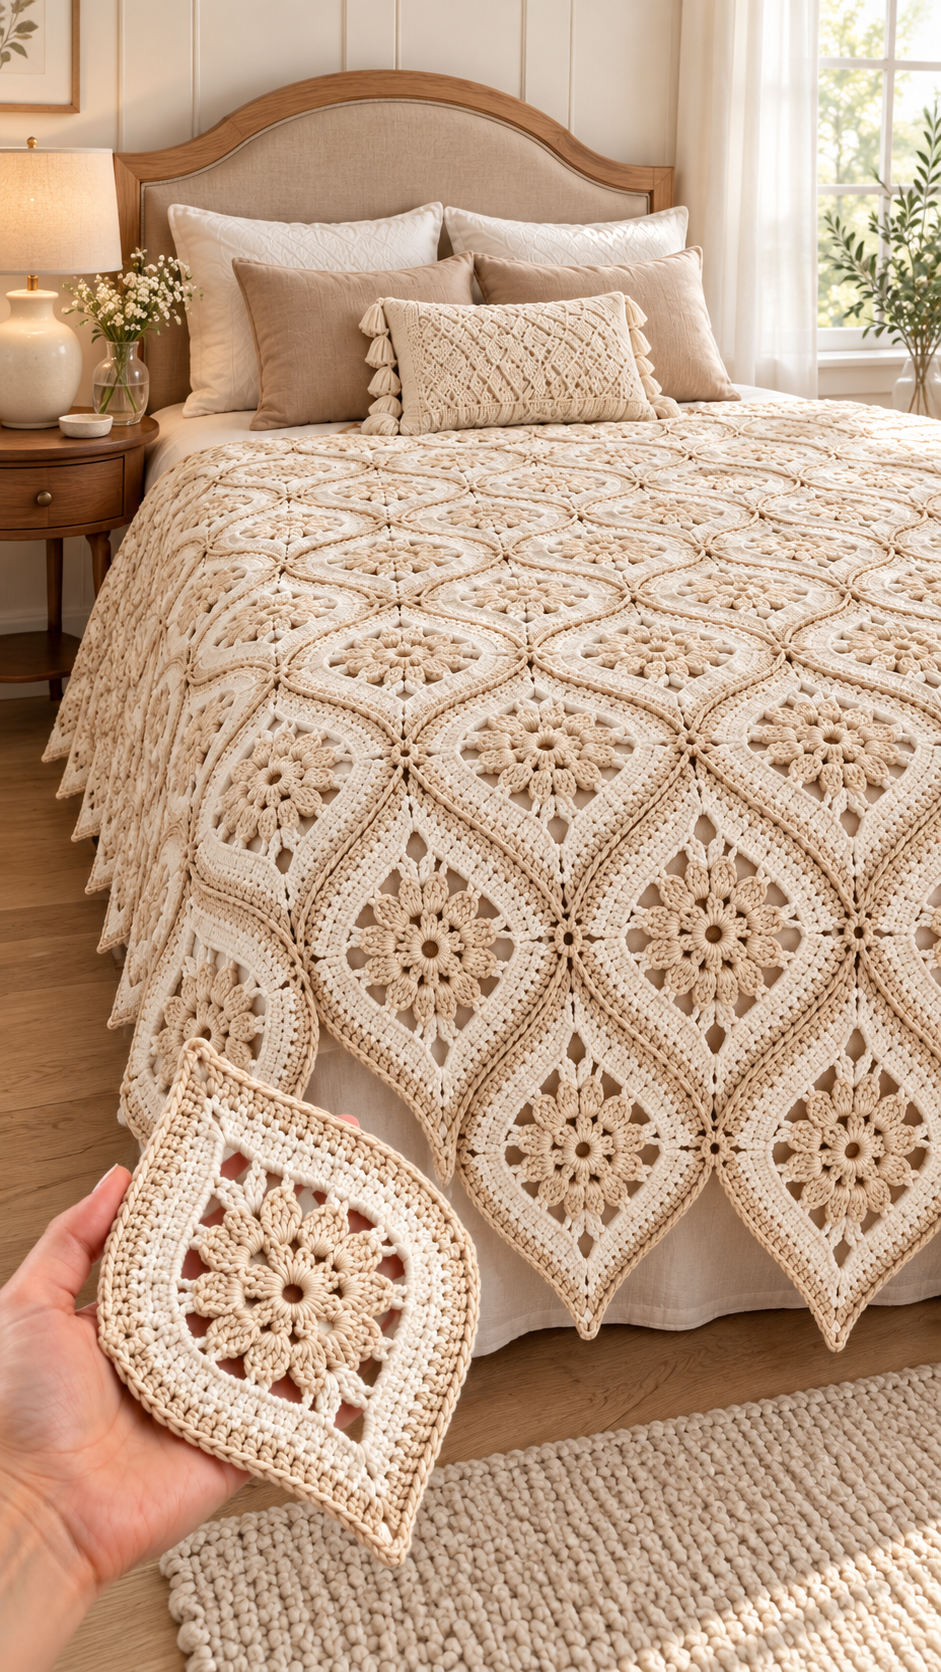
IVORY FLORAL LEAF-MOTIF CROCHET BEDSPREAD
A Romantic Heirloom Bedspread Made With Elegant Crochet Motifs
There is something timeless about an ivory crochet bedspread. The soft neutral color, delicate open spaces, raised floral details, and graceful pointed motifs create a beautiful heirloom look that works in both traditional and modern bedrooms.
This photo-inspired bedspread is assembled from individual leaf-shaped crochet motifs. Each motif begins with a dimensional flower in the center and grows outward through open chain spaces, textured stitches, and a structured frame. When the motifs are joined together, their pointed ends form a striking interlocking pattern across the bed.
The finished bedspread looks detailed and luxurious, but the project becomes much more manageable when it is divided into small motifs. You can crochet one piece at a time, carry the project easily, and gradually build a blanket in any size you need.
ABOUT THIS PHOTO-INSPIRED PATTERN
This tutorial is an original, photo-inspired interpretation of the crochet bedspread shown in the image. It is not the exact pattern used to create the photographed item.
Because a finished photograph does not reveal every stitch, measurement, yarn weight, joining point, or construction detail, some adjustments may be necessary. Use the instructions as a flexible guide and compare each motif with your desired finished size as you work.
The best approach is to make one complete sample motif before purchasing all the yarn or beginning the full bedspread.
WHY YOU WILL LOVE THIS CROCHET BEDSPREAD
This project combines several beautiful crochet features:
A raised flower in the center of every motif
An elegant leaf or teardrop-shaped outline
Decorative openwork around the flower
Textured solid sections that give the motif structure
Pointed ends that create a dramatic scalloped edge
A join-as-you-go or sewn assembly option
A classic ivory color that matches many decorating styles
A modular construction that can be adapted to different bed sizes
The individual motifs can also be used for smaller projects. A single motif can become a wall decoration, several motifs can form a table runner, and a compact arrangement can be turned into a decorative pillow panel.
SKILL LEVEL
Intermediate
A confident beginner may also be able to complete the project with patience and practice. You should be comfortable with:
Working in the round
Making chain spaces
Crocheting several stitches into one space
Working front-post stitches
Making clusters or puff stitches
Increasing and shaping
Reading repeated instructions
Joining crochet motifs
Blocking finished crochet pieces
FINISHED MOTIF SIZE
Using DK or light worsted-weight cotton yarn with a 4 mm crochet hook, one blocked motif should measure approximately:
9 to 11 inches long from point to point
6 to 8 inches across at the widest section
Your finished measurements will depend on the yarn, hook, tension, and number of framing rounds.
Always measure your blocked sample motif rather than relying only on the suggested dimensions.
ESTIMATED BEDSPREAD SIZES
Lap Blanket
Approximately 40 by 50 inches
Suggested quantity: 24 to 30 motifs
Twin Bedspread
Approximately 60 by 85 inches
Suggested quantity: 48 to 60 motifs
Full or Double Bedspread
Approximately 80 by 90 inches
Suggested quantity: 70 to 85 motifs
Queen Bedspread
Approximately 90 by 100 inches
Suggested quantity: 85 to 105 motifs
King Bedspread
Approximately 105 by 110 inches
Suggested quantity: 110 to 135 motifs
These quantities are estimates. The number required will change according to the size of your motifs, the joining method, the arrangement, and the amount of drape desired around the bed.
MATERIALS
Yarn
DK or light worsted-weight cotton yarn
Suggested fiber: 100 percent cotton or a cotton blend
Suggested color: ivory, cream, natural, soft beige, or warm white
Approximate yarn amounts:
Lap blanket: 1,800 to 2,400 yards
Twin bedspread: 3,500 to 4,500 yards
Full bedspread: 4,500 to 5,800 yards
Queen bedspread: 5,500 to 7,000 yards
King bedspread: 7,000 to 9,000 yards
Always buy a little extra yarn, especially if you want all the yarn to come from the same dye lot.
Other Supplies
4 mm crochet hook, or the size needed to create a firm but flexible fabric
Scissors
Yarn needle
Stitch markers
Measuring tape
Rustproof blocking pins
Blocking mats
Optional fabric steamer
Optional smaller crochet hook for weaving in ends
CHOOSING THE BEST YARN
Cotton is an excellent choice for this bedspread because it creates crisp stitch definition. It allows the raised flowers, open arches, and pointed edges to remain visible after blocking.
Mercerized cotton creates a polished finish and a slight sheen. Regular cotton produces a softer, more rustic appearance. A cotton-acrylic blend may be lighter and easier to wash, although the motifs may not hold their shape as firmly.
Avoid very fuzzy yarn. The detailed stitches can disappear when the fibers have too much halo.
If you want a lighter summer bedspread, use sport-weight cotton and a 3 to 3.5 mm hook. For a heavier and warmer version, use worsted-weight yarn with a 4.5 to 5 mm hook.
COLOR IDEAS
The ivory color creates a calm, elegant, and luxurious result, but the pattern can be customized in many ways.
Try one of these combinations:
Solid ivory for a classic heirloom bedspread
Warm cream with beige joining rounds
White flowers with sage-green frames
Dusty rose flowers with ivory borders
Soft blue flowers with white outer rounds
Different pastel flowers surrounded by one neutral color
Two shades of cream for subtle depth
A dark background with lighter flowers for a dramatic look
For a sophisticated finish, keep the flower and frame in the same color. Texture and shadow will define the design without requiring color changes.
CROCHET ABBREVIATIONS
This pattern uses US crochet terminology.
ch – chain
ch-sp – chain space
sl st – slip stitch
sc – single crochet
hdc – half double crochet
dc – double crochet
tr – treble crochet
FPdc – front-post double crochet
BLO – back loop only
st or sts – stitch or stitches
rep – repeat
rnd – round
yo – yarn over
SPECIAL STITCHES
Three-Double-Crochet Cluster
Yarn over, insert the hook into the indicated stitch or space, yarn over and pull up a loop, yarn over and pull through two loops. Repeat this process two more times in the same location. Yarn over and pull through all four loops on the hook.
Five-Double-Crochet Popcorn
Work five double crochet stitches into the same stitch. Remove the hook from the working loop. Insert the hook into the first double crochet, place the working loop back on the hook, and pull it through the first double crochet.
Front-Post Double Crochet
Yarn over and insert the hook from front to back and then from back to front around the post of the indicated stitch. Complete a double crochet normally.
Picot
Chain three, then slip stitch into the first chain.
Long Petal
Work the indicated combination of stitches into one chain space. A useful sequence is:
1 sc, 1 hdc, 3 dc, 1 tr, 3 dc, 1 hdc, 1 sc
This produces a pointed, dimensional petal.
GAUGE
Exact gauge is not essential because the project is made from separate motifs. However, every motif must be approximately the same size.
Make one complete sample motif, block it, and record the finished measurements. Continue using the same yarn, hook, and tension for every additional motif.
If your motifs begin to vary in size, check your stitch counts and compare each new piece with your original blocked sample.
IMPORTANT PATTERN NOTES
The motif is worked from the center outward.
The flower is made first.
Open chain arches are added around the flower.
The outer rounds transform the circular flower into a leaf or teardrop shape.
Two pointed sections are created on opposite sides.
The final rounds strengthen and define the frame.
Chain three at the beginning of a round may count as the first double crochet unless otherwise stated.
Join each round with a slip stitch unless the instructions tell you to work continuously.
Place a stitch marker in the two end points. This makes the shaping easier to follow.
If the motif begins to cup, add slightly longer chain spaces or use a larger hook.
If it becomes wavy, reduce the number of stitches or use a smaller hook.
PHOTO-INSPIRED FLORAL LEAF MOTIF PATTERN
CENTER RING
Make a magic ring.
Round 1
Chain 1 and work 12 single crochet stitches into the ring.
Pull the ring closed.
Join with a slip stitch to the first single crochet.
You should have 12 single crochet stitches.
If you prefer a visible center opening like the one shown in the photograph, begin with chain 8, join with a slip stitch to form a ring, and work 12 single crochet stitches around the chain ring.
ROUND 2: PETAL FOUNDATIONS
Chain 1.
Work 1 single crochet in the first stitch, chain 5, and skip the next stitch.
Repeat around.
Join with a slip stitch to the first single crochet.
You should have six chain-5 spaces.
ROUND 3: FIRST LAYER OF PETALS
Slip stitch into the first chain-5 space.
In each chain-5 space, work:
1 single crochet, 1 half double crochet, 3 double crochet, 1 treble crochet, 3 double crochet, 1 half double crochet, 1 single crochet
Repeat in every chain space.
Join with a slip stitch.
You should have six pointed petals.
ROUND 4: BACK LOOPS FOR THE SECOND PETAL LAYER
Working behind the petals, insert the hook around the single crochet stitches from Round 2.
Chain 1 and work 1 single crochet around the first Round 2 single crochet.
Chain 7.
Work 1 single crochet around the next Round 2 single crochet.
Repeat around.
Join with a slip stitch.
You should have six chain-7 spaces positioned behind the first petals.
ROUND 5: SECOND LAYER OF PETALS
Slip stitch into the first chain-7 space.
Work the following into each space:
1 single crochet, 1 half double crochet, 4 double crochet, 3 treble crochet, 4 double crochet, 1 half double crochet, 1 single crochet
Repeat in all six spaces.
Join with a slip stitch.
The flower should now have six smaller front petals and six larger petals behind them.
If you prefer the fuller flower shown in the photograph, add a small picot at the top of each petal.
ROUND 6: SUPPORTING ARCHES
Working behind the second layer of petals, attach the yarn around the base between any two large petals.
Chain 6 and single crochet between the next two large petals.
Repeat around.
Join with a slip stitch.
You should have six supporting chain spaces.
ROUND 7: OPEN FLORAL FRAME
Slip stitch into the first chain-6 space.
Work 1 single crochet, chain 7, and 1 single crochet in the same space.
Chain 5.
In the next chain-6 space, work 1 single crochet, chain 7, and 1 single crochet.
Continue around, placing a chain-5 connector between the larger chain-7 loops.
Join with a slip stitch.
ROUND 8: BEGINNING THE LEAF SHAPE
In this round, two opposite chain-7 loops become the pointed ends of the motif. Place a stitch marker in the first chain-7 loop and another marker in the chain-7 loop directly opposite it.
In the first marked loop, work:
1 single crochet, 1 half double crochet, 3 double crochet, 3 treble crochet, chain 3, 3 treble crochet, 3 double crochet, 1 half double crochet, 1 single crochet
This creates the first point.
Work 7 double crochet stitches in each unmarked chain-7 loop.
In the opposite marked loop, repeat the pointed combination.
Work 5 double crochet stitches into each chain-5 connector around the motif.
Join with a slip stitch.
The motif should begin to look oval, with one point at the top and one at the bottom.
ROUND 9: TEXTURED INNER FRAME
Chain 3.
Work 1 double crochet in each stitch around.
At the chain-3 space of the first point, work:
2 double crochet, chain 3, 2 double crochet
Repeat the same increase in the chain-3 space at the opposite point.
For extra texture, work a front-post double crochet around every third double crochet from the previous round.
Join with a slip stitch.
Check the motif after this round. It should lie mostly flat.
ROUND 10: DECORATIVE OPENWORK
Slip stitch to the first point.
In the first chain-3 point space, work:
1 single crochet, chain 5, 1 single crochet
Chain 4, skip 3 stitches, and work 1 single crochet in the next stitch.
Repeat the chain-4 loops along the first side.
At the widest part of the motif, use chain 5 instead of chain 4 to create a little more space.
Continue toward the opposite point.
In the opposite point space, work:
1 single crochet, chain 5, 1 single crochet
Repeat the chain-loop pattern along the second side.
Join with a slip stitch.
Try to place the same number of loops on both sides.
ROUND 11: SOLID FRAME ROUND
Slip stitch into the first chain space.
In the pointed chain-5 spaces, work:
3 double crochet, chain 3, 3 double crochet
In every regular chain-4 space, work 5 double crochet.
In every wider chain-5 space, work 6 double crochet.
Continue around and join with a slip stitch.
This round creates the solid band visible around the open center of the motif.
ROUND 12: RAISED RIDGE
Chain 3.
Work 1 front-post double crochet around each double crochet of the previous round.
At each pointed chain-3 space, work:
2 double crochet, chain 3, 2 double crochet
Continue around.
Join with a slip stitch.
The front-post stitches form a raised decorative line around the motif.
ROUND 13: SECOND OPENWORK BAND
Chain 1 and work 1 single crochet in the first stitch.
Chain 3, skip 2 stitches, and work 1 single crochet in the next stitch.
Repeat around.
At each point, work:
1 single crochet, chain 5, 1 single crochet
Adjust the final repeat if necessary so the open spaces are evenly distributed.
Join with a slip stitch.
ROUND 14: OUTER SOLID FRAME
Slip stitch into the first chain-3 space.
Work 4 double crochet stitches into each regular chain-3 space.
At each pointed chain-5 space, work:
4 double crochet, chain 3, 4 double crochet
Continue around and join with a slip stitch.
ROUND 15: FINAL EDGING
Chain 1.
Work 1 single crochet in every stitch around.
At each point, work:
2 single crochet, chain 2, 2 single crochet
If you plan to sew the motifs together, fasten off after completing this round.
If you want to use a join-as-you-go method, use the chain spaces at the points and selected spaces along the sides to connect each motif to its neighbors.
Fasten off and weave in the ends.
OPTIONAL PICOT EDGE FOR EXPOSED MOTIFS
The motifs around the outside of the finished bedspread can have a decorative picot edge.
Attach the yarn to an exposed outer edge.
Work 1 single crochet in each of the next three stitches.
Make one picot.
Repeat along the exposed edge.
At the pointed end, work:
1 single crochet, 1 picot, 1 single crochet
Continue along the remaining edge.
This creates a delicate finish without making the border too heavy.
HOW TO MAKE THE MOTIF LARGER
If your sample motif is too small, add one or two extra framing rounds.
Additional Solid Round
Work 1 double crochet in every stitch. At both pointed ends, work 2 double crochet, chain 3, and 2 double crochet in the point space.
Additional Openwork Round
Work a sequence of single crochet, chain 3, skip 2 stitches around the motif. Use chain 5 at each point.
Final Structure Round
Work 4 double crochet in every regular chain space. At each point, work 4 double crochet, chain 3, and 4 double crochet.
Continue alternating solid and openwork rounds until the motif reaches the desired size.
BLOCKING EACH MOTIF
Blocking is essential for a polished result.
Fill a clean basin with lukewarm water.
Add a small amount of gentle wool or fabric wash if desired.
Place the motif in the water and allow it to soak for approximately 15 minutes.
Lift it carefully without twisting.
Press out excess water between two towels.
Place the motif on a blocking mat.
Stretch it gently into a symmetrical leaf or teardrop shape.
Pin the upper and lower points first.
Pin the widest areas of both sides.
Adjust the flower so it remains centered.
Allow the motif to dry completely before removing the pins.
Use the first blocked motif as a template for all the remaining pieces.
PLANNING THE BEDSPREAD LAYOUT
Before joining, place all the blocked motifs on a large clean surface.
Arrange the motifs in horizontal rows. Alternate their direction if needed so the pointed ends fit naturally into the spaces between neighboring motifs.
The photographed bedspread has a flowing diamond-like arrangement. You can create a similar appearance by positioning the motifs so that their side curves touch while their points extend into the gaps above and below.
Take a photograph of the final arrangement before joining. The photograph will help you remember the order if the pieces are moved.
SEWN JOINING METHOD
This method creates a strong, nearly invisible seam.
Thread a yarn needle with a length of matching yarn.
Place two motifs beside each other with the right sides facing upward.
Match the joining stitches along the curved sides.
Insert the needle through the back loops of corresponding stitches.
Continue using a mattress stitch or whipstitch.
Keep the seam secure but do not pull it too tightly.
Fasten off and weave the yarn through several stitches.
Join the motifs into horizontal rows first.
After completing all the rows, join the rows together.
Check frequently to make sure the bedspread remains flat.
SLIP-STITCH JOINING METHOD
Hold two motifs with the wrong sides together.
Insert the hook through one stitch on each motif.
Yarn over and pull through both motifs and the loop on the hook.
Continue along the joining area.
This method creates a visible raised ridge. It can become an attractive design feature when worked neatly and consistently.
JOIN-AS-YOU-GO METHOD
Complete all but the final round of the first motif.
Finish the first motif normally.
On the final round of the second motif, replace selected chain stitches with slip-stitch joins into the corresponding spaces of the first motif.
For example, instead of making chain 3:
Chain 1, slip stitch into the matching space on the completed motif, and chain 1.
Continue the final round.
Join at the pointed ends and at two or three evenly spaced locations along each curved side.
Do not join every stitch. A small amount of flexibility will help the completed bedspread drape naturally.
ADDING HALF MOTIFS ALONG THE EDGES
Depending on your arrangement, the sides of the bedspread may have deep gaps. You can leave these gaps for a dramatic pointed edge or fill them with half motifs.
To create a half motif:
Make the central ring.
Work only three petals instead of six.
Add open arches across the top of the half flower.
Shape one curved outer edge.
Finish with a straight row of double crochet stitches along the cut side.
Join the curved side to the bedspread and use the straight side as part of the outer edge.
Make one sample half motif and block it before creating the remaining pieces.
SIMPLE OUTER BORDER
Once all the motifs are joined, add a border around the entire bedspread.
Border Round 1
Attach the yarn to any outer edge.
Work single crochet stitches evenly around the bedspread.
Place three single crochet stitches in each outer point.
In each inner valley, decrease by working two single crochet stitches together.
Join with a slip stitch.
Border Round 2
Chain 3.
Work 1 double crochet in every stitch.
At each outer point, work 2 double crochet, chain 2, and 2 double crochet.
At each inner valley, work a double crochet decrease.
Join with a slip stitch.
Border Round 3
Chain 1.
Work 1 single crochet in the first stitch.
Chain 3, skip 2 stitches, and single crochet in the next stitch.
Repeat around.
At every outer point, make a chain-5 loop.
Border Round 4
Work 3 single crochet stitches in each chain-3 space.
In every outer chain-5 point, work:
3 single crochet, 1 picot, 3 single crochet
Join and fasten off.
Weave in all remaining ends.
HOW TO CALCULATE THE NUMBER OF MOTIFS
Make and block one sample motif.
Measure its length and width.
Measure the desired width and length of the finished bedspread.
Divide the desired bedspread width by the effective width of one joined motif.
Divide the desired bedspread length by the effective length of one row.
Remember that overlapping or alternating motifs may reduce the amount of space each motif covers.
Lay several paper shapes or finished samples on the bed before deciding on the final quantity.
It is wise to make two or three additional motifs. They can replace any piece that becomes damaged, stained, or noticeably different in size.
CUSTOMIZATION IDEAS
Create a Matching Pillow
Join two or four motifs to form the front panel. Add a solid crochet or fabric back and insert a cushion form.
Make a Table Runner
Join one long row of motifs. Add a narrow single crochet and picot border.
Create a Wall Hanging
Join three to six motifs and attach the upper edge to a wooden dowel.
Make a Decorative Bed Scarf
Create a narrow panel wide enough to lie across the foot of the bed. This requires much less yarn than a full bedspread.
Add Colored Flower Centers
Use gold, dusty rose, sage, or brown for the center rings while keeping the petals and frames ivory.
Use Two Neutral Shades
Crochet the flower in light cream and the outer frame in natural beige. The subtle color difference will emphasize the layered construction.
Add Small Beads
Sew one pearl-style bead into the center of each flower after washing and blocking. Do not add beads if the bedspread will be used around babies or young children.
COMMON CROCHET MISTAKES AND HOW TO FIX THEM
The Motif Cups in the Center
This usually means there are not enough stitches or the tension is too tight.
Use a slightly larger hook, lengthen the chain spaces, or add one stitch to each repeated section.
The Outer Edge Becomes Wavy
Too many stitches have been added.
Remove a few stitches from each repeat or use a smaller hook for the framing rounds.
The Two Points Are Uneven
One point may contain a different number of stitches, or the marked locations may not be directly opposite each other.
Count the stitches on both sides and place markers before beginning the shaping rounds.
The Flower Will Not Lie Flat
The petal stitches may be too tight.
Try making the petals with a hook that is 0.5 mm larger. Return to the original hook when you begin the outer frame.
The Flower Disappears Into the Background
The petals may need more definition.
Work the petal rounds through the back loops or add surface slip stitches around the base of each petal.
The Motifs Have Different Sizes
Differences in tension can become more noticeable in a large project.
Count every round, block all motifs to the same template, and avoid changing hooks or yarn brands halfway through the project.
The Joining Seams Pucker
The seam is probably too tight or the joining points are unevenly spaced.
Undo the affected section and rejoin it with more relaxed tension.
The Bedspread Pulls Diagonally
Some motifs may have been joined in the wrong direction, or one row may contain a different number of joining points.
Lay the work flat after adding every row. Correct alignment problems before joining more pieces.
The Points Curl Up
The point increases may be too narrow.
Add an extra chain at each tip or block the points firmly with rustproof pins.
The Bedspread Feels Too Heavy
Cotton bedspreads can become heavy when many dense rounds are used.
Use lighter yarn, replace some solid rounds with mesh rounds, or make a decorative bed scarf instead of a full bedspread.
HOW TO WEAVE IN ENDS SECURELY
Thread the yarn tail onto a yarn needle.
Weave it through the back of several stitches in one direction.
Turn and weave it back in the opposite direction.
Change direction one more time.
Trim the excess yarn close to the fabric.
Do not weave ends only through open chain spaces. They may loosen during washing. Whenever possible, weave them through the dense flower or framing stitches.
WASHING AND CARE
Check the yarn label before washing.
For cotton yarn, wash the bedspread by hand or use a gentle machine cycle with cool water.
Use mild detergent.
Avoid bleach unless the yarn manufacturer specifically allows it.
Place the bedspread in a large laundry bag if machine washing.
Do not twist or wring the wet crochet fabric.
Support the entire bedspread when lifting it because wet cotton becomes heavy.
Lay it flat to dry whenever possible.
Reshape the points and flowers while the fabric is damp.
If using a dryer, select a very low temperature only when permitted by the yarn label.
Store the bedspread folded in a dry, ventilated place.
Do not hang it for long periods because its weight may stretch the motifs.
Place acid-free tissue paper between the folds if storing it for an extended period.
PROJECT WORKFLOW FOR A LARGE BEDSPREAD
A full bedspread is a long-term project, so divide it into smaller stages.
First, make and block one sample motif.
Second, calculate the approximate number of motifs needed.
Third, purchase enough yarn from the same dye lot.
Fourth, crochet the flower centers in batches.
Fifth, complete the petal rounds.
Sixth, add the openwork and outer frames.
Seventh, weave in the ends as each group is finished.
Eighth, block every motif to the same measurements.
Ninth, arrange all motifs on the bed or floor.
Tenth, join the motifs into rows.
Eleventh, connect the rows.
Finally, add and block the outer border.
Working in batches makes the project feel more organized and helps maintain consistent tension.
FREQUENTLY ASKED QUESTIONS
Can a beginner make this bedspread?
An adventurous beginner can make it, but the pattern is best suited to someone who already understands basic stitches and working in the round. Practice by making one motif before committing to the entire bedspread.
Can I use acrylic yarn?
Yes. Acrylic yarn creates a lighter and often more affordable bedspread. However, it may not produce the same crisp stitch definition as cotton. Steam-block acrylic very carefully and never allow a hot iron to touch the yarn.
Can I use thicker yarn?
Yes, but every motif will become larger and heavier. Make one sample and place it on the bed before buying the full amount of yarn.
Does every motif need to be blocked?
Blocking is strongly recommended. It opens the lace, sharpens the points, evens out the flower, and makes joining much easier.
Should I join the motifs as I crochet?
Both methods work. Join-as-you-go reduces the amount of sewing, while sewing blocked motifs gives you more control over the final layout.
How can I make the bedspread less heavy?
Choose sport-weight cotton, use a larger hook for a more open fabric, remove one solid framing round, or make the bedspread shorter so it does not reach the floor.
Can I make the motif round instead of pointed?
Yes. Replace the special point increases with ordinary increases and distribute them evenly around the motif. This will produce an oval or circular floral medallion.
How do I keep the center opening consistent?
Begin every flower with the same number of chains. You can also crochet around a small plastic ring if you want a perfectly defined center, although a crocheted chain ring will create a softer finish.
Can I make the flower in a different color?
Yes. Fasten off after completing the flower and attach the frame color behind the petals. This is an excellent way to use small amounts of leftover yarn.
How many motifs should I make each week?
Choose a comfortable goal based on your schedule. Completing three motifs per week will produce approximately 78 motifs in six months. Even one motif per week will gradually grow into a meaningful heirloom project.
Can I use this motif for a baby blanket?
Yes, but use a washable, baby-safe yarn and avoid beads, buttons, or loose decorations. Make sure every yarn end is securely woven in.
How can I stop the bedspread from stretching?
Use a stable cotton yarn, keep the joining seams firm, and store the bedspread folded instead of hanging. A final single crochet border will also provide additional support.
Why is my finished motif smaller after washing?
Some cotton yarn can shrink. Wash and block your sample motif before calculating the number of pieces required for the bedspread.
Can I add fabric underneath the crochet?
Yes. A lightweight cotton lining can be sewn beneath the finished bedspread. Attach it around the outer edge and at several interior joining points so the layers remain aligned.
QUICK PATTERN SUMMARY
Make a center ring with 12 single crochet stitches.
Create six chain spaces.
Crochet six pointed petals.
Add six larger petals behind the first layer.
Create supporting chain arches.
Mark two opposite sections for the points.
Shape the motif into a leaf or teardrop.
Alternate solid and openwork framing rounds.
Finish with a firm single crochet edge.
Block every motif to the same size.
Arrange the pieces in staggered rows.
Join the motifs along their curved sides and points.
Add an optional decorative border.
Wash gently and reshape flat.
FINAL THOUGHTS
The ivory floral leaf-motif crochet bedspread is the kind of project that can become part of a home for many years. Its neutral color feels peaceful and elegant, while the raised flowers and pointed shapes give it the character of a handmade heirloom.
Although the completed bedspread appears intricate, it is created one manageable motif at a time. Each finished flower becomes a small milestone, and every joined row brings the final design closer to life.
Take time to make a careful sample, count the stitches consistently, block every motif, and arrange the pieces before joining. With patience and thoughtful finishing, this photo-inspired design can become a beautiful bedspread, decorative throw, table covering, or meaningful handmade gift.